Hi Strawman89,
Welcome to Gimp Chat.
There are a myriad of ways to achieve this, so here is my take on this solution.
I'm not sure how much you know about Gimp, so I'll start with this amount of information, if you require more detailed help let me know....
1. Create a new image 100x100 px.
2. File menu, 'Open as layer', your sample dirt picture - I want to set our Foreground/Backgound colours from your original image.
Lets do this now...
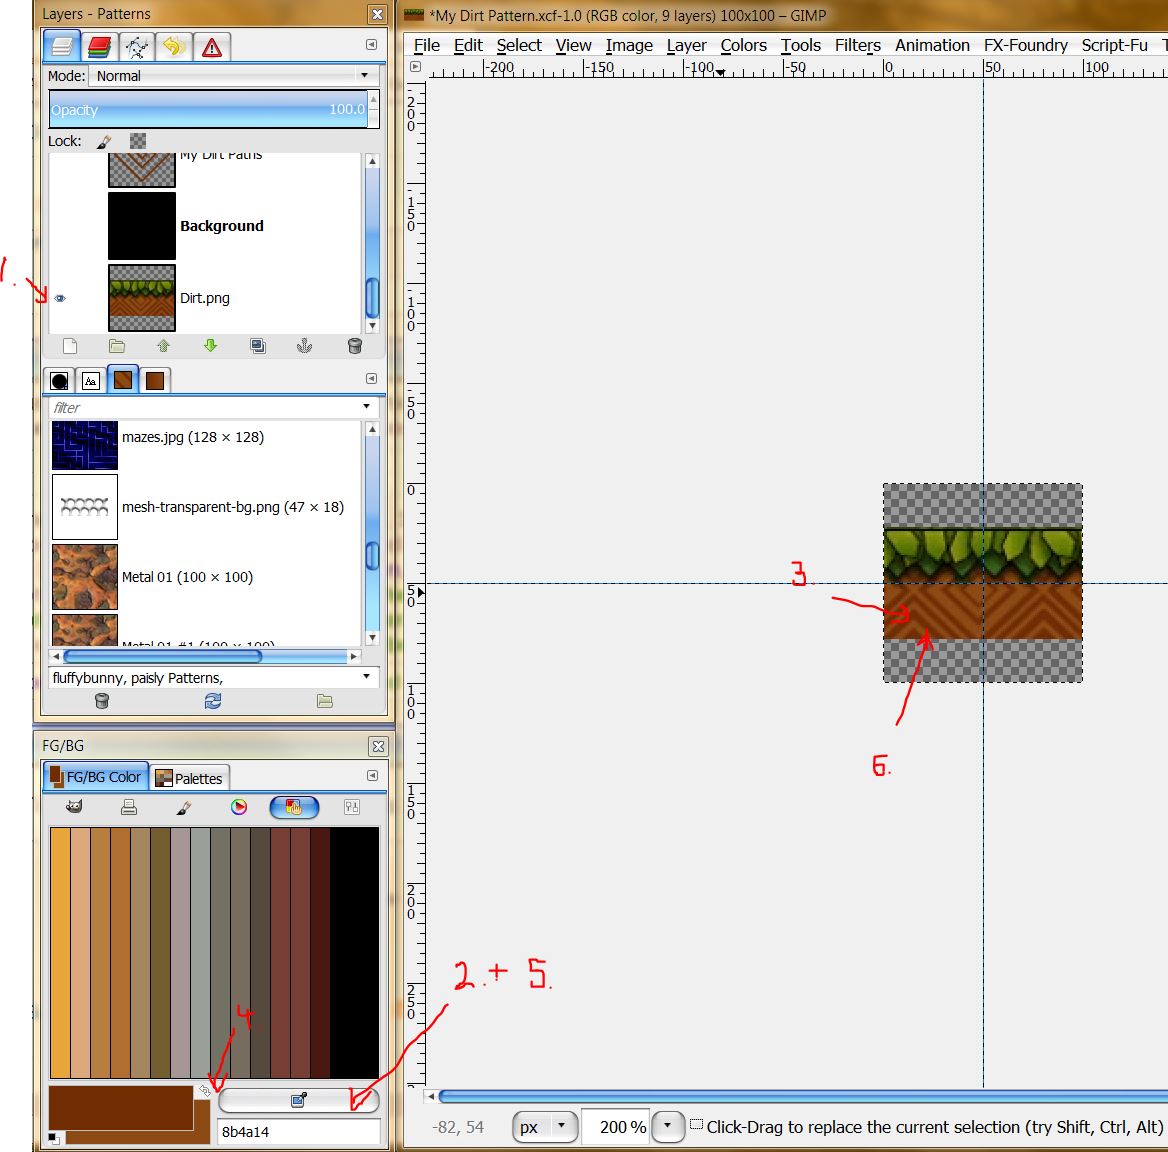
Using the numbers on the image below, 1. Ensure you original dirt.png layer's 'eye' is visible.
Then on the FG/BG Colors dialog, click the 'color picker' shown at 2.
Then 3. Click the darker colour on the canvas as the FG colour.
Then click the 'Swap FG/BG' at 4.
Then click the 'Color Picker' again 5.
Finally 6. Click the BG color on the canvas.
Now make turn off the 'eye' on the dirt.png layer and let us continue...
3. 'Image' menu ->Guides, create some Center Guides then under the View menu, select 'Snap to Canvas edges'.
This will come in handy when we have to arrange the layers later...
4. Click the 'Paths' dialog, then using the Rectangle Selection Tool, ensure the 'Expand from Center', and 'Fixed Ratio' of 1:1 are selected in the tool options.
5. Create a selection that is 10x10 in size centred on the canvas. (Use the Width and Height tool options to make it easier)
6. At the bottom of the 'Paths' dialog, click 'Selection to Path' icon.
7. Create a new selection that is 30x30 in size centred on the canvas.
8. At the bottom of the 'Paths' dialog, click 'Selection to Path' icon.
9. Create another new selection that is 60x60 in size centred on the canvas.
10. At the bottom of the 'Paths' dialog, click 'Selection to Path' icon.
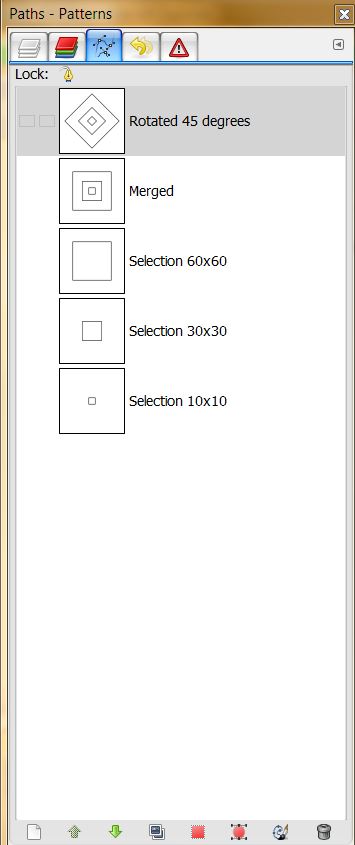
Make sure the 'eye' is visible for each of the three paths.
11. Right Click on the upper most (60x60) path and choose 'Merge Visible Paths'.
12. Using the Rotate tool, ensure that the Path icon is chosen in the tool options, then on the canvas click the visible path.
Rotate 45 degrees.
In the image below I have left all the original paths I created before merging them into 1 to make it clearer what you would see step by step.
13. Now on the 'Layers' dialog, create a new layer called 'My Dirt Paths'.
14. Under the 'Edit' menu -> Stroke Path, stroke the merged path using your original dirt image's FG colour, with a 3px wide 'Solid Colour' line.
15. Duplicate this 'My Dirt Paths' layer 4 times.
16. Select the first duplicate layer. Using the Move tool, move it up vertically until it's centre is aligned with the top of the canvas edge and the vertical guide you created earlier.
17. Now select the second duplicated layer, and move that horizontally left until it's centre is aligned with the canvas edge and the horizontal guide.
18. Select the third duplicated layer, and move that horizontally right until it's centre is aligned with the canvas edge and the horizontal guide.
19. Finally move the fourth duplicated layer vertically down until it's centre is aligned with the canvas edge and the vertical guide.
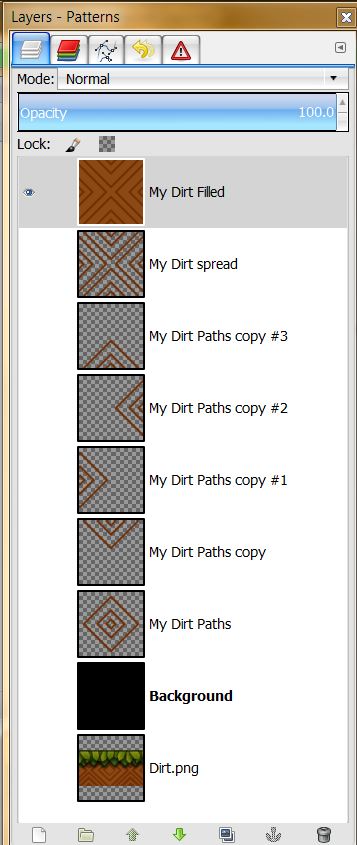
20. Unclick the 'eye' on the original 'My Dirt Paths' layer and then Right Click any layer and choose 'New Layer from Visible'. Move this new 'visible' layer top the top of the layers stack and call it 'My Dirt Spread'.
21. Create a new layer above this and call it 'My Dirt Filled'.
22. Using the 'Bucket Fill' tool, ensure 'Fill type' is set to 'BG Color fill' in the tool options. Fill this new layer with your original dirt image's background colour.
23. Duplicate the 'My Dirt Spread' layer, and move this duplicate above the new 'My Dirt Filled' layer.
24. Right Click this duplicate layer and choose 'Merge Down'.
Your layers should look like the image below.
Nearly there....
25. Under the 'Edit' menu -> 'Copy Visible'
26. Under the 'Edit' menu -> 'Paste as' -> 'New Pattern'
27. Give it a pattern name, and a filename.
Voila!
Create a new image and test your pattern.


