Round Raster 2 experimental (python script)
Sat May 14, 2016 3:24 am
The script will generate height maps (I think that's what they're called) for your selection.
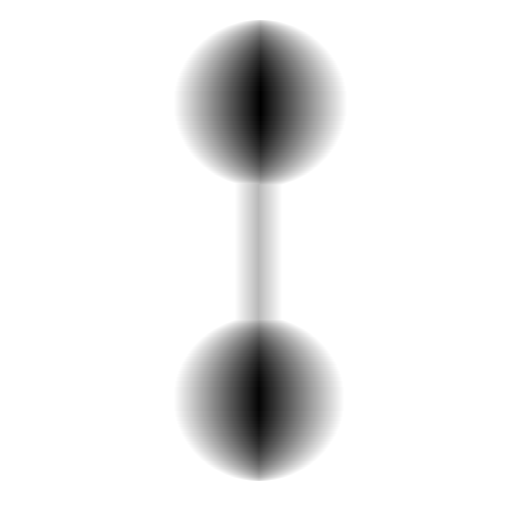
example 1.
make a selection like below
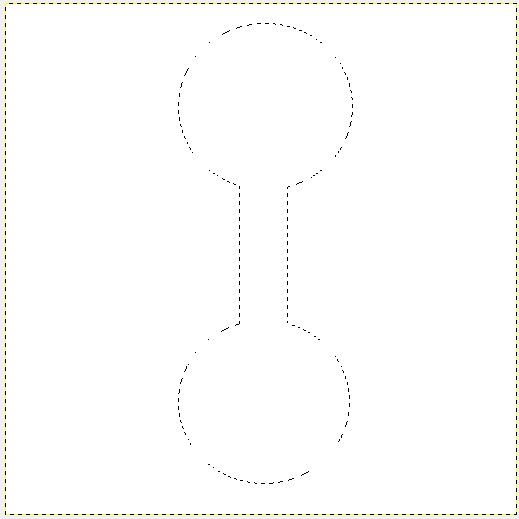
script renders
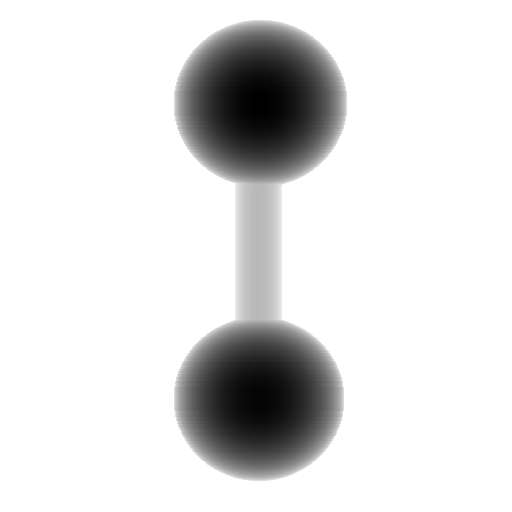
example 2.
make a selection like below
script renders
Script will be available under Python-Fu/Round Raster 2 Experiment...
example 1.
make a selection like below
script renders
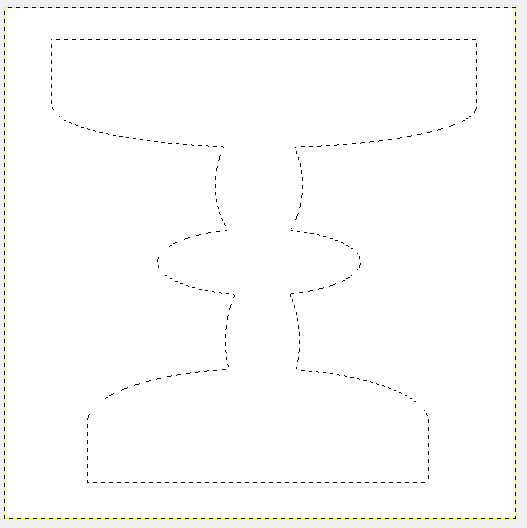
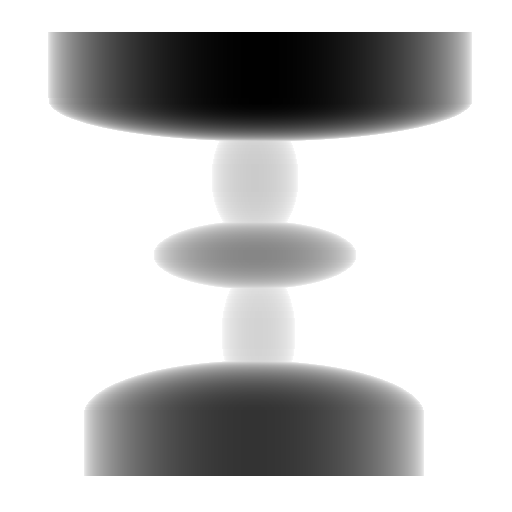
example 2.
make a selection like below
script renders
Script will be available under Python-Fu/Round Raster 2 Experiment...
Re: Round Raster 2 experimental (python script)
Sat May 14, 2016 8:07 am
Some people call them height map some depth map some alphas. It all depends on who your talking to. Is the glass half empty is the glass half full. It's all the same thing.
This looks like the round raster script you made except it starts with a selection. And it's a python script. It works great. It seems to be effective only with symmetrical and horizontal shapes.
I like it.
This looks like the round raster script you made except it starts with a selection. And it's a python script. It works great. It seems to be effective only with symmetrical and horizontal shapes.
I like it.
Re: Round Raster 2 experimental (python script)
Sat May 14, 2016 8:27 am
This gets me to thinking well how about not just round but maybe from black left to whit right. Or even instead of round white to black to white, kind of pointed. This script is unique because you don't seem to need to be perfectly symmetrical from side to side, so it could give some pretty good blend effects other than round.
Re: Round Raster 2 experimental (python script)
Sat May 14, 2016 10:49 am
PegLeg44 wrote:This gets me to thinking well how about not just round but maybe from black left to whit right. Or even instead of round white to black to white, kind of pointed. This script is unique because you don't seem to need to be perfectly symmetrical from side to side, so it could give some pretty good blend effects other than round.
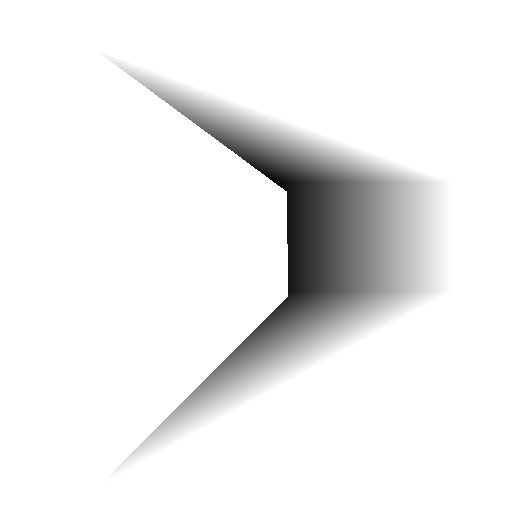
you said pointed so i thought maybe this one is of some use too

sample 1

sample 2
I called it Pointed Raster
will be available under Python-Fu/Pointed Raster Experiment ...
Re: Round Raster 2 experimental (python script)
Sat May 14, 2016 11:12 am
PegLeg44 wrote:This gets me to thinking well how about not just round but maybe from black left to whit right.
I call this one slope raster experiment
sample of when user choose "Left To Right"
sample of when user choose "Right To Left"
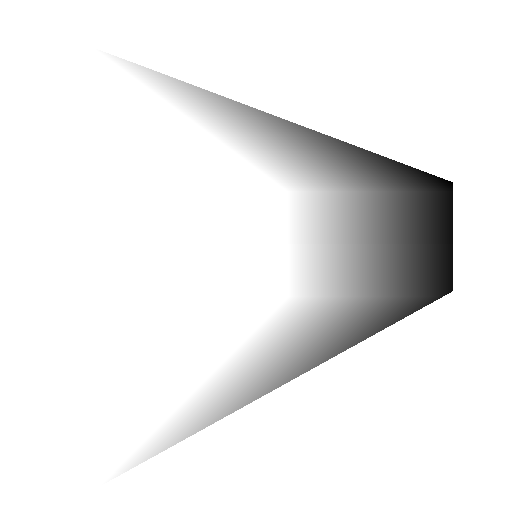
script will be available under Python-Fu/Slope Raster Experiment...
Re: Round Raster 2 experimental (python script)
Sat May 14, 2016 11:14 am
If ya got any other crazy ideas and that you can give me formulas to calculating the height, let me know
btw what is the program that you used in your video to show the 3D view when you rotate it around to look like wood looking texture...is it easy to use and is it free? I thought maybe if it's free i'll use it to play around with these black and white experiements of mine. If it's not free then it's okay no worries.
btw what is the program that you used in your video to show the 3D view when you rotate it around to look like wood looking texture...is it easy to use and is it free? I thought maybe if it's free i'll use it to play around with these black and white experiements of mine. If it's not free then it's okay no worries.
Re: Round Raster 2 experimental (python script)
Sat May 14, 2016 11:40 am
The pointed and slope look good. I'll try them out a little later. I've got some work that I need to do.
The program I use to easily paste in and view the height maps is a software that goes with my Carvewright CNC machine. I know you can try out the software for 30 days but that's no good. You can save as an image and set it up on a mesh as a displacement map in blender but it's a little work setting it up and saving and all. I use my zbrush to easily bring it into the mesh via zaplink external editor. I have my zaplink set up for gimp. Which means I have to edit in gimp and save as a photoshop psd to re enter zbrush. There's also a free to try program called bmp2cnc which is the software that I use to set up my g-code for my CNC. But it's not truly a 3D preview with shadows. It's just a 3D height by color.
The program I use to easily paste in and view the height maps is a software that goes with my Carvewright CNC machine. I know you can try out the software for 30 days but that's no good. You can save as an image and set it up on a mesh as a displacement map in blender but it's a little work setting it up and saving and all. I use my zbrush to easily bring it into the mesh via zaplink external editor. I have my zaplink set up for gimp. Which means I have to edit in gimp and save as a photoshop psd to re enter zbrush. There's also a free to try program called bmp2cnc which is the software that I use to set up my g-code for my CNC. But it's not truly a 3D preview with shadows. It's just a 3D height by color.
Re: Round Raster 2 experimental (python script)
Sat May 14, 2016 11:42 am
PegLeg44 wrote:The pointed and slope look good. I'll try them out a little later. I've got some work that I need to do.
The program I use to easily paste in and view the height maps is a software that goes with my Carvewright CNC machine. I know you can try out the software for 30 days but that's no good. You can save as an image and set it up on a mesh as a displacement map in blender but it's a little work setting it up and saving and all. I use my zbrush to easily bring it into the mesh via zaplink external editor. I have my zaplink set up for gimp. Which means I have to edit in gimp and save as a photoshop psd to re enter zbrush. There's also a free to try program called bmp2cnc which is the software that I use to set up my g-code for my CNC. But it's not truly a 3D preview with shadows. It's just a 3D height by color.
that's sounds way to complex for me
I'll stick to playing with GIMP
Re: Round Raster 2 experimental (python script)
Sat May 14, 2016 11:56 am
Any other manipulations can be added after the script using the Curves dialog or [Colors] [Map] [Gradient Map]
Re: Round Raster 2 experimental (python script)
Sat May 14, 2016 1:41 pm
PegLeg44 wrote:Any other manipulations can be added after the script using the Curves dialog or [Colors] [Map] [Gradient Map]
[ Image ]
neat stuff you do.
Re: Round Raster 2 experimental (python script)
Sat May 14, 2016 5:39 pm
I call this one Round Border Raster Experiment.
Warning this script takes a really long time to render on larger selected areas, like enough time to go have a coffee and come back to.
sample selection 1
script renders this
sample selection 2
script renders this
selected shape blurred and bump mapped
it'll be availabe under Python-Fu/Round Border Raster Experiment...
Re: Round Raster 2 experimental (python script)
Sat May 14, 2016 8:25 pm
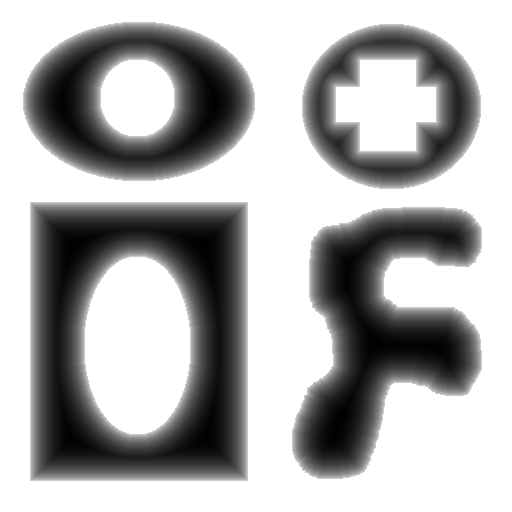
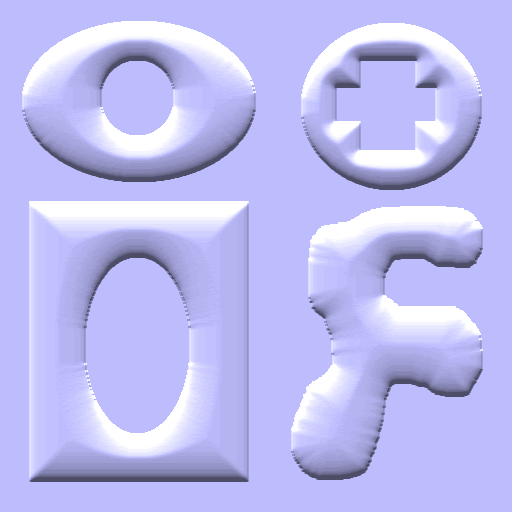
This one is even slower and even more experimental.
selection
what script renders
blurred and bump mapped.

I particularly like the result of the lop-sided donut shape.
This is a different version of the script in the above post.
selection
what script renders
blurred and bump mapped.
I particularly like the result of the lop-sided donut shape.
This is a different version of the script in the above post.
Re: Round Raster 2 experimental (python script)
Sat May 14, 2016 9:30 pm
You can get those same kind of results just simply using a round gradient with the blend tool set to [shaped (angular)] and it doesn't take a whole lot of time.
If you could get something where the fill is lets say black on the outside and white on the inside, then that would be something new. The Path blend script is the only way I've seen that something like that can be done.
If you could get something where the fill is lets say black on the outside and white on the inside, then that would be something new. The Path blend script is the only way I've seen that something like that can be done.
Re: Round Raster 2 experimental (python script)
Sat May 14, 2016 9:44 pm
PegLeg44 wrote:You can get those same kind of results just simply using a round gradient with the blend tool set to [shaped (angular)] and it doesn't take a whole lot of time.
If you could get something where the fill is lets say black on the outside and white on the inside, then that would be something new. The Path blend script is the only way I've seen that something like that can be done.
Black on the outside and white on the inside? doesn't invert do that? I am confused.
Re: Round Raster 2 experimental (python script)
Sun May 15, 2016 12:17 am
I mean anything with a hole in it. If you could do your slope type of thing, only from the inside to the outside of a donut. It is possible... anything is possible...
It's not possible though unless it's done manually.
It's not possible though unless it's done manually.
Re: Round Raster 2 experimental (python script)
Sun May 15, 2016 1:03 am
i think that's probably easier manually.
I could probably do one shape with a hole in it but not a shape with 2 or more holes or many shapes with multiple holes.
It's probably easier right now to use lighten only and cut out the holes manually.
I could probably do one shape with a hole in it but not a shape with 2 or more holes or many shapes with multiple holes.
It's probably easier right now to use lighten only and cut out the holes manually.
Re: Round Raster 2 experimental (python script)
Sun May 15, 2016 10:05 am
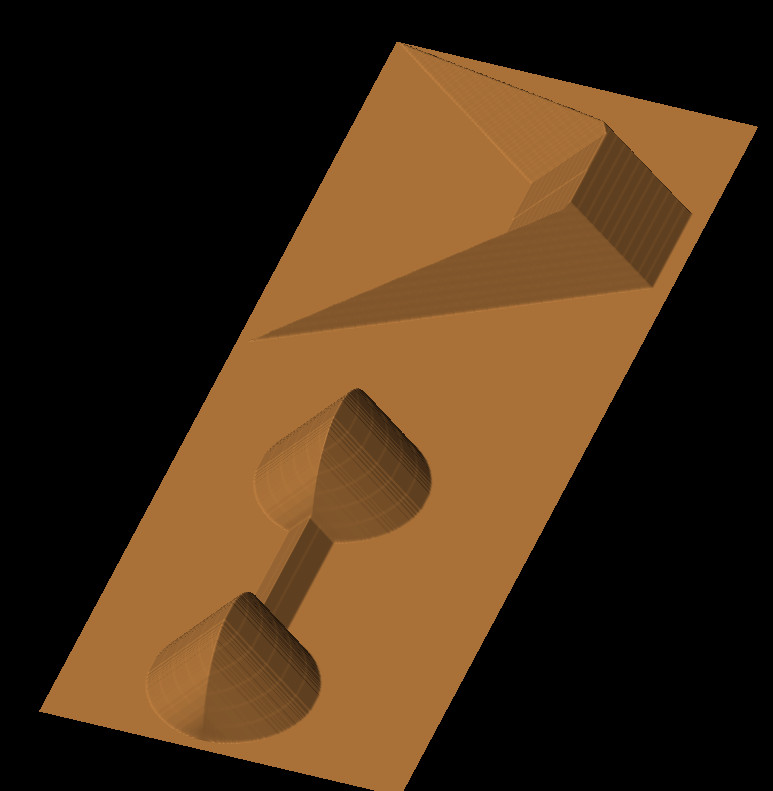
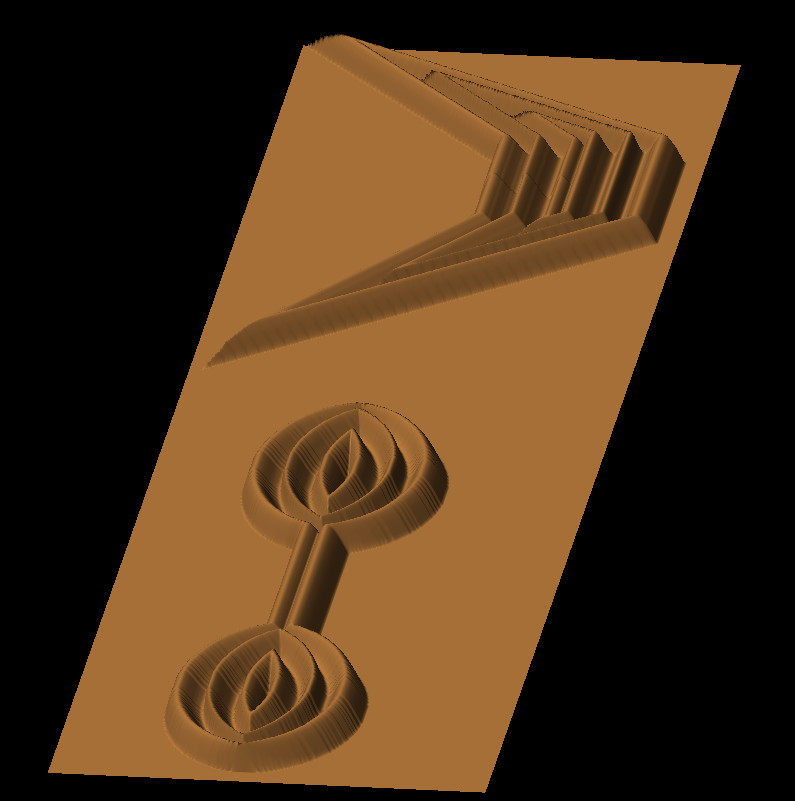
Just for a laugh, I tried using your height/depth map as a height_field image in POVRay (after inverting, POVRay treats white as the highest point)
Kevin
- height_field2.png (316.44 KiB) Viewed 1716 times
- height_field4.png (333.04 KiB) Viewed 1716 times
Kevin
Re: Round Raster 2 experimental (python script)
Sun May 15, 2016 10:12 am
paynekj wrote:Just for a laugh, I tried using your height/depth map as a height_field image in POVRay (after inverting, POVRay treats white as the highest point)
Kevin
a badly designed drumbell
Re: Round Raster 2 experimental (python script)
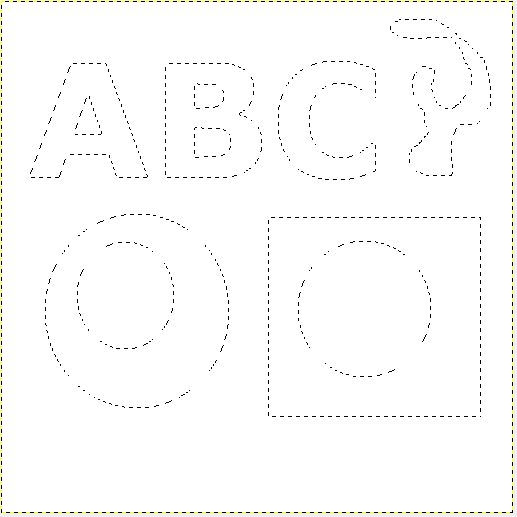
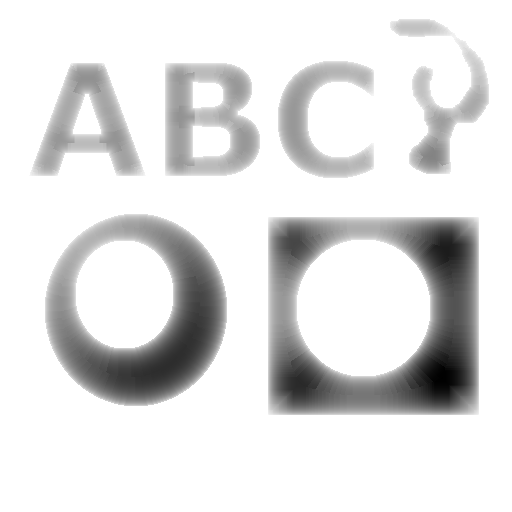
Mon May 16, 2016 12:37 pm
Hi There,
I was just trying the script on a square and got the look of ceramic tiles. Such tiles have been used on the walls of our house. I had no plan to design them in gimp with this script.
I was just trying the script on a square and got the look of ceramic tiles. Such tiles have been used on the walls of our house. I had no plan to design them in gimp with this script.
Re: Round Raster 2 experimental (python script)
Mon May 16, 2016 2:13 pm
Rashid wrote:Hi There,
I was just trying the script on a square and got the look of ceramic tiles. Such tiles have been used on the walls of our house. I had no plan to design them in gimp with this script.
nice looking red tiles.