NICE!

| GIMP Chat http://gimpchat.com/ |
|
| Logo Toolbox V2.3 http://gimpchat.com/viewtopic.php?f=9&t=7237 |
Page 2 of 17 |
| Author: | Wallace [ Wed May 15, 2013 4:37 pm ] |
| Post subject: | Re: Logo Toolbox V1.0 |
NICE!
|
|
| Author: | Gms9810 [ Wed May 15, 2013 4:49 pm ] |
| Post subject: | Re: Logo Toolbox V1.0 |
"Before you post, please prove you are sentient." < unfair question because I'm not sentient. On behalf of all the brainless people, I protest. Thanks for the script by the way. |
|
| Author: | sallyanne [ Thu May 16, 2013 12:41 am ] |
| Post subject: | Re: Logo Toolbox V1.0 |
Gms9810 wrote: "Before you post, please prove you are sentient." < unfair question because I'm not sentient. On behalf of all the brainless people, I protest. Thanks for the script by the way. lol  |
|
| Author: | GnuTux [ Fri May 17, 2013 6:06 am ] |
| Post subject: | Re: Logo Toolbox V1.1 (updated) |
@Gms  - That actually works to stop bots. - That actually works to stop bots.  @sallyanne - Nice effect you got there and that is an interesting font. |
|
| Author: | GnuTux [ Fri May 17, 2013 6:15 am ] |
| Post subject: | Re: Logo Toolbox V1.1 (updated) |
The script has been updated to Version 1.1 - Download the new version from gimpscripts.com (see link in 1st post). Version 1.1 Give Bump it's own dropdown and add invert option. Add new effect drop down for Background, Shadow & Gloss + Combinations of each. Add option for Letter Spacing. |
|
| Author: | sallyanne [ Fri May 17, 2013 6:16 am ] |
| Post subject: | Re: Logo Toolbox V1.1 (updated) |
GnuTux wrote: @sallyanne - Nice effect you got there and that is an interesting font. Thank you very much. Font is called Flames Medium and I used a tortoise shell pattern on it |
|
| Author: | sallyanne [ Fri May 17, 2013 6:42 am ] |
| Post subject: | Re: Logo Toolbox V1.1 (updated) |
 |
|
| Author: | GnuTux [ Fri May 17, 2013 7:53 am ] |
| Post subject: | Re: Logo Toolbox V1.1 (updated) |
 Sallyanne SallyanneI needed to make this change to the script so I could separate out the bump layer from the the effects layer, in order to bump and add effects (like gloss) in one step. I plan on adding several more effects layer options and combinations. By the way, you can turn off any of the option layers by selecting none or setting the rotator value to 0. |
|
| Author: | Oregonian [ Fri May 17, 2013 8:06 am ] |
| Post subject: | Re: Logo Toolbox V1.1 (updated) |
I love that I can change / delete / add layers after the script has been run. This is my Logo Toolbox monster. |
|
| Author: | sallyanne [ Fri May 17, 2013 8:17 am ] |
| Post subject: | Re: Logo Toolbox V1.1 (updated) |
 Oregonian Oregonian
|
|
| Author: | GnuTux [ Fri May 17, 2013 8:18 am ] |
| Post subject: | Re: Logo Toolbox V1.1 (updated) |
That monster is great, O! Anther handy thing to do, after running the script once, is to keep running the alpha script on other selections of the image you're working on, in order to fill those areas with color, gradients, beveled patterns or combinations.  For example, on the hands of your monster. |
|
| Author: | Oregonian [ Fri May 17, 2013 8:35 am ] |
| Post subject: | Re: Logo Toolbox V1.1 (updated) |
sallyanne wrote: OregonianGnuTux wrote: That monster is great, O! Thanks, GnuTux. Good idea on the hands. Anther handy thing to do, after running the script once, is to keep running the alpha script on other selections of the image you're working on, in order to fill those areas with color, gradients, beveled patterns or combinations. For example, on the hands of your monster. LATER: I did the eyes and mouth manually but it worked well on the hands. |
|
| Author: | GnuTux [ Fri May 17, 2013 10:48 am ] |
| Post subject: | Re: Logo Toolbox V1.1 (updated) |
Looks great, O! Oregonian wrote: LATER: I did the eyes and mouth manually but it worked well on the hands. You do have to be mindful of stroke offsets when using a2l with the current version of this script because the outer stroke comes from the whatever is underneath. That technique is useful but can fall short when there is nothing underneath. That is a deficiency of the a2l section of this script that I'll address with a option in a later release. There really isn't any advantage in using a script to do one step fills, anyway. The advantage comes when you want to apply multiple steps in one operation, say pattern fill & bevel (offset/double/multiple) or bumped gradient fills, things like that. The way to leverage the script is to set everything like you want, run it, then if you don't like the results, Ctrl+Z will undo all the steps, change say the active pattern, then Ctrl-F to repeat the script with the new pattern. You can quickly test a bunch of pattern/gradient/bump/effect combinations to see what work best. Ctrl-Z after the Create Logo section will undo back to the text layer, which is kinda handy too. Now that I have a UI and script framework in place that I'm happy with, it's just a matter of adding new fills, effects, shadows and other bells and whistles.
|
|
| Author: | GnuTux [ Fri May 17, 2013 2:57 pm ] | ||
| Post subject: | Re: Logo Toolbox V1.1 (updated) | ||
Rendered using Logo Toolbox, from Mokonafan's Original Rose Outline here. 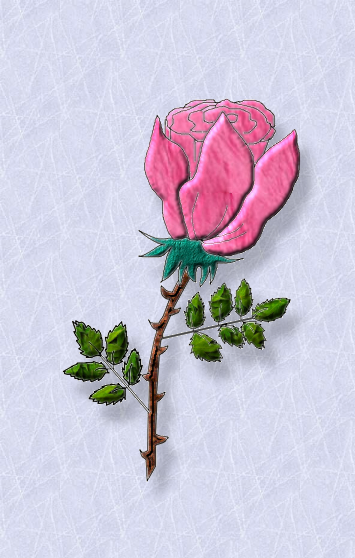 I created a seamless rose petal pattern, which I'll attach.
|
|||
| Author: | Rod [ Fri May 17, 2013 3:42 pm ] |
| Post subject: | Re: Logo Toolbox V1.1 (updated) |
Thanks for the pattern and the new update Tux. |
|
| Author: | Oregonian [ Fri May 17, 2013 6:55 pm ] |
| Post subject: | Re: Logo Toolbox V1.1 (updated) |
GnuTux wrote: Rendered using Logo Toolbox, from Mokonafan's Original Rose Outline here. That's gorgeous, GnuTux. Clever idea using Moko's rose. Thank you for the pretty pattern. I looked through my dingbats and used this leaf. It was solid fill so selected and shrank 2 and went from there. Want to find a flower I can use, too.I created a seamless rose petal pattern, which I'll attach.  |
|
| Author: | GnuTux [ Mon May 20, 2013 7:05 am ] |
| Post subject: | Re: Logo Toolbox V1.2 (Enhanced Glass Effects) |
@O - Very 420 of you!  I've updated the Logo Toolbox script to include enhanced Glass Effects and improved Gradient Fills. Now supports gradient, beveled and textured glass (text and alpha). Improved fills to allow selection of vertical, horizontal & diagonal Gradient Fills. Fixed a couple of bugs and improved logic. You can grab the update from gimpscripts.com |
|
| Author: | Oregonian [ Mon May 20, 2013 2:40 pm ] |
| Post subject: | Re: Logo Toolbox V1.2 (Enhanced Glass Effects) |
Wow GnuTux. Totally nice. Thanks for the update and extra choices. I tried to make windchimes but this is not really what I had in mind. I used the perspective tool to try to make the glass parts look turned but they just look distorted. Wanted them viewed through a window but couldn't figure out how to make the metal part attached to something. Finally, I decided, enough! 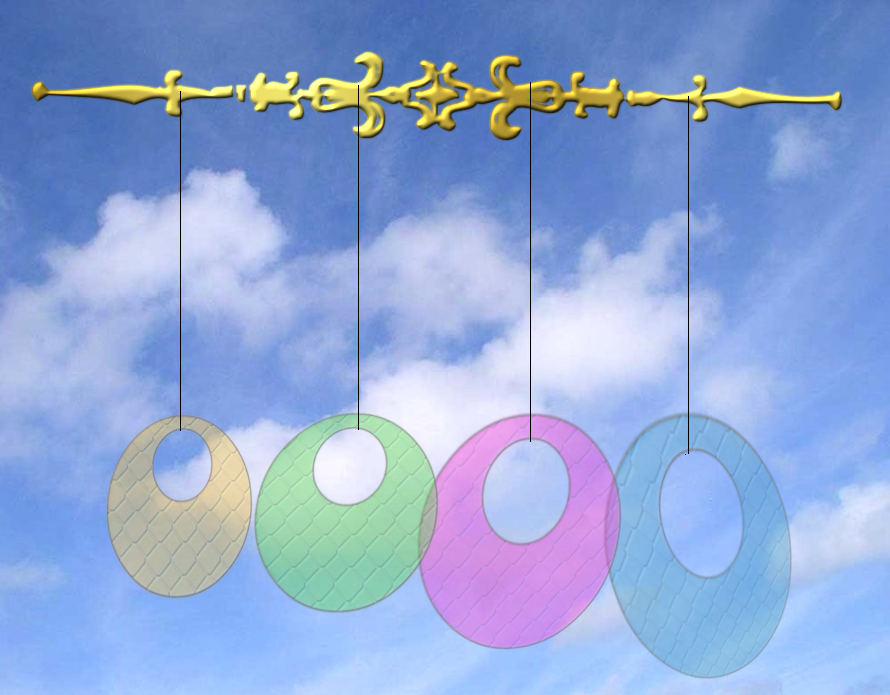 |
|
| Author: | akky [ Mon May 20, 2013 3:56 pm ] |
| Post subject: | Re: Logo Toolbox V1.2.1 (Enhanced Glass Effects) |
some very nice effects there. Thank you. |
|
| Author: | GnuTux [ Mon May 20, 2013 4:03 pm ] |
| Post subject: | Re: Logo Toolbox V1.2.1 (Enhanced Glass Effects) |
| akky. Very pretty image, O! I like your idea of multiple glass layers at different depths (looking though a window at glass chimes). I'm just not sure how to pull off the effect. Seems you need some way to give depth between the glass layers. Perhaps by placing an object between the two glass layers, with a shadow falling on the 2nd glass layer, would give the illusion of depth needed to create a realistic effect. Updated the script to V1.2.1 to fix a major bug. The script was trying the delete the bumpmap layer, even if it didn't exist, which generated an error in Version 1.2 of the script. Dang scheme braces!  ) ) Gimp Scripts has been updated with the fixed Version 1.2.1. |
|
| Page 2 of 17 | All times are UTC - 5 hours [ DST ] |
| Powered by phpBB © 2000, 2002, 2005, 2007 phpBB Group http://www.phpbb.com/ |
|