This was one I intended to rework for Gimp users but it started to get really long due to the fact there were so many steps involved. PS does three and sometimes four operations at one time whereas Gimp has to do them all separately. In addition, some of the steps like using the Bevel & Emboss in Layer Effects is quite different. The script interface seems to be tailored after PS but when you enter the same settings, well it just doesn't work. I had to do all the little white highlights by hand using a combination of six or seven steps. Here's what I did.
1. First, I duped the text layer and filled it with white, select>shrink about 5 to 7 pixels (originally did this at 1600 x 1200), offset the layer a few pixels, used the text selection (saved to a channel) to cut it out, then moved it back about three times the distance I originally moved it.
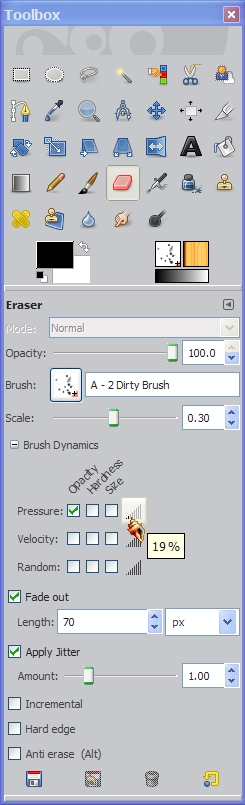
2. Iused the eraser tool and a "Kitra" dirty brush (Deviantart) set really small using the Fade, Jitter and Opacity settings below to taper off the ends of each highlight.
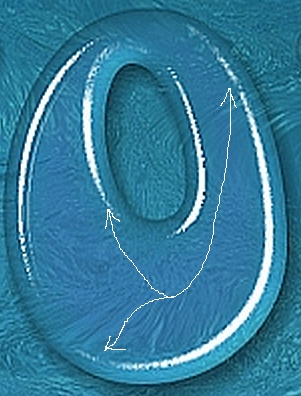
3. I went to filters>noise>spread and I used either 1 or 2 (very low) to make it look more like a rough chalk line, and then gaussian blur at 3. I can't remember exactly but sometimes the blur makes the highlight sort of "fade" a bit so I may have duped the highlight layer to make it a bit more intense.
I use these same similar steps to make highlights cuz the Gimp filters will not allow you to set the angle at anything more than 180 degrees so there seems to be no way to get either shadows or highlights in the lower right hand area. I did the same similar thing with the lower right blurred shadows and just locking the alpha channel before applying the blur.
The first part of the original tut is easy enough to follow but (maybe it's just my lack of knowledge) I could not get the Bevel & Emboss filter to work the way I wanted it to. Hope this helps.