It is currently Tue Jul 23, 2024 2:26 pm


All times are UTC - 5 hours [ DST ]


Post new topic Reply to topic  [ 46 posts ]  Go to page Previous  1, 2, 3  Next
Author Message
 Post subject: Re: Old Damaged Photo Repaired With Gimp
PostPosted: Thu Aug 18, 2011 4:36 pm  (#21) 
Offline
GimpChat Member
User avatar

Joined: Jun 24, 2011
Posts: 22
The picture looks beautiful. Great job!


Top
 Post subject: Re: Old Damaged Photo Repaired With Gimp
PostPosted: Sat Aug 27, 2011 4:03 pm  (#22) 
Offline
GimpChat Member

Joined: Aug 05, 2011
Posts: 606
Location: limestone,ny
i like using the g-mic enhancement-anisotropic smoothing on old pictures

Image


Top
 Post subject: Re: Old Damaged Photo Repaired With Gimp
PostPosted: Sat Aug 27, 2011 8:53 pm  (#23) 
Offline
GimpChat Member
User avatar

Joined: Apr 08, 2010
Posts: 5420
Location: Northwest Ohio
you did a great job with g'mic


Top
 Post subject: Re: Old Damaged Photo Repaired With Gimp
PostPosted: Sun Aug 28, 2011 12:04 am  (#24) 
Offline
GimpChat Founder
User avatar

Joined: May 22, 2008
Posts: 5242
Location: Gimpville
alc59 wrote:
i like using the g-mic enhancement-anisotropic smoothing on old pictures

Thanks for the tip on the filter, alc59.

One thing to note is that it looks like you are comparing the "after" image to a g-mic'd version of the "final" image, which is not a true comparison because there was already processing done on the "final" image before you applied the g-mic filter. I can tell because there is a slight halo effect in the "after" image that I eliminated (mostly) in the "final" image.

A more true comparison would be this..

Image

I can detect a smoothing effect with the g-mic filter applied. It's less grainy.

_________________
“If you reach for the stars, you just might land on a decently sized hill.” - Stuart Hill


Top
 Post subject: Re: Old Damaged Photo Repaired With Gimp
PostPosted: Sun Aug 28, 2011 5:35 am  (#25) 
Offline
GimpChat Member
User avatar

Joined: Apr 09, 2011
Posts: 1764
looking very nice!


Top
 Post subject: Re: Old Damaged Photo Repaired With Gimp
PostPosted: Sun Aug 28, 2011 6:55 am  (#26) 
Offline
GimpChat Member
User avatar

Joined: May 16, 2010
Posts: 14728
Location: USA
I think you did an excellent job Tux. :)
I would be willing to bet your friend is really happy with the results also.

These types of jobs require a lot of time and patience.

_________________
Image
Edmund Burke nailed it when he said, "The only thing necessary for the triumph of evil is for good men to do nothing."


Top
 Post subject: Re: Old Damaged Photo Repaired With Gimp
PostPosted: Sun Aug 28, 2011 11:14 pm  (#27) 
Offline
GimpChat Member
User avatar

Joined: May 16, 2010
Posts: 14728
Location: USA
Hey Tux i took the liberty (i hope you do not mind), of trying out some of my new software.
The software is called "AnyPic Image Resizer Pro" .
I re-sized your original 200% and i am pleased with the results.

Image

I just thought that with the image this much bigger it would be a lot less tedious doing this type of work.
It will be nice to be able to enlarge the image, and fix it then re-size it back down to it's original size. :)

Anyways the software seems to work very nicely.

Thanks!

_________________
Image
Edmund Burke nailed it when he said, "The only thing necessary for the triumph of evil is for good men to do nothing."


Top
 Post subject: Re: Old Damaged Photo Repaired With Gimp
PostPosted: Mon Aug 29, 2011 9:32 am  (#28) 
Offline
GimpChat Member
User avatar

Joined: Jun 25, 2011
Posts: 914
Location: Mount Olive, North Carolina
Great work! You did an especially good job on the pattern of the tablecloth. That would have frustrated me to no end.

It might be worth taking another look at the left eyebrow, though. I might be wrong (I'm using a laptop screen now), but I think I see still some white border around it.


Top
 Post subject: Re: Old Damaged Photo Repaired With Gimp
PostPosted: Tue Sep 06, 2011 11:56 am  (#29) 
Offline
GimpChat Member
User avatar

Joined: Sep 06, 2011
Posts: 368
Location: US, Ohio
My business scans photos and videos, and converts them and repairs them. I have repaired many a photo like this. Saying that, I applaud you. You did a fantastic job. I wish you had recorded what you did!


Top
 Post subject: Re: Old Damaged Photo Repaired With Gimp
PostPosted: Tue Oct 25, 2011 5:48 pm  (#30) 
Offline
GimpChat Member
User avatar

Joined: Aug 18, 2011
Posts: 8
Location: Gimp Land
Thanks.

GnuTux wrote:
Thanks for the kudos, friends.

latachuela wrote:
Just wondering how you did the restoration on the photo. because I have a few that I want to restore but no clue where to start.

I see others have already pointed you in the right direction. My technique was to copy and paste good sections over bad sections, wherever I could. I would then zoom in and blend those new sections sections as best I could. Those operations were made easier by using tools like clone :clone , smudge :smudge , blur :blur and airbrush :airbrush. Sometimes, it's a matter of zooming :zoom way in and rebuilding the image, almost on a pixel by pixel basis.

The face and pattens on the table cloth were the most tricky to repair and yes, it was very time consuming. Although, you get faster as you go.

_________________
La Tachuela [Graphic Designer]


Top
 Post subject: Re: Old Damaged Photo Repaired With Gimp
PostPosted: Wed Apr 18, 2012 8:30 am  (#31) 
Offline
New Member

Joined: Apr 18, 2012
Posts: 1
I did one too! 1/2 hour with photoshop. (Problem?)
Image
Image


Top
 Post subject: Re: Old Damaged Photo Repaired With Gimp
PostPosted: Wed Apr 18, 2012 10:05 am  (#32) 
Offline
GimpChat Member
User avatar

Joined: Mar 23, 2012
Posts: 7316
Location: Göteborg at last!
Choscura wrote:
I did one too! 1/2 hour with photoshop. (Problem?)


And the results aren't anywhere near as good!

Gnu Tux - You did a great job there!


Top
 Post subject: Re: Old Damaged Photo Repaired With Gimp
PostPosted: Wed Apr 18, 2012 10:54 am  (#33) 
Offline
GimpChat Member
User avatar

Joined: Mar 23, 2012
Posts: 7316
Location: Göteborg at last!
On a duplicate layer, I created a selection around the boy and applied G'MIC's thin brush smoothing. The results were too smooth compared to the rest of the photo so I reduced the opacity to allow the original to show a little.


Image


Top
 Post subject: Re: Old Damaged Photo Repaired With Gimp
PostPosted: Wed Apr 18, 2012 3:53 pm  (#34) 
Offline
GimpChat Member

Joined: Dec 07, 2011
Posts: 102
Impressive work! Given the source material, I don't think it could've been done any better.


Top
 Post subject: Re: Old Damaged Photo Repaired With Gimp
PostPosted: Wed Apr 18, 2012 4:38 pm  (#35) 
Offline
GimpChat Member

Joined: Apr 12, 2010
Posts: 5870
very nice

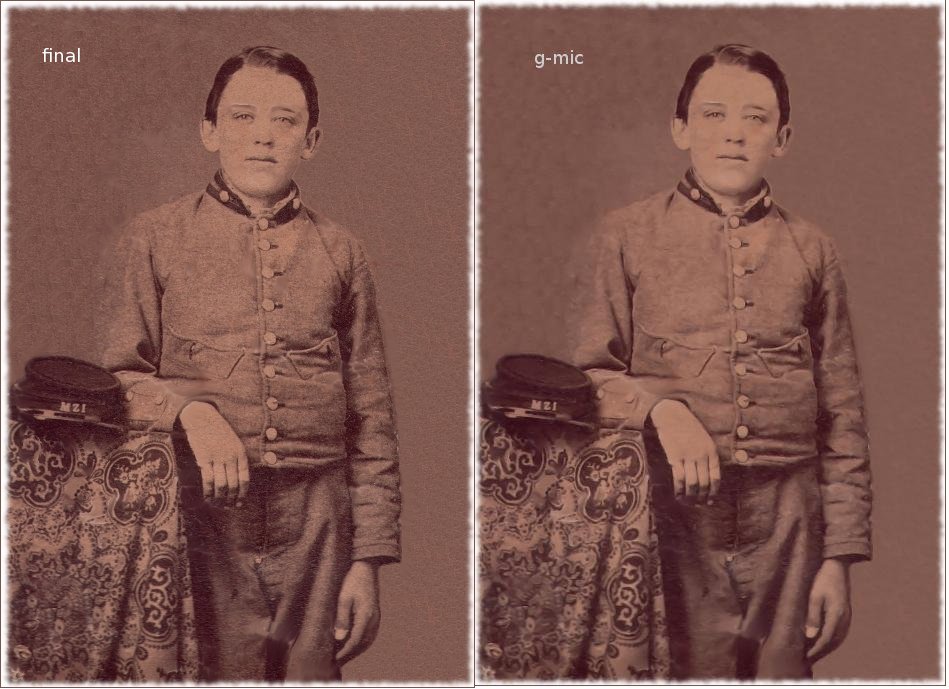
About the preset you used, your solution works but if you want modify the preset to reduce the smoothing 1 tip.

Of the many sliders 3 are most relevant because how they interact together:
the filter first try to determine which are the edges to preserve (on the base of difference of contrast with neighbors pixels) and the image structure ...then apply a blur but along the image structure.

so
1 Sharpness= change the threshold that determine which are edges , more you raise more part of the image will be seen as edges to preserve

2 smoothing=how MUCH of blur to be applied

3 anisotropy = determine HOW the blur will be applied:
more you raise the value more the blur will try to follow the image structure and so look ..sort of less blurred

So you may balance more blur with more anisotropy (one of my favorite trick, give a painted and often glossy look but preserving neat edges...you may transform someone in his wax sculpture )

Or if you simply want less smoothing you may

1 reduce "smoothing"
or
2 if the global level of smoothing is fine BUT too much edges are smoothed you may increase "sharpness"
3) or you may change effect of the smoothing making it follow more the image structure raising "Anisotropy

basically are 3 variables to play (much more but those 3 are the most relevant )

before using as main component for my favorite filters, i did play much with it, (as example here http://www.flickr.com/photos/photocomix ... 871852975/ ) it is really powerful for both denoise and special effects

_________________
My 3D Gallery on Deviantart http://photocomix2.deviantart.com/
Main gallery http://www.flickriver.com/photos/photocomix-mandala/
Mandala and simmetry http://www.flickriver.com/photos/photocomix_mandala/

Image

Mrs Wilbress


Last edited by PhotoComix on Wed Apr 18, 2012 4:48 pm, edited 1 time in total.

Top
 Post subject: Re: Old Damaged Photo Repaired With Gimp
PostPosted: Wed Apr 18, 2012 4:43 pm  (#36) 
Offline
GimpChat Member

Joined: Apr 12, 2010
Posts: 5870
Edit

now my message should be readable...sorry if before was a mess for too much typo and syntax errors

_________________
My 3D Gallery on Deviantart http://photocomix2.deviantart.com/
Main gallery http://www.flickriver.com/photos/photocomix-mandala/
Mandala and simmetry http://www.flickriver.com/photos/photocomix_mandala/

Image

Mrs Wilbress


Top
 Post subject: Re: Old Damaged Photo Repaired With Gimp
PostPosted: Wed Apr 18, 2012 4:59 pm  (#37) 
Offline
GimpChat Member
User avatar

Joined: Mar 23, 2012
Posts: 7316
Location: Göteborg at last!
I'll play with that PC, thank you.


Top
 Post subject: Re: Old Damaged Photo Repaired With Gimp
PostPosted: Wed Apr 18, 2012 11:22 pm  (#38) 
Offline
GimpChat Member

Joined: Apr 12, 2010
Posts: 5870
your retouch is very good and the idea of soften the effect by lowering opacity over the original works well, so my tip was a bit unrelated but i hope may be useful

BTW you notice in EDIT " Fade" ?
When the manip is not done on a new duplicate layer, but directly over the original is quite handy..and is quite good for special effect even if was not created for that

_________________
My 3D Gallery on Deviantart http://photocomix2.deviantart.com/
Main gallery http://www.flickriver.com/photos/photocomix-mandala/
Mandala and simmetry http://www.flickriver.com/photos/photocomix_mandala/

Image

Mrs Wilbress


Top
 Post subject: Re: Old Damaged Photo Repaired With Gimp
PostPosted: Thu Apr 19, 2012 4:58 am  (#39) 
Offline
GimpChat Member
User avatar

Joined: Mar 23, 2012
Posts: 7316
Location: Göteborg at last!
I don't explore things enough really. I ought to experiment more.


Top
 Post subject: Re: Old Damaged Photo Repaired With Gimp
PostPosted: Thu Apr 19, 2012 5:19 am  (#40) 
Offline
GimpChat Member

Joined: Apr 12, 2010
Posts: 5870
Fade allow to merge the last operation down with the previous stage of the image as it was on different layer, and may merge in all supported layer modes and a few more only available from there

_________________
My 3D Gallery on Deviantart http://photocomix2.deviantart.com/
Main gallery http://www.flickriver.com/photos/photocomix-mandala/
Mandala and simmetry http://www.flickriver.com/photos/photocomix_mandala/

Image

Mrs Wilbress


Top
Post new topic Reply to topic  [ 46 posts ]  Go to page Previous  1, 2, 3  Next

All times are UTC - 5 hours [ DST ]


   Similar Topics   Replies 
No new posts Attachment(s) Photo To Logo

0

No new posts Attachment(s) Glossy Photo's

4

No new posts Attachment(s) Photo To Comic Art

2

No new posts Beautify photo

5

No new posts Attachment(s) i want to tranform a photo like that

7


* Login  


Powered by phpBB3 © phpBB Group