The spider brush again. Last time it made fuzzy slippers
here.
This time the spider brush becomes tinsel on a tree.
Original tree found
here.

Open your tree image. Make a new layer, fill it with white, and move it below your tree. You can delete it later. It's easier to see the paths with white behind them.
Lower the opacity on your tree layer so that it's faint but so you can still see it well.
Make a new transparent layer above your tree layer and name it tinsel.
Select the Paths tool

. Make a straight path from one side of the tree to the other.
Hold down the Shift key and click the beginning of the next path, let go the Shift key and make a straight path to the other side.
Keep doing this until you have enough paths on your tree.
Start dragging the lines of the paths downward to make curved paths.
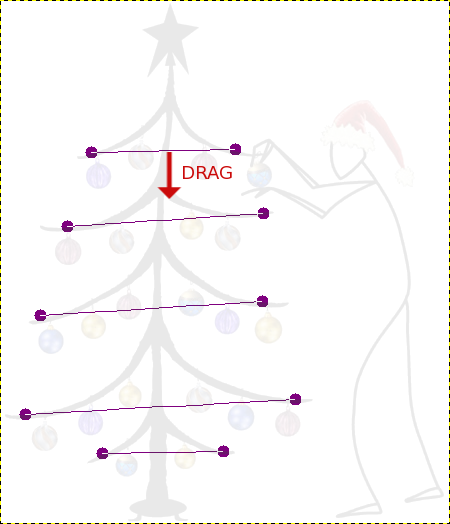
Curve every path.

When you have finished curving each path, be sure to restore the opacity of the tree to 100%
Select the Paintbrush

and find the black spider brush.
Use these settings:
Any color.
Size: 0.25
Jitter: 1.3
Spacing: 15 (You will need to do Ctrl + Shift + B to get to this setting in the brushes dialog)
Make sure the tinsel layer is the active layer.
Edit > Stroke Path > Stroke with a paint tool. Be sure Paintbrush is the Paint tool selected, Stroke.
Repeat. (Stroking twice makes the tinsel fluffier.)
Lock the transparency on the tinsel layer, click the Bucket fill tool

, choose Pattern fill, find the Gold glitter pattern, make sure Fill whole selection is ticked in the dialog, and click in the image.
Merge the tinsel layer to the tree layer. You can delete the white background layer.

If you are better at mousing than I am, you could simply paint the tinsel on with the paintbrush.
Attached below is the spider-glitters.zip file containing:
goldglitter.pat
silverglitter.pat
blackspider.gih
Unzip and put the two .pat files in the /.gimp-2.6 patterns folder and the blackspider.gih file in the /.gimp-2.6 brushes folder.


 Yes, my avatar and sig collections are growing.


