It is currently Sat Jun 20, 2026 4:44 pm


All times are UTC - 5 hours [ DST ]


Post new topic Reply to topic  [ 7 posts ] 
Author Message
 Post subject: Multi Gegl
PostPosted: Wed Jul 02, 2025 8:50 am  (#1) 
Offline
GimpChat Member
User avatar

Joined: Jan 13, 2011
Posts: 2639
Location: Poland
This is a way to use Gegl operations in a sequential way (after reading the discussion in this thread).
I don't know of a way to interactively call individual Gegl filters sequentially from a Python plugin.
This plugin will execute several Gegl operations (not interactive) sequentially with default values.

Image

After executing the plugin, now you can call a particular filter from the layers dock and edit its parameters and change the order of filter execution or disable them:
Image

After editing (changing) the filter parameters, you can save them (under an appropriate name) for possible reloading (for use as so-called presets):
Image

or export (if you want to share your settings):
Image

In menu: Filters ➤ Multi Gegl

One Gegl filter is just 4 lines of code which you can easily change (delete or add filters) to call other Gegl operations and/or filters LinuxBeaver.

This plugin is just an example (a bit like a Composer) but by far the simplest solution is to use BATCHER.

The advantage of the multiGegl.py plugin (or rather fx) is the direct preview on canvas and the ability to use 'Presetss' or 'Import Current Settings' from a file. ;)


Attachments:
multiGegl.zip [2.26 KiB]
Downloaded 75 times

_________________
Image
Share on Facebook Share on Twitter Share on Orkut Share on Digg Share on MySpace Share on Delicious Share on Technorati
Top
 Post subject: Re: Multi Gegl
PostPosted: Thu Jul 03, 2025 5:13 am  (#2) 
Offline
GimpChat Member
User avatar

Joined: Oct 31, 2020
Posts: 2012
Why not just make a empty layer group .xcf file with these three filters and drag and drop it into the canvas then put the content you want inside it?

or

Why not import a batcher preset? That does the same thing, I'm just saying. What works for you works for you.


Top
 Post subject: Re: Multi Gegl
PostPosted: Thu Jul 03, 2025 6:39 am  (#3) 
Offline
GimpChat Member
User avatar

Joined: Jan 13, 2011
Posts: 2639
Location: Poland
As I wrote that Batcher is the simplest (best) solution - but not always.
Maybe try adding gegl: threshold as 'Add Custom Action'.
You will get this error:
Image

It's a bit confusing but in Python code you should use gimp:threshold (which Batcher can't know about).

Batcher is also not the fastest solution because it works twice (separately for preview and result, which can also give a different final result than in the preview, but also G'MIC works the same way).

Operating on a group of layers is very cool but to share the result with others it requires sending a file saved as XCF (which you often suggest but somehow I haven't found examples).

Your other idea of ​​creating a separate Gegl filter from these operations is probably just another (unfortunately not very effective) incentive for others (and modifying the Python plugin is much easier).

_________________
Image


Top
 Post subject: Re: Multi Gegl
PostPosted: Thu Jul 03, 2025 8:58 pm  (#4) 
Offline
GimpChat Member
User avatar

Joined: Oct 31, 2020
Posts: 2012
MareroQ wrote:
As I wrote that Batcher is the simplest (best) solution - but not always.
Maybe try adding gegl: threshold as 'Add Custom Action'.
You will get this error:
[ Image ]

It's a bit confusing but in Python code you should use gimp:threshold (which Batcher can't know about).

Batcher is also not the fastest solution because it works twice (separately for preview and result, which can also give a different final result than in the preview, but also G'MIC works the same way).

Operating on a group of layers is very cool but to share the result with others it requires sending a file saved as XCF (which you often suggest but somehow I haven't found examples).

Your other idea of ​​creating a separate Gegl filter from these operations is probably just another (unfortunately not very effective) incentive for others (and modifying the Python plugin is much easier).


Regarding GIMP name space
https://github.com/kamilburda/batcher/issues/85

Regarding .xcf file. Try opening this and typing text in it.

and below the text put an empty layer with no content so it doesn't clip. I can't add the empty layer because I don't know the canvas size.

Attachment:
layergroup_for_pal.xcf [31.78 KiB]
Downloaded 71 times


Image


Top
 Post subject: Re: Multi Gegl
PostPosted: Sun Jul 06, 2025 11:20 am  (#5) 
Offline
GimpChat Member
User avatar

Joined: Jan 13, 2011
Posts: 2639
Location: Poland
Thank you for the XCF example.
Maybe we'll see a separate thread with such files.
Objectively, it's the easiest way.
However, I appreciate (prefer) the ability to invoke the plug-in from the Gimp menu.
Great that at your request, Batcher will have even more options.

I was directed to a very well explained (described) plugin by quietreader in another thread. :tyspin

How to Write Python Plug-ins for GIMP 3 by Kamil Burda:
https://medium.com/@kamilburda/how-to-w ... b81fc2c98d
Download https://gist.github.com/kamilburda/320b ... 0f3e21f1fb

Image

In menu: Filters ➤ Artistic ➤ Sketchify
However, in this example, fx operations are not available by using: 'image.merge_down'.

In the attached version, I added an option to use this command?
Image

In menu: Filters ➤ Artistic ➤ Sketchify fx...


Attachments:
sketchify-fx.zip [2.43 KiB]
Downloaded 67 times

_________________
Image
Top
 Post subject: Re: Multi Gegl
PostPosted: Sun Jul 06, 2025 5:30 pm  (#6) 
Offline
GimpChat Member
User avatar

Joined: Oct 31, 2020
Posts: 2012
Here is GEGL syntax to do sketchify

Image

edge-neon radius=3 amount=0.4
color-to-alpha color=black
color-overlay value=#d3cb95
dst-over aux=[ color value=#50956c
over aux=[ noise-solid x-size=2 y-size=2 detail=7 opacity value=0.15 ]
]


Please note gegl:dst-over is the behind blend mode
and gegl:over is the normal blend mode

Here are the nodes defined with custom names, notice how gegl:color-to-alpha is named c2a
and cloudy is short for gegl:noise-solid, that's because we can name them whatever we want


GeglNode *input    = gegl_node_get_input_proxy (gegl, "input");
GeglNode *output   = gegl_node_get_output_proxy (gegl, "output");

GeglNode *edge = gegl_node_new_child (gegl, "operation", "gegl:edge-neon", "radius", 3.0, "amount", 0.4,  NULL);

GeglColor *black = gegl_color_new ("#000000");
GeglNode *c2a = gegl_node_new_child (gegl, "operation", "gegl:color-to-alpha", "color", black,  NULL);

GeglNode *behind = gegl_node_new_child (gegl, "operation", "gegl:dst-over",   NULL);

GeglNode *normal = gegl_node_new_child (gegl, "operation", "gegl:over",   NULL);

GeglNode *color = gegl_node_new_child (gegl, "operation", "gegl:color",   NULL);

GeglNode *coloroverlay = gegl_node_new_child (gegl, "operation", "gegl:color-overlay",  NULL);

GeglNode *cloudy = gegl_node_new_child (gegl, "operation", "gegl:noise-solid",  "x-size", 2.0, "y-size", 2.0, "detail", 7,    NULL);

GeglNode *opacity = gegl_node_new_child (gegl, "operation", "gegl:opacity", "value", 0.15,   NULL);


Now lets define the property redirects

  gegl_operation_meta_redirect (operation, "color1", coloroverlay, "value");
  gegl_operation_meta_redirect (operation, "color2", color, "value");
  gegl_operation_meta_redirect (operation, "seed", cloudy, "seed");
  gegl_operation_meta_redirect (operation, "cloud_size", cloudy, "x-size");
  gegl_operation_meta_redirect (operation, "cloud_size", cloudy, "y-size");
  gegl_operation_meta_redirect (operation, "edge_amount", edge, "amount");


Now lets define the properties


property_double (edge_amount, _("Edge Amount"), 0.4)
    description (_("Edge amount"))
    value_range (0.0,  1.0)

property_color (color1, _("Foreground Color"), "#d3cb95")
    description (_("The color of the edge extracted content"))

property_color (color2, _("Background Color"), "#000000")
    description (_("The background color"))

property_double (cloud_size, _("Cloud Size"), 2.0)
    description (_("Cloud texture size"))
    value_range (1.0,  10.0)

property_seed (seed, _("Cloud Seed"), rand)


Now lets write the defined GEGL Graph

gegl_node_link_many (input, edge, c2a, coloroverlay, behind,  output,  NULL);
gegl_node_connect (behind, "aux", normal, "output");
gegl_node_link_many (color, normal,   NULL);
gegl_node_connect (normal, "aux", opacity, "output");
gegl_node_link_many (cloudy, opacity,   NULL);


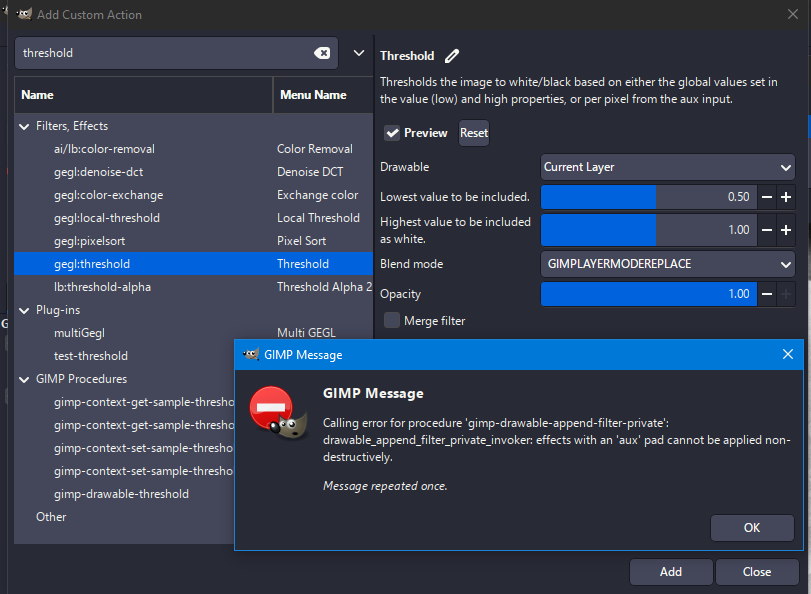
Before I explain, keep in mind blend modes in GEGL have unique abilities such as storing multiple filters or other blend modes inside them something GIMP cannot do. And this case does exactly that


What's going on?

The first three GEGL nodes gegl:edge-neon, gegl:color-to-alpha and gegl:color-overlay are being applied linearly but then a behind blend mode is introduced after gegl:color-overlay, Inside the behind blend mode is gegl:color, then a unique GEGL feature that GIMP does not have happens, a following node representing the normal blend mode is put inside the behind blend mode, a blend mode inside a blend mode, and keep in mind each blend mode can store infinite nodes.

The normal blend mode (gegl:over is put inside the behind blend mode (gegl:dst-over)

Put in the simplest way possible

input, BEHIND, output,
BEHIND aux connects to  NORMAL


In this filters case behind blend mode has a gegl:color and behind blend mode in it, but remember the normal blend mode can also have content in it to.

input, gegl:edge-neon, gegl:color-to-alpha, gegl:color-overlay, BEHIND, output,
BEHIND aux connects to NORMAL
Inside BEHIND is gegl:color, gegl:normal,

NORMAL aux connects to gegl:opacity
Inside NORMAL is gegl:noise-solid, gegl:opacity


And indeed it does have content, the normal blend mode has gegl:noise-solid inside it followed by a gegl:opacity to make it mostly transparent at 15% opacity.

So explained simply, we have an edge detect, color to alpha and color overlay applied linear, Then the behind blend mode instructs gegl:color to fill behind the edge extract while also housing a gegl normal blend mode for the solid noise and gegl opacity exist within normal so solid noise has an opacity slider.


Now lets wrap things up with the title and description

    "name",        "mynamehere:sketchify",
    "title",       _("Sketchify"),
    "reference-hash", "waterbottlerrandomwhateverdude",
    "description", _("Sketchify edge extraction   "
                     ""),
    "gimp:menu-path", "<Image>/Filters/Edge-Detect",
    "gimp:menu-label", _("Sketchify..."),
    NULL);
}

#endif


I'm telling you its worth time to learn GEGL syntax and make true GEGL plugins. 95% percent of what you need to make this a plugin is here, the only thing I didn't do is put it in the correct order and file name

1. first comes property list
2. then comes node definitions
3. then comes the defined graph
4. then comes property redirects
5. then comes title and description

1.5 is where you put the filename, c file name and other few things I excluded.

I wonder if someone will figure out how to convert this to a plugin. If they do it will have two color pickers, edge amount slider and a slider for and button for the solid noise


Top
 Post subject: Re: Multi Gegl
PostPosted: Mon Jul 07, 2025 4:37 am  (#7) 
Offline
GimpChat Member
User avatar

Joined: Oct 31, 2020
Posts: 2012
I completed the plugin renaming it "edge detect theories" to show off various types of edge detect artistic styles. I did not do this because of benevolence but because I myself had self interest in it and added new features. I credited Kamil Burda for parts of it they found, but keep in mind I made original modifications to the GEGL graph. Myself as someone who doesn't believe in IP means anyone is welcome to modify my plugin and make it better or worse if they want to tinker.

Once again partial credit goes to Kamil Burda for discovering a large part of the graph
(even though my 2022 edge extract does something similar)

Image

Image

Image

Image

Image


Attachment:
edgetheory_SourceCode.zip [5.28 KiB]
Downloaded 56 times


Attachment:
edgetheory_windows_binaries_gegl_plugin.zip [34.15 KiB]
Downloaded 76 times


Attachment:
edgetheory_linux_binaries_gegl_plugin.zip [8.6 KiB]
Downloaded 56 times


LOCATION TO PUT BINARY

Windows

C:\Users\(USERNAME)\AppData\Local\gegl-0.4\plug-ins

Linux

~/.local/share/gegl-0.4/plug-ins

Linux (Flatpak includes Chromebook)

~/.var/app/org.gimp.GIMP/data/gegl-0.4/plug-ins

--


Top
Post new topic Reply to topic  [ 7 posts ] 

All times are UTC - 5 hours [ DST ]


* Login  


Powered by phpBB3 © phpBB Group