This update adds two new options and also updates the script to remove a couple of bugs. The original guide is still relevant if you need more general information.
Original GuideDownload, unzip and install to your Gimp 2.10 user plug-ins folder.
Attachment:
 Custom_Font_Ghoster_v0_5.zip [5.69 KiB]
Downloaded 55 times
Custom_Font_Ghoster_v0_5.zip [5.69 KiB]
Downloaded 55 times
A pdf version of this text:
Attachment:
 CustomFont Ghoster05 Update.pdf [372.17 KiB]
Downloaded 60 times
CustomFont Ghoster05 Update.pdf [372.17 KiB]
Downloaded 60 times
The new default dialog:

The user can now limit or restrict the space used by Ghoster in which to add the ghosting effect. This can be useful where the custom font has a large amount of space below the character baseline (or at the top of the custom font).
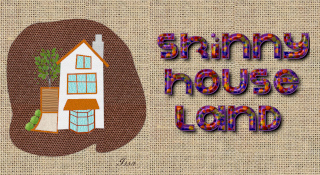
The image below shows the ghost effect added to a custom font with generous spacing above and below the character and with the default limit of 100 percent.

The dialog below shows the limit set to 50 percent (of the space available).

The results showing that the ghost characters now appear much closer to the original character:

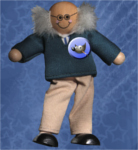
The other new option allows the user to apply the ghosting effect to just the current active layer. The idea behind this is to allow the user to apply ghosting to the contents of any layer.

This could be a character layer or any gimp layer such as the one below showing a two layer image which has the figure as the active layer and a blue background layer below it.

The following image shows the three direction options (from above, from below and from both directions).

You can repeat the filter to add multiple ghosting layers if you require.

Have even more fun with Gimp 2.10...