It is currently Fri Jun 12, 2026 11:25 am


All times are UTC - 5 hours [ DST ]


Post new topic Reply to topic  [ 7 posts ] 
Author Message
 Post subject: The perfect cut - antialiasing and true original edge discrimination.
PostPosted: Fri Jul 13, 2018 11:59 am  (#1) 
Offline
GimpChat Member

Joined: Apr 19, 2017
Posts: 14
GIMP Version: 2.8.14
Operating System: Mac OS
OS Version: Mac OS High Sierra, Version 10.13.6
GIMP Experience: Basic Level

List any relevant plug-ins or scripts:
Antialias, Intelligent Scissors, Paths, Levels.

List any ERROR messages you received:
Brain: huh?


Hello,

I have been trying to figure out how to make cuts that reflect the true edges of some drawings. So far I keep finding that the antialiasing is stifling my attempts to get a very accurate cut. I compare to my naked eye and don't see exactly the same outline at high magnification.

I potentially want to magnify the images from the few millimeters per line in the originals to several centimeters per line. (Eg, sides of buildings, etc). The other motive to wanting the absolute true outline in cutting sections of images is in regard to maintaining proof of copyright over digital manipulations (archiving based on my known and documented pixel fidelity originals in mash-up images(Yeah, I know this is not foolproof, but, hey, why not try?).

Some of the things I have tried:

1) Intelligent scissors
2) Paths tool (basic menu use)
3) Mucking around with curves (see below note #1,#2). This looks promising, but if it works, how would I restore the original texture within the cut shape?
3) Stack exchange (net response to antialiasing elimination). I find the selection doesn't match the outline of the object, and then color to alpha doesn't function.


Attachments:
File comment: Note#2
Shard voltage001 curves cut out.png
Shard voltage001 curves cut out.png [ 16 KiB | Viewed 6574 times ]
File comment: Note #1
Shard voltage001 cut out.png
Shard voltage001 cut out.png [ 126.55 KiB | Viewed 6574 times ]


Last edited by ordream on Fri Jul 13, 2018 6:02 pm, edited 1 time in total.
Share on Facebook Share on Twitter Share on Orkut Share on Digg Share on MySpace Share on Delicious Share on Technorati
Top
 Post subject: Re: The perfect cut - antialiasing and true original edge discriminati
PostPosted: Fri Jul 13, 2018 2:41 pm  (#2) 
Offline
Script Coder
User avatar

Joined: Oct 25, 2010
Posts: 4812
For #3: like everybody you assume you have to cut the image your worked on to create the selection. Then one day it strikes you:

* duplicate the layer,
* mercilessly process it to achieve the selection you need
* then go back to the initial layer and use the selection to cut it (the selection is on the image, not on a specific layer)

IMHO, no need to be too accurate to prove copyright. If you can show that what you have cut exactly overlaps a picture you have you should be good.

_________________
Image


Top
 Post subject: Re: The perfect cut - antialiasing and true original edge discriminati
PostPosted: Fri Jul 13, 2018 4:17 pm  (#3) 
Offline
GimpChat Member
User avatar

Joined: May 10, 2013
Posts: 1430
Location: FInland
Yeah with that image You could finish at least that image with selection tools alone I believe.
But I wrote a weird mini tut using only levels and brush, so why not post it.
I think the planets are in mystical position, and it's also Friday the 13th!

You can keep and restore original texture by using layer mask.
To have smooth edge, image must be either in RGB or greyscale mode.
Your cutout is 1-bit, that's why you can't use color to alpha.
Image: mode RGB or grayscale revives the possibility, but I see it isn't very good.
Using Colors: Threshold, the default setting gives better result.

No detailed pics because I'm slacking in Summer vacation.
And the planets are still in mystical position hahaha.

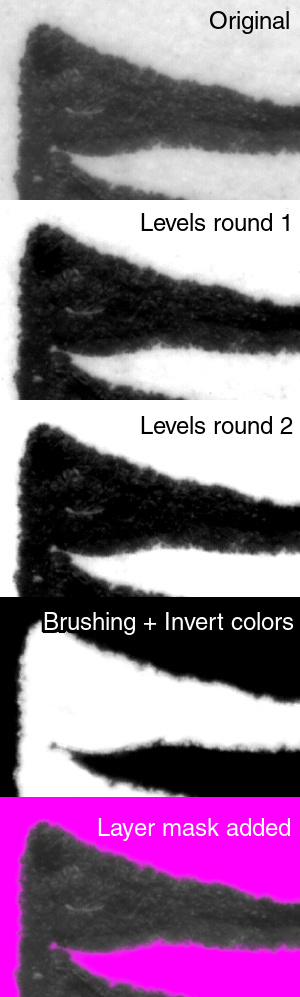
1. Duplicate layer, original will remain unedited.
2. Colors: levels. Use the input levels black pipette and click the darkest pixel in the image. Should switch to about 40-45
3. Use the white pipette (zoom in) and click the lightest spot. I got it around 200.
4. I repeated same thing again, but you need to be careful.
You should end up with pretty good contrast, keeping the edge accurate.

Then a procedure I did lot in past with .tga format....
You don't see it used much anymore.

5. Choose black round brush (the one that has 050 hardness, size 15-20) to color over the grey areas.
6. Invert colors. You may use white brush doing the same thing.
I find it easier this way, to ensure not brushing too close edges.

7. Select all, copy.
8. Switch to your original layer, right-click, add layer mask (white full opacity)
9. Activate the layer mask of the original by clicking it, hit ctrl+v. The modified layer turns into floating selection.
Right click it, anchor layer. Hide other layers.
Export to .png if you need transparent .png.
To restore original background, right-click layer mask and tick "disable layer mask"
And same again to enable it. Do not delete layer mask!

Used magenta bg so you can see the final result easier.
So that's it for this image. The approach could be entirely different with another, more complicated image.

Image

PS. Perfect cut is a myth.


Top
 Post subject: Re: The perfect cut - antialiasing and true original edge discriminati
PostPosted: Fri Jul 13, 2018 5:48 pm  (#4) 
Offline
GimpChat Member

Joined: Apr 19, 2017
Posts: 14
To both replies THANKS!!!! :clap

Ofnuts:

I think, as I understand it, I started to have a vague thought about doing that, but just lacked a bit of confidence, and exact clarity about it all.

Nidhogg:

:) WOW! I am a skeptic so planetary alignment, Friday 13, and Gimp responses are, probabilistically speaking, surely a correlation. That being said, it is a most propitious set of events.

I will spend some time recovering from my Friday the 13th dark celebrations of propitious correlations, and then very concretely trying to inch ever closer to that perfect cut.........

YAY! :gimp the chat


Top
 Post subject: Re: The perfect cut - antialiasing and true original edge discriminati
PostPosted: Sat Jul 14, 2018 2:20 pm  (#5) 
Offline
GimpChat Member

Joined: Apr 19, 2017
Posts: 14
Hi Ofnuts:

I am little confused about this bit:

`then go back to the initial layer and use the selection to cut it (the selection is on the image, not on a specific layer)´

What I am seeing is that anything I do to the copy is also evident in the original layer. I have checked that I don't have the layers locked.

Cheers,

Luke


Top
 Post subject: Re: The perfect cut - antialiasing and true original edge discriminati
PostPosted: Sun Jul 15, 2018 7:18 am  (#6) 
Offline
Script Coder
User avatar

Joined: Oct 25, 2010
Posts: 4812
ordream wrote:
Hi Ofnuts:

I am little confused about this bit:

`then go back to the initial layer and use the selection to cut it (the selection is on the image, not on a specific layer)´

What I am seeing is that anything I do to the copy is also evident in the original layer. I have checked that I don't have the layers locked.

Cheers,

Luke


How did you do the copy?

_________________
Image


Top
 Post subject: Re: The perfect cut - antialiasing and true original edge discriminati
PostPosted: Mon Jul 16, 2018 12:04 pm  (#7) 
Offline
GimpChat Member

Joined: Apr 19, 2017
Posts: 14
Hi,

No idea what I did to the layers before. Now they are independent. I probably just pressed something without realizing.

Luke


Top
Post new topic Reply to topic  [ 7 posts ] 

All times are UTC - 5 hours [ DST ]


* Login  


Powered by phpBB3 © phpBB Group