It is currently Wed Jun 03, 2026 5:11 pm


All times are UTC - 5 hours [ DST ]


Post new topic Reply to topic  [ 19 posts ] 
Author Message
 Post subject: enhance this cat with Peter's tutorial
PostPosted: Sun Feb 24, 2019 4:47 am  (#1) 
Offline
GimpChat Member

Joined: Apr 09, 2018
Posts: 1888
Location: France
GIMP Version: 2.8.9
Operating System: Windows
GIMP Experience: New User


:wvy
following the post here:
viewtopic.php?p=236553#p236553
I propose to play with this cat using the tutorial of Peter, because I had an unsolved problem with his back .. :) . and I will be able to increase my knowledge.
This is a photo offered by the site:https://pixabay.com/fr/
Image

_________________
Les parfums, les couleurs et les sons se répondent.Baudelaire (Les fleurs du mal)
2.10.36/(Samj) Gimp 2.10.38 OS Windows 10 Home 64 bits


Share on Facebook Share on Twitter Share on Orkut Share on Digg Share on MySpace Share on Delicious Share on Technorati
Top
 Post subject: Re: enhance this cat with Peter's tutorial
PostPosted: Sun Feb 24, 2019 5:01 am  (#2) 
Offline
GimpChat Member
User avatar

Joined: Jan 20, 2013
Posts: 14831
Location: roma, italy
Not me, personally; I'm a "filter man", not much a tutorial follower.
I hope that Ella takes this challenge; in this case you will surely get an outstanding result.

_________________
"Where am I ?"


Top
 Post subject: Re: enhance this cat with Peter's tutorial
PostPosted: Sun Feb 24, 2019 5:07 am  (#3) 
Offline
GimpChat Member

Joined: Apr 09, 2018
Posts: 1888
Location: France
You are too modest Dinasset, too bad.
The part of the cat that annoyed me is the one in red.
Image

_________________
Les parfums, les couleurs et les sons se répondent.Baudelaire (Les fleurs du mal)
2.10.36/(Samj) Gimp 2.10.38 OS Windows 10 Home 64 bits


Top
 Post subject: Re: enhance this cat with Peter's tutorial
PostPosted: Sun Feb 24, 2019 5:33 am  (#4) 
Offline
GimpChat Member
User avatar

Joined: Jan 20, 2013
Posts: 14831
Location: roma, italy
Problems are in the overall contour, look at the area inside the red lines: hair is not clearly distinct from the background, as it should.
Attachment:
6068_chat_Peter.png
6068_chat_Peter.png [ 1.63 MiB | Viewed 6745 times ]

_________________
"Where am I ?"


Top
 Post subject: Re: enhance this cat with Peter's tutorial
PostPosted: Sun Feb 24, 2019 5:49 am  (#5) 
Offline
GimpChat Member
User avatar

Joined: Jan 20, 2013
Posts: 14831
Location: roma, italy
Please, have a look again at this outcome by Ella.
Attachment:
Kittens.JPG
Kittens.JPG [ 613.02 KiB | Viewed 6742 times ]


As you see, hair is always NOT blurred into the background, but clearly separated (and that subject is even more difficult).
Likely the tutorial does not solve this problem, and there is a need for a post-process step.

_________________
"Where am I ?"


Top
 Post subject: Re: enhance this cat with Peter's tutorial
PostPosted: Sun Feb 24, 2019 6:57 am  (#6) 
Offline
GimpChat Member

Joined: Apr 09, 2018
Posts: 1888
Location: France
Dinasset, I used the filters: levels, and curves as well as G'Mic filters but failed to improve.
Finally, maybe I should not have opened this topic, because some might think it's a competition. Or it's not my intention, I'm just trying to learn ... I'm asking Wallace to remove?

edit:
I think it's better for me to give up on this cat and to study other things (like paths and canals).

_________________
Les parfums, les couleurs et les sons se répondent.Baudelaire (Les fleurs du mal)
2.10.36/(Samj) Gimp 2.10.38 OS Windows 10 Home 64 bits


Top
 Post subject: Re: enhance this cat with Peter's tutorial
PostPosted: Sun Feb 24, 2019 7:00 am  (#7) 
Offline
GimpChat Member
User avatar

Joined: Jan 20, 2013
Posts: 14831
Location: roma, italy
Why? It's not a competition, it's a challenge.
If someone can indicate which steps have to be applied to improve the outcome, you and all other perople here interested can only learn.

_________________
"Where am I ?"


Top
 Post subject: Re: enhance this cat with Peter's tutorial
PostPosted: Sun Feb 24, 2019 7:06 am  (#8) 
Offline
GimpChat Member
User avatar

Joined: Jan 20, 2013
Posts: 14831
Location: roma, italy
PS: hope you do not consider my refuse to partecipate to this challenge as a lack of help, it's only that this is not my area of competence, hope someone more competent can provide help.
That's the goal of each challenge.

_________________
"Where am I ?"


Top
 Post subject: Re: enhance this cat with Peter's tutorial
PostPosted: Sun Feb 24, 2019 7:19 am  (#9) 
Offline
GimpChat Member
User avatar

Joined: May 17, 2014
Posts: 1552
level_0 wrote:
Dinasset, I used the filters: levels, and curves as well as G'Mic filters but failed to improve.
Finally, maybe I should not have opened this topic, because some might think it's a competition. Or it's not my intention, I'm just trying to learn ... I'm asking Wallace to remove?

edit:
I think it's better for me to give up on this cat and to study other things (like paths and canals).


level_0, don't apologize for opening this topic. And certainly don't give up practicing.
At the moment I don't have enough time to look at the cat picture. I'll do it later.

But every photo has another result and not every picture is suitable to create a nice outcome.

Here I think the problem is the cat and the background haven't much contrast.
I think Peter mentioned he sometimes replaces the background ...

_________________
Ella's gallery - YouTube


Top
 Post subject: Re: enhance this cat with Peter's tutorial
PostPosted: Sun Feb 24, 2019 7:35 am  (#10) 
Offline
GimpChat Member
User avatar

Joined: Feb 07, 2019
Posts: 70
level_0 wrote:
I think it's better for me to give up on this cat and to study other things (like paths and canals).

No, don't give up, I think this cat is well worth the effort.

What exactly did you do on your pic? Did you just do the tutorial like in the film?

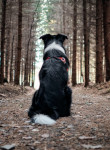
For my dog, try 2, I used an approach via the intelligent select tool. Maybe this helps you, too?

After step 6 (the sharpening), right before dream smooth, I
- Duplicated the layer step 2-6. One for the background, one for the dog.
- Used scissors select (the intelligent select tool) to select the dog, pretty far out to get the hairs (lower layer).
- Feathered selection by about 20 (pic was 1600 x about 1600)
- Applied dream smooth on dog
- Went to background, selection still in work
- Inverted selection
- Grew it (I think - selection line was closer to the dog, background was selected) by about 15 or so
- Applied dream smooth with different adjustments for background
- Inverted selection
- Deleted dog on that layer
- Merged down one

Further on like in the video; only doing without the white canvas.

Hopefully I didn't mess up with what was above and down and growing and shrinking :oops: Maybe I'll take a try on the cat later on.

PS: I am happy that you opened this thread. From all the nice and perfect pictures posted I can't learn to much. But here I can learn a real lot, finding out what went wrong and improve the painting.

_________________
cu
Monika M.


Top
 Post subject: Re: enhance this cat with Peter's tutorial
PostPosted: Sun Feb 24, 2019 8:15 am  (#11) 
Offline
Script Coder
User avatar

Joined: Oct 25, 2010
Posts: 4812
Furry animals are always good candidates for the "freaky details" processing:

Attachment:
cat-FD.jpg
cat-FD.jpg [ 280.75 KiB | Viewed 3603 times ]

_________________
Image


Top
 Post subject: Re: enhance this cat with Peter's tutorial
PostPosted: Sun Feb 24, 2019 9:03 am  (#12) 
Offline
GimpChat Member
User avatar

Joined: Feb 07, 2019
Posts: 70
ofnuts wrote:
Furry animals are always good candidates for the "freaky details" processing:
There is freaky details in the tutorial :thinking:
I don't remember quite what exactly I did; I worked with two layers for dream smooth with different adjustments but I dream smoothed the whole layers, not a selection, and selected and cut after that; I also worked with layer mask on the background over the copy of the original to get it darker around the whiskers.

Attachment:
cat_monikas_attempt.jpg
cat_monikas_attempt.jpg [ 113.05 KiB | Viewed 3599 times ]

_________________
cu
Monika M.


Top
 Post subject: Re: enhance this cat with Peter's tutorial
PostPosted: Sun Feb 24, 2019 9:08 am  (#13) 
Offline
GimpChat Member
User avatar

Joined: May 17, 2014
Posts: 1552
level_0 and dinasset, I think you can't avoid blurring the fur when using dream smooth. Because the background of the cat picture already is blurred just around the fur. Here's my try, also blurred. With the canvas texture applied it shows less.

Attachment:
Cat_dreamSmooth.jpg
Cat_dreamSmooth.jpg [ 296.34 KiB | Viewed 3597 times ]


Attachment:
Cat_dreamSmooth.CanvasTexture.jpg
Cat_dreamSmooth.CanvasTexture.jpg [ 600.83 KiB | Viewed 3597 times ]

_________________
Ella's gallery - YouTube


Top
 Post subject: Re: enhance this cat with Peter's tutorial
PostPosted: Sun Feb 24, 2019 10:17 am  (#14) 
Offline
GimpChat Member
User avatar

Joined: Jan 20, 2013
Posts: 14831
Location: roma, italy
Thanks for trying, Ella.
So, the source image was somehow "destroyed" by the author.
Did you try starting with the "freaky details" first (i.e. using as "source" the outcome of Ofnuts)?

_________________
"Where am I ?"


Top
 Post subject: Re: enhance this cat with Peter's tutorial
PostPosted: Sun Feb 24, 2019 1:34 pm  (#15) 
Offline
GimpChat Member
User avatar

Joined: May 17, 2014
Posts: 1552
dinasset wrote:
Did you try starting with the "freaky details" first (i.e. using as "source" the outcome of Ofnuts)?


@ Diego, When I downloaded the cat photo Ofnuts hadn't post his outcome yet.
Now I've tried with it. And still a little hazy appearance on the fur.


Attachments:
cat-FD.jpg
cat-FD.jpg [ 305.8 KiB | Viewed 3581 times ]

_________________
Ella's gallery - YouTube
Top
 Post subject: Re: enhance this cat with Peter's tutorial
PostPosted: Sun Feb 24, 2019 1:45 pm  (#16) 
Offline
GimpChat Member
User avatar

Joined: Jan 20, 2013
Posts: 14831
Location: roma, italy
I see, no chance, the "defect" should in the combination between the image and G'mic.

_________________
"Where am I ?"


Top
 Post subject: Re: enhance this cat with Peter's tutorial
PostPosted: Sun Feb 24, 2019 4:49 pm  (#17) 
Offline
GimpChat Member
User avatar

Joined: Jul 06, 2013
Posts: 2661
Location: California
I use filters and follow tutorials. I might find a photo of an animal and just play with it in gimp to see what I come up with.


Top
 Post subject: Re: enhance this cat with Peter's tutorial
PostPosted: Sun Feb 24, 2019 5:55 pm  (#18) 
Offline
GimpChat Member

Joined: May 12, 2015
Posts: 4693
Never, ever stop asking questions to learn! That is why we are here. We share our art, talent,and knowledge to others as those before us taught us. I love this forum for that main reason.

Many good suggestions to help you have been made and will probably come in handy many times.

I use this method when Gimp's or GMIC's foreground extraction plug-ins fail us. Very easily explained, no additional scripts beyond Gimp are needed. I hope you will find this helpful.

https://www.youtube.com/watch?v=t-eWfoYNvJE


Top
 Post subject: Re: enhance this cat with Peter's tutorial
PostPosted: Mon Feb 25, 2019 8:27 am  (#19) 
Offline
GimpChat Member

Joined: Apr 09, 2018
Posts: 1888
Location: France
:wvy
Thank you all for having reviewed this problem chat in detail and now I will look at your suggestions carefully. :)

_________________
Les parfums, les couleurs et les sons se répondent.Baudelaire (Les fleurs du mal)
2.10.36/(Samj) Gimp 2.10.38 OS Windows 10 Home 64 bits


Top
Post new topic Reply to topic  [ 19 posts ] 

All times are UTC - 5 hours [ DST ]


* Login  


Powered by phpBB3 © phpBB Group