It is currently Wed Jun 17, 2026 5:20 am


All times are UTC - 5 hours [ DST ]


Post new topic Reply to topic  [ 22 posts ]  Go to page 1, 2  Next
Author Message
 Post subject: Object placement
PostPosted: Tue May 18, 2010 1:33 am  (#1) 
Offline
GimpChat Member
User avatar

Joined: Apr 30, 2010
Posts: 1937
Location: Missouri
I was wondering if gimp allows a method to evenly place objects around, for example a circle. If I wanted 8 objects on a circle they would need to be spaced every 45 degrees apart. I've attached an example, hopefully it will make more sense than me. I ended up going to my old faithful CAD program and making a template to use as a gauge. It just seems to me that as good as Gimp is, that it should allow a way to do this.

_________________
Image
The last time I kept an open mind,
my brain fell out and the dog grabbed it.
Now it's full of dirt, toothmarks, and dog slobber.
No more open minds or dogs for me.


Share on Facebook Share on Twitter Share on Orkut Share on Digg Share on MySpace Share on Delicious Share on Technorati
Top
 Post subject: Re: Object placement
PostPosted: Tue May 18, 2010 9:09 am  (#2) 
Offline
Retired Staff
User avatar

Joined: May 22, 2008
Posts: 6946
Location: Somewhere in GIMP
I know this sounds a bit odd, but I like your template and I saved it. I'm pondering what you have written. I like stuff like this.

Somehow, I think there may be a way to do it in GAP. Not as animation but as placement. I'm going to play around a bit there.

_________________
Image
World War IV will be fought with sticks and stones. - Albert Einstein


Top
 Post subject: Re: Object placement
PostPosted: Tue May 18, 2010 9:18 am  (#3) 
Offline
Script Coder
User avatar

Joined: Apr 13, 2010
Posts: 244
As O indicated, GAP would be ideal for this. I don't have time to experiment with it, but right of the top of my head, I think you could create a circular path and then use GAP to place the objects along that path.

_________________
I'd rate you as an upper-middle-lower-mod with pro-novice-inter tendencies.....and a twist of lime! Of course, my rating scale is completely objectively subjective, but ALWAYS consistently inconsistent.


Top
 Post subject: Re: Object placement
PostPosted: Tue May 18, 2010 9:29 am  (#4) 
Offline
Retired Staff
User avatar

Joined: May 22, 2008
Posts: 6946
Location: Somewhere in GIMP
Thinking about x, y coordinates, also you may have to autocrop each layer to get the exact dimensions of each object by checking the Layer boundary size and finding the center of each one. If anyone can automate that, fencepost can.

Wondering about that circular path and placing points on the path at precise intervals ... 8 equally spaced points for the 45-degree one. Once that has been built, should be a piece of cake in GAP. Grid? Path would be a polygon but that would be ok.

Each object would need to be centered on a layer sized so that it would accommodate the largest of the objects, then an image 8 times the width and the height of the layer size. Once that image was made with the objects in it, GAP could be brought into play.

_________________
Image
World War IV will be fought with sticks and stones. - Albert Einstein


Top
 Post subject: Re: Object placement
PostPosted: Tue May 18, 2010 1:44 pm  (#5) 
Offline
GimpChat Member
User avatar

Joined: Apr 30, 2010
Posts: 1937
Location: Missouri
I used that angles template for CAD work since I'm too lazy to remember the numbers. I never dreamed it would be of any use to anyone but I'm glad you found it useful. from that template I came up with the guide attached and used that for object placement.

_________________
Image
The last time I kept an open mind,
my brain fell out and the dog grabbed it.
Now it's full of dirt, toothmarks, and dog slobber.
No more open minds or dogs for me.


Top
 Post subject: Re: Object placement
PostPosted: Tue May 18, 2010 1:47 pm  (#6) 
Offline
Retired Staff
User avatar

Joined: May 22, 2008
Posts: 6946
Location: Somewhere in GIMP
Grabbed that one, too. I'm thinking an octagon would be a good shape for path points to place objects in GAP. Giving me ideas there GMS.

_________________
Image
World War IV will be fought with sticks and stones. - Albert Einstein


Top
 Post subject: Re: Object placement
PostPosted: Tue May 18, 2010 2:20 pm  (#7) 
Offline
Retired Staff
User avatar

Joined: May 22, 2008
Posts: 6946
Location: Somewhere in GIMP
Well using Script-Fu > Draw > Polygon and specifying 8 sides got me an octagon. I tried selecting outside the octagon, inverting and copying it to a path.

Unfortunately, there are more nodes on the path than I want. I can delete the extra nodes but it would be nice if I could tell something that I just wanted path nodes at the angle apices. Does anyone know how I could do that?

Image

_________________
Image
World War IV will be fought with sticks and stones. - Albert Einstein


Top
 Post subject: Re: Object placement
PostPosted: Tue May 18, 2010 2:28 pm  (#8) 
Offline
Script Coder
User avatar

Joined: Apr 13, 2010
Posts: 244
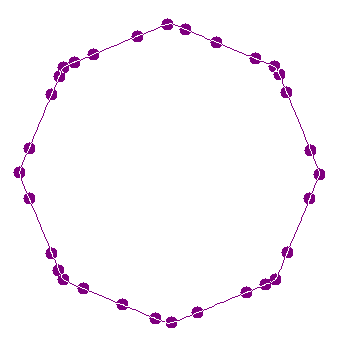
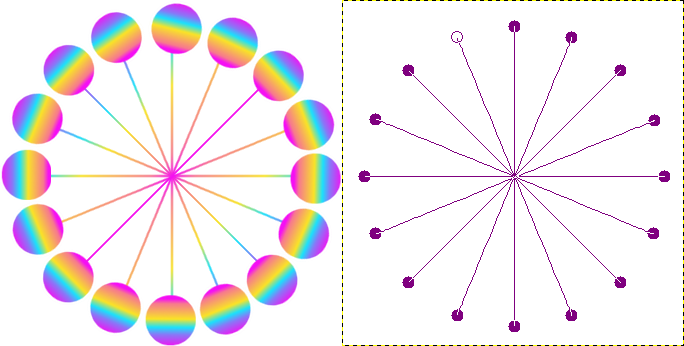
Try this script from LIMN. Don't remember where I got it, but it appears to do what you want. It's found under Shapes > Polygon... Couldn't find the "Insert Code" feature so make sure you copy and paste all of the information below.


;Draw a polygon with the desired radius and sides (lines)
;Has some filling and stroking options
;For the latest version, email me at <[email protected]>


(define (script-fu-polygon img segs radius visible stroke brush gradient-length gradient fill type gradient2)

(let* (

(temp 0)

(points (cons-array (* segs 6) 'double))
(pure_points (cons-array (+ (* segs 2) 2) 'double))

(count 0)

(angle (/ 360 segs))

(pointx 0)

(pointy 0)

(vectors (car(gimp-vectors-new img (string-append (number->string segs) " Sided Polygon"))))

(centerx (/ (car(gimp-image-width img)) 2))
(centery (/ (car(gimp-image-height img)) 2))

(layer 0)

)

(gimp-context-push)

;undo group
(gimp-image-undo-group-start img)

(gimp-selection-none img)

(gimp-image-add-vectors img vectors -1)

;(print (pointx pointy))

(while (< count segs)
(begin

(set! pointx (* radius (sin (/ (* angle count *pi*) 180))))
(set! pointy (* radius (cos (/ (* angle count *pi*) 180))))

;(print (pointx pointy))

(aset points (* 6 count) pointx)
(aset points (+ (* 6 count) 1) pointy)
(aset points (+ (* 6 count) 2) pointx)
(aset points (+ (* 6 count) 3) pointy)
(aset points (+ (* 6 count) 4) pointx)
(aset points (+ (* 6 count) 5) pointy)

(aset pure_points (* 2 count) (+ centerx pointx))
(aset pure_points (+ 1 (* 2 count)) (- centery pointy))

(set! count (+ 1 count))

;(print (pointx pointy))

))

(aset pure_points (* 2 segs) (aref pure_points 0))
(aset pure_points (+ 1 (* 2 count)) (aref pure_points 1))


(set! temp (car(gimp-vectors-stroke-new-from-points vectors 0 (* 6 segs) points TRUE)))
(gimp-vectors-stroke-translate vectors temp centerx centery)
(gimp-vectors-stroke-flip vectors temp 1 centery) ;Flip vertically since it looks upside-down when using an ood number of segments

(gimp-vectors-set-visible vectors visible)

(if (or (= stroke 1) (= fill 1))
(begin

(set! temp (car(gimp-layer-new img (* centerx 2) (* centery 2) 1 (string-append (number->string segs) " Sided Polygon") 100 0)))
(gimp-image-add-layer img temp -1)
(gimp-edit-clear temp)

))

(if (= fill 1)
(begin

(gimp-vectors-to-selection vectors 2 TRUE FALSE 0 0)

(if (= 0 type)
(gimp-edit-bucket-fill temp 1 0 100 255 FALSE centerx centery) )

(if (not (= 0 type))
(begin
(gimp-context-set-gradient gradient2)
(gimp-edit-blend temp 3 0 (+ type 5) 100 0 FALSE FALSE FALSE 0 0 FALSE 0 0 1 1) ))
(gimp-selection-none img)
))

(if (= stroke 1)
(begin

(gimp-context-set-brush (car brush))
(gimp-brush-set-spacing (car brush) (caddr brush))

(gimp-context-set-gradient gradient)
(gimp-paintbrush temp FALSE (+ 2 (* segs 2)) pure_points 0 gradient-length)
;(gimp-edit-stroke-vectors (car(gimp-image-get-active-drawable img)) vectors)


))

;end of undo group
(gimp-image-undo-group-end img)

(gimp-context-pop)

;Refresh View
(gimp-displays-flush)

))

(script-fu-register
"script-fu-polygon"
"<Image>/Shapes/Polygon..."
"Draw a new polygon path"
"LightningIsMyName (LIMN)"
"March 2008"
""
SF-IMAGE "Image" 0
SF-ADJUSTMENT "Sides" '(5 3 1000 1 10 0 1)
SF-ADJUSTMENT "Radius (Size)" '(200 0.1 10000 1 10 0 1)
SF-TOGGLE "Make the new path Visible" TRUE
SF-TOGGLE "Stroke the shape (path)" FALSE
SF-BRUSH "Brush for stroking" '("Circle (03)" 100 1 0)
SF-VALUE "Gradient length for stroking (0=Use ForeGround Color instead)" "0"
SF-GRADIENT "Gradient for stroking" "FG to BG (RGB)"
SF-TOGGLE "Fill the shape (path)" FALSE
SF-OPTION "Fill Method" '("BackGround Color" "Shaped (angular) Gradient" "Shaped (spherical) Gradient" "Shaped (dimpled) Gradient")
SF-GRADIENT "Gradient for Filling" "FG to BG (RGB)"

)

_________________
I'd rate you as an upper-middle-lower-mod with pro-novice-inter tendencies.....and a twist of lime! Of course, my rating scale is completely objectively subjective, but ALWAYS consistently inconsistent.


Top
 Post subject: Re: Object placement
PostPosted: Tue May 18, 2010 3:18 pm  (#9) 
Offline
Retired Staff
User avatar

Joined: May 22, 2008
Posts: 6946
Location: Somewhere in GIMP
Thank you fencepost. I'll give that script a try.

Meanwhile, I made an octagon, zoomed in and placed path nodes on the angle apices and closed the path with Ctrl + Click on the first node. The hearts in the image is a brush I had made from icons. I made 8 layers that were 50x50, put a heart on each layer, centered each one and used that for my stack.

Made a 500x500 image, and made that my gap_000001.xcf file. Duplicated it 7 times so I'd have 8 layers. Used the heart layers in Move Path. Frames to Image and then merged all the resulting frames. Got this.

Now, to that script. :scram

Image

_________________
Image
World War IV will be fought with sticks and stones. - Albert Einstein


Top
 Post subject: Re: Object placement
PostPosted: Tue May 18, 2010 3:35 pm  (#10) 
Offline
Script Coder
User avatar

Joined: Apr 13, 2010
Posts: 244
Nice work! Are you giving me your heart? I feel the love...I really do! :rofl

_________________
I'd rate you as an upper-middle-lower-mod with pro-novice-inter tendencies.....and a twist of lime! Of course, my rating scale is completely objectively subjective, but ALWAYS consistently inconsistent.


Top
 Post subject: Re: Object placement
PostPosted: Tue May 18, 2010 3:40 pm  (#11) 
Offline
Retired Staff
User avatar

Joined: May 22, 2008
Posts: 6946
Location: Somewhere in GIMP
fencepost wrote:
Nice work! Are you giving me your heart? I feel the love...I really do! :rofl

After running that script, it is all yours, Art.

That script created a perfect path for an Octagon. :wh
Going to try some other angles.

_________________
Image
World War IV will be fought with sticks and stones. - Albert Einstein


Top
 Post subject: Re: Object placement
PostPosted: Tue May 18, 2010 4:44 pm  (#12) 
Offline
Retired Staff
User avatar

Joined: May 22, 2008
Posts: 6946
Location: Somewhere in GIMP
Not having good luck here. I made a 12-sided polygon with the script and it is perfect. I can't get my 12 layers of different images to show, a different one at each point.
Here is the To Path dialog. I have chosen the bottom layer of the source image as I did with the hearts. I can't see anything that I missed in there. Have redone it about 5 times and closed gimp between some of those times to make sure it wasn't holding onto something. I can't figure out what is different from doing the octagon except that I manually placed the points.

Image

Image

I tried manually putting in the 12 points using the other polygon script (Script-Fu > Draw > Polygon) and that still didn't work.

Attaching my 12-layered xmas pix file in case someone else wants to try it and not have to track down 12 pictures.


Attachments:
xmas.xcf [53.59 KiB]
Downloaded 146 times

_________________
Image
World War IV will be fought with sticks and stones. - Albert Einstein
Top
 Post subject: Re: Object placement
PostPosted: Tue May 18, 2010 5:57 pm  (#13) 
Offline
Script Coder
User avatar

Joined: Apr 23, 2010
Posts: 1553
Location: not from Guildford after all
Oregonian wrote:
Made a 500x500 image, and made that my gap_000001.xcf file. Duplicated it 7 times so I'd have 8 layers. Used the heart layers in Move Path. Frames to Image and then merged all the resulting frames.


Another option would be to activate "trace layers" in Move Path's Advanced Settings tab. Make both trace opacities 100% and then do everything else the same as you did before.

After the Move Path has completed, go to the last frame and delete the layer above the one named "tracelayer". The last frame will contain all of your objects and there is no need to convert your frames to an image. This approach might be particularly useful for a large image with many frames as it requires far less memory.

_________________
Any sufficiently primitive technology is indistinguishable from a rock.


Top
 Post subject: Re: Object placement
PostPosted: Tue May 18, 2010 6:11 pm  (#14) 
Offline
Retired Staff
User avatar

Joined: May 22, 2008
Posts: 6946
Location: Somewhere in GIMP
OK, that works except that I'm not getting all of the images from the source image. It is an xcf file in layers with 12 layers and each layer is a different image.

I only get the bottom layer which is the one I start out with (#1). What am I missing that I'm not getting all of the layers from the source image to be in the final picture?

It worked for the octagon ... each picture was different.

_________________
Image
World War IV will be fought with sticks and stones. - Albert Einstein


Top
 Post subject: Re: Object placement
PostPosted: Tue May 18, 2010 6:24 pm  (#15) 
Offline
Script Coder
User avatar

Joined: Apr 23, 2010
Posts: 1553
Location: not from Guildford after all
Oregonian wrote:
I only get the bottom layer which is the one I start out with (#1). What am I missing that I'm not getting all of the layers from the source image to be in the final picture?

You appear to be using a Stepmode of "None"; instead you should use a Stepmode of "Loop".

Attachment:
File comment: Final frame screenshot
SSxmas.png
SSxmas.png [ 14.5 KiB | Viewed 3737 times ]

_________________
Any sufficiently primitive technology is indistinguishable from a rock.


Top
 Post subject: Re: Object placement
PostPosted: Tue May 18, 2010 6:33 pm  (#16) 
Offline
Retired Staff
User avatar

Joined: May 22, 2008
Posts: 6946
Location: Somewhere in GIMP
Ah! I must have accidentally left Loop the choice on the hearts one.

You have rescued me from running down the street crazily screaming. Thank you saulgoode!

Thank you for the tip about trace layers also.

Image

Gms9810, it looks like it's possible to do in GIMP what you asked about.

Thanks to fencepost and saulgoode.

Attaching the filter fencepost put up there. Right-click the attachment and save. Unzip into /.gimp-2.6/scripts folder. Find it in Script-Fu > Shape Paths > Polygon.


Attachments:
script-fu-polygon.scm.zip [1.45 KiB]
Downloaded 200 times

_________________
Image
World War IV will be fought with sticks and stones. - Albert Einstein
Top
 Post subject: Re: Object placement
PostPosted: Wed May 19, 2010 12:06 am  (#17) 
Offline
Retired Staff
User avatar

Joined: May 22, 2008
Posts: 6946
Location: Somewhere in GIMP
You can have "spokes" going to the objects. These spokes were done by Shift + Click to the lines of the path between the nodes, then joining the nodes the other way. The spokes can be shorter too. Make a polygon with the same amount of sides but with a smaller radius. Do the spokes the same way.

Stroke the spokes with the paintbrush, then lock the transparency and color how you want.

The objects were made to turn with the path by selecting Rotate Follow after grabbing the path.

Image

_________________
Image
World War IV will be fought with sticks and stones. - Albert Einstein


Top
 Post subject: Re: Object placement
PostPosted: Wed May 19, 2010 1:43 pm  (#18) 
Offline
GimpChat Member
User avatar

Joined: Apr 08, 2010
Posts: 5420
Location: Northwest Ohio
I don't have apng as yet, so does this stuff animate? Oooh, a juggler graphic would be cute!


Top
 Post subject: Re: Object placement
PostPosted: Wed May 19, 2010 2:29 pm  (#19) 
Offline
GimpChat Member
User avatar

Joined: Apr 30, 2010
Posts: 1937
Location: Missouri
I tried the script, I wasn't sure what to do with it so I copied it and saved it as test.scm and put it in my scripts folder. It gave me an error message but worked fine. That would have saved me a lot of work earlier. I re saved it as polygons.scm and put it on all 4 of my computers. Thanks.

_________________
Image
The last time I kept an open mind,
my brain fell out and the dog grabbed it.
Now it's full of dirt, toothmarks, and dog slobber.
No more open minds or dogs for me.


Top
 Post subject: Re: Object placement
PostPosted: Wed May 19, 2010 3:33 pm  (#20) 
Offline
Retired Staff
User avatar

Joined: May 22, 2008
Posts: 6946
Location: Somewhere in GIMP
2-ton wrote:
I don't have apng as yet, so does this stuff animate? Oooh, a juggler graphic would be cute!

Don't have to have apng to animate it. But since I do ...
Image

_________________
Image
World War IV will be fought with sticks and stones. - Albert Einstein


Top
Post new topic Reply to topic  [ 22 posts ]  Go to page 1, 2  Next

All times are UTC - 5 hours [ DST ]


* Login  


Powered by phpBB3 © phpBB Group