It is currently Mon Oct 12, 2026 6:56 am


All times are UTC - 5 hours [ DST ]


Post new topic Reply to topic  [ 11 posts ] 
Author Message
 Post subject: Maintain Sharpness When Correcting Colors
PostPosted: Mon Nov 08, 2010 6:34 pm  (#1) 
Offline
GimpChat Member

Joined: Nov 08, 2010
Posts: 5
Hello Everyone,

I have a photograph that has a large portion of the grass "yellowed" due to "lens flare". The area should be mostly green with sunset highlights. What are the basic steps to correct this area in my photo? I want to keep the sharp details of the blades of grass but the "healing" and "cloning" feature in GIMP causes a lot of loss of detail by blurring the image in that area. Can anyone tell me how to solve something like this?

Sincerely,

The Meltdownman


Share on Facebook Share on Twitter Share on Orkut Share on Digg Share on MySpace Share on Delicious Share on Technorati
Top
 Post subject: Re: Maintain Sharpness When Correcting Colors
PostPosted: Mon Nov 08, 2010 6:45 pm  (#2) 
Offline
GimpChat Member
User avatar

Joined: Oct 06, 2010
Posts: 4050
This sounds like something a script by Elsamuko could possibly help you with:

http://registry.gimp.org/node/24265

There are several "manual" ways to accomplish what you are asking, but I would have to sit down with a copy of the photo and document my steps.

From just your description alone, I would try selecting the grass area in question and do some color (Colors - Color balance) blending by trying to match it with the rest of the image. Like someone here always says: "There are a thousand ways to accomplish the same thing."

_________________
"In order to attain the impossible, one must attempt the absurd."
~ Miguel de Cervantes


Top
 Post subject: Re: Maintain Sharpness When Correcting Colors
PostPosted: Mon Nov 08, 2010 6:51 pm  (#3) 
Offline
GimpChat Member

Joined: Nov 08, 2010
Posts: 5
Hi,

Thanks for the quick response. I have tried selecting the areas using the lasso method and encircling it and then performing changes via the sliders for hue and gamma but I guess I am am having difficulty where the encircled area and the unaffected area show a dramatic change in color when looking at it.

Anyone here have the willingness to accept the pic and take a go at it? I'd like to learn how to do these steps.

I really like the shot that I took. I just hate to see it ruined.

The Meltdownman


Top
 Post subject: Re: Maintain Sharpness When Correcting Colors
PostPosted: Mon Nov 08, 2010 6:55 pm  (#4) 
Offline
GimpChat Member

Joined: Apr 12, 2010
Posts: 5870
well just upload the photo, not sure to have time but if the image is already here, for me or someone else will be easier give a try

_________________
My 3D Gallery on Deviantart http://photocomix2.deviantart.com/
Main gallery http://www.flickriver.com/photos/photocomix-mandala/
Mandala and simmetry http://www.flickriver.com/photos/photocomix_mandala/

Image

Mrs Wilbress


Top
 Post subject: Re: Maintain Sharpness When Correcting Colors
PostPosted: Mon Nov 08, 2010 7:06 pm  (#5) 
Offline
GimpChat Member

Joined: Nov 08, 2010
Posts: 5
Okay as a new guy,

I checked FAQ and went to my profile but could not find a way to upload my photo? Any help would be appreciated. Then I can show it off and have people correct what I screwed up. I guess it is a weird way of learning but hey, I am open to all new things...well most.

Great active site...love the quick responses and people willing to help.

The Meltdownman


Top
 Post subject: Re: Maintain Sharpness When Correcting Colors
PostPosted: Mon Nov 08, 2010 7:31 pm  (#6) 
Offline
GimpChat Member

Joined: Apr 12, 2010
Posts: 5870
click " post reply" button (NOT to be confused with the "quick reply" field) and you will immediatly see how to...
well maybe you will need to scroll a bit the page, but you will see

_________________
My 3D Gallery on Deviantart http://photocomix2.deviantart.com/
Main gallery http://www.flickriver.com/photos/photocomix-mandala/
Mandala and simmetry http://www.flickriver.com/photos/photocomix_mandala/

Image

Mrs Wilbress


Top
 Post subject: Re: Maintain Sharpness When Correcting Colors
PostPosted: Mon Nov 08, 2010 7:43 pm  (#7) 
Offline
GimpChat Member
User avatar

Joined: Oct 06, 2010
Posts: 4050
Just a reminder: when making selections and blends, it's almost impossible to accomplish a 100% repair on one single layer. In many cases, you'll have to incorporate a few color layers (hue, saturation, etc) to help your image along.

Yes, I realize just saying it, isn't enough, which is why having the image would be most helpful for many of us.

Image
Image upload button

_________________
"In order to attain the impossible, one must attempt the absurd."
~ Miguel de Cervantes


Top
 Post subject: Re: Maintain Sharpness When Correcting Colors
PostPosted: Tue Nov 09, 2010 2:31 am  (#8) 
Offline
GimpChat Member

Joined: Nov 08, 2010
Posts: 5
You can see the lens flare on both the left side (yellow grass) and the right side with a slight circle on the grass.

I have a much higher detailed image of this photos but is too large to download. Therefore I had to reduce the image quality quite a bit. Therefore the clouds have come out screwed up. However, I think it is the process of correcting the grass is what I am trying to learn here.

If anyone think they can correct this for me and then tell me how they did it I would really really appreciate it. I really want to keep the details of the grass if possible.


Sincerely,

The Meltdownman


Attachments:
Steps.jpg
Steps.jpg [ 848.19 KiB | Viewed 3170 times ]
Top
 Post subject: Re: Maintain Sharpness When Correcting Colors
PostPosted: Tue Nov 09, 2010 4:42 am  (#9) 
Offline
GimpChat Member
User avatar

Joined: Oct 06, 2010
Posts: 4050
Due to the file size of the image, and being on my laptop (I'm not in the position to use my office computer at this time) I had some memory issues that didn't allow me full ability, but the technique to repair the colors/lens flare was quite simple. I only needed two layers to accomplish the task. On the bottom layer, I Free Selected the lens flare areas, using a feather of about 10 (could probably go higher since the image is so large) and then I slightly raised the contrast on the right side, and moderately lowered the brightness on the left side. I duplicated the image, added an alpha channel, selected the brown grass area (feather of 10 - 15, please experiment), inverted the selection, deleted the inverted area. I then used Color balance, preserve luminosity unchecked, on midtone range only, lower the cyan scale til your greens match. Select - none, switch to bottom layer, and select only the ground area affected (you'll see a difference in color highlights) and apply color balance, same settings, and blend. Once you are satisfied, merge the two layers.

_________________
"In order to attain the impossible, one must attempt the absurd."
~ Miguel de Cervantes


Top
 Post subject: Re: Maintain Sharpness When Correcting Colors
PostPosted: Tue Nov 09, 2010 5:13 am  (#10) 
Offline
GimpChat Member

Joined: Nov 08, 2010
Posts: 5
Mahvin,

Do you ever sleep....LOL.

Great job, and thank you so very much for showing me the steps in which to fix this. I am sure I will be using this technique over and over again. Keep teaching, you have a gift for it.

Sincerely,

The Meltdownman


Top
 Post subject: Re: Maintain Sharpness When Correcting Colors
PostPosted: Fri Nov 12, 2010 1:00 pm  (#11) 
Offline
Global Moderator
User avatar

Joined: May 16, 2010
Posts: 16200
Mahvins is great.Thought i would give it a go.

First i scaled the image down to half it's size.
Then all i did was select the bad area and colorized it at
68
75
-32

one layer =)
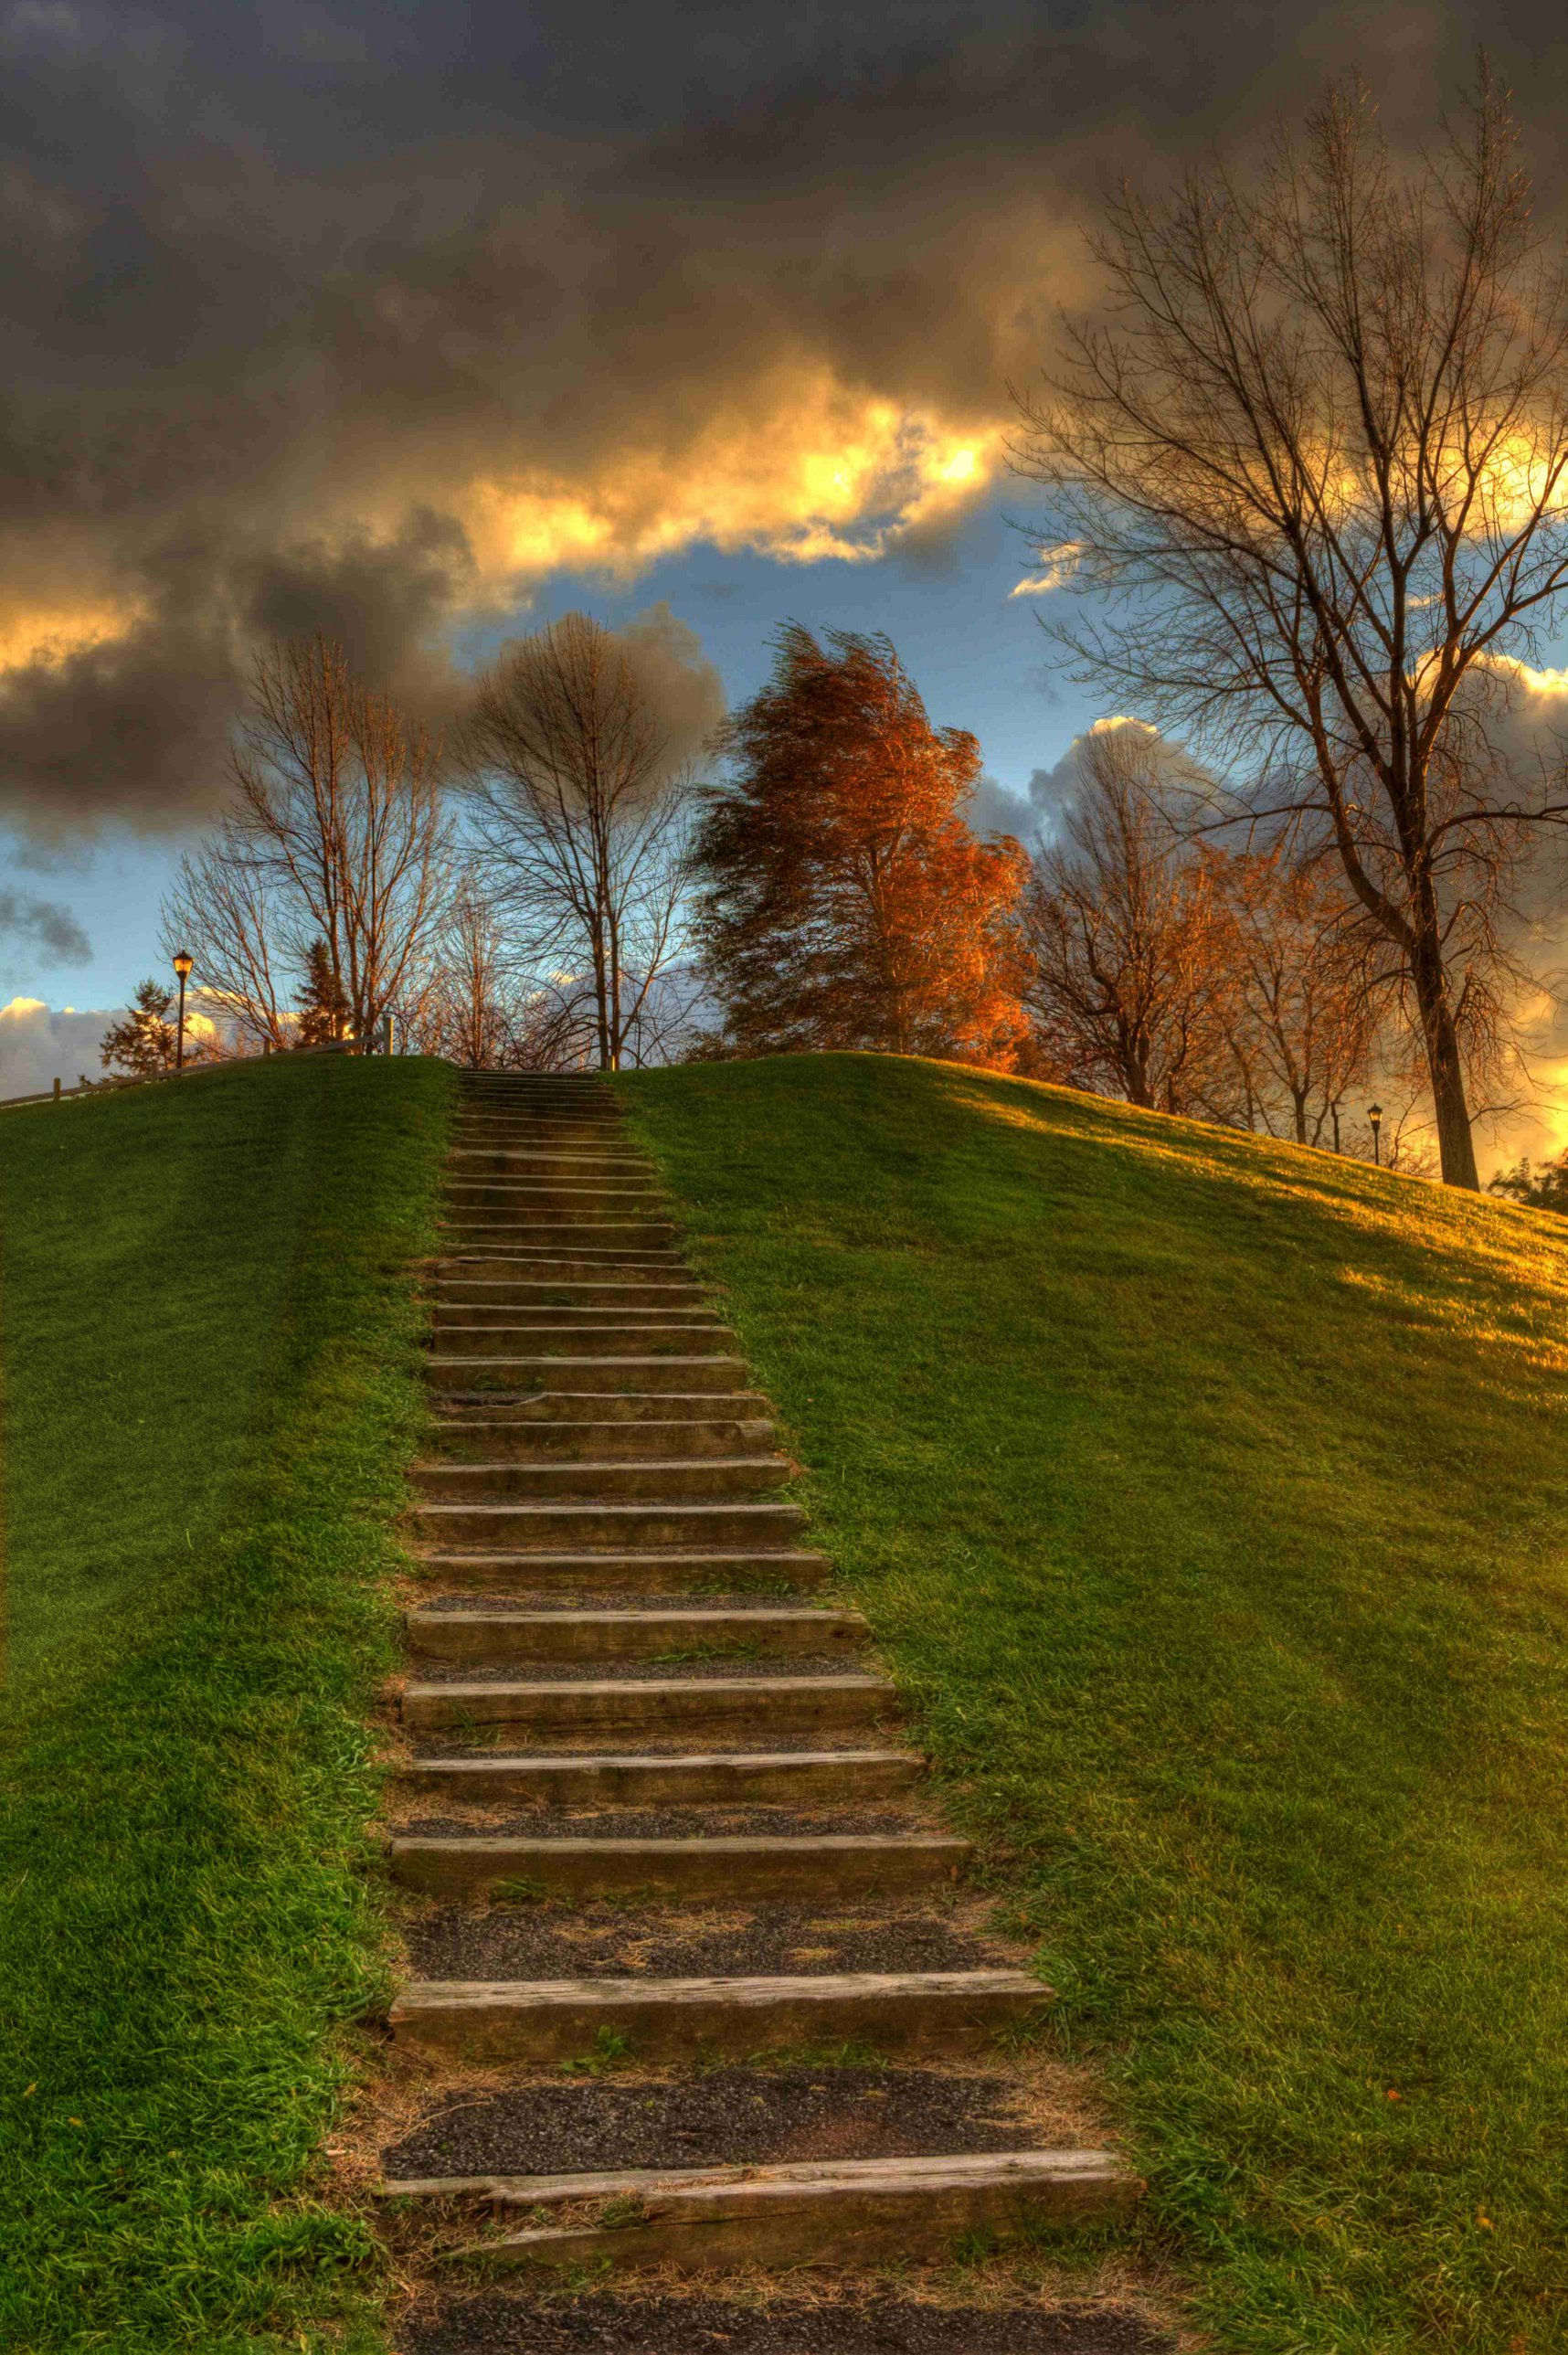
Image

You can still see the area that's fixed though.

Another way is to select each side of the grass and copy and paste into separate layers.
Then use the color selector tool to select a nice green color from the original layer.
After that fill each selection with that color, merge the selections that you colored together and set the layer to hue mode. Then just use brightness and contrast to get the color you want.
That way both sides will be even, and you can make your grass a real nice full lushy green color if you wish, or kill it all off with a nice brown dirty color...lol
Gotta love digital art effects and layer modes. =)


Top
Post new topic Reply to topic  [ 11 posts ] 

All times are UTC - 5 hours [ DST ]


* Login  


Powered by phpBB3 © phpBB Group