It is currently Fri Sep 04, 2026 8:45 am


All times are UTC - 5 hours [ DST ]


Post new topic Reply to topic  [ 76 posts ]  Go to page Previous  1, 2, 3, 4  Next
Author Message
 Post subject: Re: Gimp Tips and Tricks
PostPosted: Sun May 12, 2013 10:17 am  (#41) 
Offline
GimpChat Member

Joined: Mar 04, 2013
Posts: 105
I set up keyboard shortchuts for the "brush angle" and "aspect ratio" sliders. This allows you to leave your mouse cursor (with the shape of the brush) on the canvas and see it change in real time. Using the mouse to move the sliders was "hit or miss" for me. You had to move the cursor back onto the canvas to see the result, then go back an forth until you got it right.
Since "[" and "]" (brackets) control the size, I used "alt + [ or ]" for brush angle and "shift + [ or ] (which is really { or })" for the aspect ratio, but you can use anything you like.
You can set this under Edit > Keyboard shortcuts > Tools.


Top
 Post subject: Re: Gimp Tips and Tricks
PostPosted: Sun May 12, 2013 9:30 pm  (#42) 
Offline
GimpChat Member

Joined: May 12, 2013
Posts: 18
Hopefully this aren't too obvious...but I've seen enough people not use these on youtube tutorials, that I think they are worth pointing out.

Pan/Zooming:
* Ctrl-middle mouse button zooms in and out
* Holding down the middle mouse button pans your image
* Middle mouse button pans up/down
* Middle mouse button + shift pans right/left (not as fun as dragging the middle mouse button)
* The ctrl-middle mouse button works with other operations. eg...I want to crop exactly from xy to x2yx. I place the cursor at xy with the crop tool and while the left mouse button is held down with my index button, my middle finger zooms outs so I can see the entire picture. I can then finish the selection.

Layers:
* You can drag operations onto the layer icons at the bottom of the layers tab. eg to Delete a layer you can drag and release on the delete icon. To anchor a layer, you can drag your floating layer ontop of the anchor. To duplciate a layer, copy and release on the double page icon.
* To select a layer by clicking it, use "Edit > Preferences > Tool Options > Set Layer or Path as active". Then you can select a layer you see with the move tool (even through a transparent foreground layer). Why this isn't default, I don't know.

Selections (start with the basics):
* Feather selections whenever possible
* Paths select is much better than the wand or free select
* Paths is easy to understand if you don't worry about the curves to start and just create a outline of your selection to start. Then drag in the middle section, section by section, and pull in the handles as needed to then set the curves.
* The "remove holes" plugin is awsome for shift-chaining contiugeous magic wand selections
* A great selection trick is to duplicating a new layer, threshold it for best results, clean up the results with a paintbrush and then apply as a layer mask. You may have to tweak the colors a bit before doing a threshold for best results. Good for hair/branches.
* Color to alpha is a top option for "de-layering" aliased objects. Really if there is a solid rgb background...you almost always want to start with this if possible.
* Good trick to remove halos, is to select your objects, invert and grow. Then with just the edges selected, you can select by color, sample by sample to delete and clean up much of this safely.
* To clean up bad edges, start by selecting your object and placing into a layer mask. Blur the layer mask (not just the selection). Do this until nasty border colors and aliasing go away. Then collapse the threshold with curves until you restore a nice edge.
* Some techniques work better than others...try saving component selections to paths so you can recompile the best parts later.

Photo Enhancing
* Don't use despeckle or Selective Gaussian Blur for elimating digital camera noise. Use Filters > Gmic > Testing > Lain Fergusson > Noise Reduction 5. Best free denoiser I've found so far. Does take a while though.
* To improve composition, both the select and crop tool come with rule of thirds and fifths to help recrop/recompose your image.
* To improve "image pop", duplicate the image and set the top to overlay
* Also to provide "image pop", duplicate twice. Set one layer to screen and one to saturation.


Top
 Post subject: Re: Gimp Tips and Tricks
PostPosted: Mon May 13, 2013 8:12 pm  (#43) 
Offline
Script Coder
User avatar

Joined: Oct 25, 2010
Posts: 4812
Two I have learned lately:

1) The power of the "color erase" paint mode, which is really like color-to alpha, and the usefulness of the "behind" paint mode, which often alleviates the need to add a layer to paint background.

2) With the Move tool:
- click and hold on the layer to move (until you get the small cross at its center)
- depress [control]
- start dragging: you are constrained to horizontal, vertical, and 45° diagonal moves.

_________________
Image


Top
 Post subject: Re: Gimp Tips and Tricks
PostPosted: Mon May 13, 2013 10:27 pm  (#44) 
Offline
GimpChat Member

Joined: May 12, 2013
Posts: 18
Nice trick! I don't think I'll use color to alpha again.

Did some checking and it appears and number of tools have "color erase" as a mode you can select. Think all the clone/heal tools and the ink/airbrush tools. But where this is really handy is with pen/pencil/bucket fill.

With bucket fill you can blast a chosen color of your entire selection. Pen/Pencil are nicest though... Just run the pencil along the anti-aliased edge you want to de-colorify and you will get very good results. Kind of an interactive select and color to transparency tool all in one. Sometimes you'll have to sample multiple colors and do multiple passes, but it preserves partial transparencies of your main object.

This makes a suprisingly good selection tool...especially if your foreground/background are of different colors. I played with this and had decent results...but did have to make mulitple passes and to change the sample color when I came to a new edge/section. So if you have red boat against a blue sky and green grass...this can work well. Set the color picker to green and get rid of the grass. Keep adding colors and painting and you have that edge. Then move onto the sky (which I found works well with erase by color). Then with your edge set you can convert this to a mask to get a nice snapshot of our boat with no background. Works great with tree branches (although in my tests it took a number of passes to find all the colors..but the partial transperencies were well kept).

Or say you have a yellow kayak with a nice reflection on the water. You can with the pen or pencil tool and multiple erase color passes get the reflection of the kayak but not the water...which then you could paste on say...lava. Cool stuff.


Top
 Post subject: Re: Gimp Tips and Tricks
PostPosted: Wed May 15, 2013 8:58 pm  (#45) 
Offline
GimpChat Member

Joined: May 12, 2013
Posts: 18
Applying curves to the alpha can be a fun trick. Especially if you have a layer mask that you've heavily blured to clean up a bad edge...you can then very precisely restore the edge using the curves. Or say, you did a color to alpha operation that damaged the interior...I think you might be able to restore part of this by using curves and alpha to restore full opacity to pixels that were mostly opaque while keeping the lighter edge pixels partially transpaent. I have to do some more tinkering with this though.

Use can curves+alpha as an effect for anything with a fuzzish border/outline and can get a fun "rings of Saturn" look.


Top
 Post subject: Re: Gimp Tips and Tricks
PostPosted: Wed May 15, 2013 9:05 pm  (#46) 
Offline
GimpChat Member
User avatar

Joined: Jul 17, 2012
Posts: 2769
smithaa02 wrote:
Applying curves to the alpha can be a fun trick. Especially if you have a layer mask that you've heavily blured to clean up a bad edge...you can then very precisely restore the edge using the curves. Or say, you did a color to alpha operation that damaged the interior...I think you might be able to restore part of this by using curves and alpha to restore full opacity to pixels that were mostly opaque while keeping the lighter edge pixels partially transpaent. I have to do some more tinkering with this though.

Use can curves+alpha as an effect for anything with a fuzzish border/outline and can get a fun "rings of Saturn" look.
here is a tutorial exploring that effect:

http://gimpchat.com/viewtopic.php?f=10&t=6518


Top
 Post subject: Re: Gimp Tips and Tricks
PostPosted: Wed May 15, 2013 10:25 pm  (#47) 
Offline
Global Moderator
User avatar

Joined: May 16, 2010
Posts: 16169
I like using the middle mouse for paint brush size. :)
I use the little bottom right hand corner blue cross image to pan.It works just like the navigator window.

Image

You can find it exactly opposite the mask button. :)

_________________
Image


Top
 Post subject: Re: Gimp Tips and Tricks
PostPosted: Thu May 16, 2013 2:29 am  (#48) 
Offline
Script Coder
User avatar

Joined: Oct 25, 2010
Posts: 4812
smithaa02 wrote:
Applying curves to the alpha can be a fun trick. Especially if you have a layer mask that you've heavily blured to clean up a bad edge...you can then very precisely restore the edge using the curves. Or say, you did a color to alpha operation that damaged the interior...I think you might be able to restore part of this by using curves and alpha to restore full opacity to pixels that were mostly opaque while keeping the lighter edge pixels partially transpaent. I have to do some more tinkering with this though.


No, you have to paint the inside with white, because it's very likely that the transparency level you get inside your object also applies to some border pixels.

For color-to-alpha, you have better do a preliminary selection of what you want to remove (using fuzzy select, not color select), then grow that selection by one pixel to cover the border pixels of what you want to keep (color-to-alpha doesn't need to apply to more than one pixel inside your extracted object).

_________________
Image


Last edited by ofnuts on Thu May 16, 2013 6:03 am, edited 1 time in total.

Top
 Post subject: Re: Gimp Tips and Tricks
PostPosted: Thu May 16, 2013 3:48 am  (#49) 
Offline
GimpChat Member
User avatar

Joined: Sep 22, 2012
Posts: 2089
Location: US
It was fully functional in GIMP 2.8.0 single-window mode. Actually, #3 (see below) was accidental feature due to.... a bug.
Now it works (partially) in GIMP 2.8.4 SW mode but will be implemented again in 2.10 as a full feature.

What works now:
1. Drag and Drop (DND) any layer over the toolbox area to open this layer as a new image (instead of Ctrl+C -> Shift-Ctrl+V)
2. With multiple images open in gimp, DND* any single-layer image over other image tab to open it as a new layer
(instead of Ctrl+C -> Ctrl+V -> Floating Selection -> Anchor).
What will be working:
3. DND* any layer from multiple-layer image to perform #2.

* When you drag layer over other image TAB, you have to hover and wait when that image opens and drop it to the IMAGE itself, not its TAB.


Top
 Post subject: Re: Gimp Tips and Tricks
PostPosted: Thu May 16, 2013 4:20 am  (#50) 
Offline
GimpChat Member
User avatar

Joined: Sep 22, 2012
Posts: 2089
Location: US
It may not work if you've changed your keyboard bindings.
When you bring mouse focus (by left mouse button clicking) on layers palette, Spacebar key toggles layers visibility,
but as soon as you performed any action from the bottom row (new layer, move layer up/down, duplicate, delete) Image
pressing Spacebar will repeat this action infinitely until you switch mouse focus to other gimp area - toolbar, other palettes, etc.

Also you can navigate through the dockable dialogues tabs with the scroll wheel of your mouse Image


Top
 Post subject: G'MIC Frame Trick
PostPosted: Wed May 22, 2013 12:01 pm  (#51) 
Offline
GimpChat Member
User avatar

Joined: Nov 16, 2011
Posts: 5127
Location: Metro Vancouver, BC
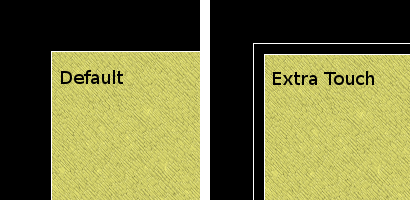
Quick G'MIC frame with a nice extra touch.
1. G'MIC | Arrays & frames | Frame [regular]
2. Frame parameters: w=2, h=2
3. Change Output mode... | New active layer(s) | Apply
4. Frame parameters: w=8, h=8 | OK

Image

_________________
Image
Gimp 2.8.18, Linux, median user
Gimp Chat Tutorials Index
Spirit Bear (Kermode)


Top
 Post subject: Re: Gimp Tips and Tricks
PostPosted: Sun Jun 02, 2013 7:07 am  (#52) 
Offline
Global Moderator
User avatar

Joined: May 16, 2010
Posts: 16169
This was originally posted by smithaa02 - see viewtopic.php?f=23&t=7410

**************************************************************************
I thought it would be nice to put together an overview of the techniques you can use to fix or enhance brightness or contrast in an image. Feel free to suggest your tricks!

1) Colors > Brightness/Contrast. Very basic. Many times this is too all or nothing though.

2) Colors > Levels. One step more advanced. Often times is sufficient to do most basic corrections. Usually you'll want to drag the end arrows in to remove dead-space on the histogram and then play with the middle triangle until you get a nice look. Cropping some of the histogram is usually ok...but not too much.

3) Colors > Auto > Normalize. This will stretch the histogram to destroy deadspace to provide nice white balance and won't destroy any color data. This is usually very safe and a precursor to other operations...but often times it is too passive.

4) Colors > Auto > White Balance. Unlike normalize, this will chop weak data to provide a nice white balance. Sometimes this works well, but sometimes it doesn't. It also corrects color as well. I believe this is the same operation as Colors > Levels > Auto. Generally speaking I prefer manual levels over the auto functions unless I need to do batch operations (one of the major gimp batch plugins supports auto levels).

3) Colors > Curves. One step more advanced than levels. Through repeated sampling and adjusting you can more precisely control the shadows and highlights. Downside like levels is that this can be too all or nothing.

4) Using selections. This is a powerfull technique for brightness/contrast fixes. If I take a picture into the sun, no doubt I'll have exagerated highlights and shadow. Using curves/levels will not let me say restore detail of say a dark raft in the shadows without ruining the surrounding water and sky. Selecting the raft first, and then doing basic color operations on just the selection (like white-balance with levels) can produce VERY nice results. Downside is that it can take a while to make nice selections.

5) Filtering color corrections using HSV layers. If you duplicate your base layer and put it at the top with layer mode set to either Hue, Saturation or Balance...then those respective attributes will be protected. This is often handy when doing brightness tweaks, and you want to protect Saturation or Hue. Dupe layers for these...and then set one mode to Saturation...one to Hue. You can then see if that helps. Using protection layers is applicable for nearly all the techniques discussed here.

6) Overlay mode + duplicate layer. Overlay mode for layers provides more contrast. If you don't have blownout highlights or hidden shadows, this can be a very nice way to provide 'pop' to your picture. But if you do have shadow/highlight issues, this can exagerate those problems. Soft-light is a less mild version of overlay. Overlay mode can negatively affect colors though. It can be benificial to put a another layer ontop set to 'color' so overlay only affects brightness.

7) Contrast Mask. The idea of a contrast mask is to reduce blownout areas while similantously brighten under-exposed shadows. This is a very effective technique for a lot of amature outdoor shots. Nice tutorial at: http://www.gimp.org/tutorials/ContrastMask/ In a nutshell, you duplicate a layer, place it on top, desaturate it, invert it, blur it (like like radius 10px), then set the top layer to overlay. Normally overlay increases contrast, but because the brightness is the opposite, it decreases it. If your picture doesn't have shadow/highlight issues, this can unfortinitely make a picture look less 3d and more flat (you are reducing contrast after all).

7a) While most contrast mask plugins didn't recreate the same look as the manual technique describe above, the closest and best IMO is FX foundary > Photo > Enhancement > Contrast Overlay (I like blur = 10 and opacity = 100%)

8) Luminosity mask. These are apparently legendary and I'm still trying to figure them out. The gist is that you sub-divide a picture into say 2-5 selections based on lightness. You then perform curve corrections separately on each selection or mask. Great way to protect say a sky while adding that detail back into the shadows. Core concepts here: http://goodlight.us/index.html This is a very popular technique with nature photography.

8a) Obtaining tonal regions using thresholds and layer masks. In theory this should work, but I get banding issues.

8b) Generate the luminosity masks using this tool: http://registry.gimp.org/node/25479 Not bad, but seems to lack the ability to make more fine masks.

8c) G'mic > Enhancement > Mask Creator . Seems to be powerful and there is a nice example at http://www.flickr.com/groups/gimpusers/ ... 890498_281 ...but I just can't get a handle on this.

8d) Manually using desaturation/invert/difference layers. Nice but only gives you three tonal selections. http://gimpforums.com/thread-luminosity ... mp#pid5807

9) Tone mapping. Tone mapping basically reduces global contrast, while increasing local contrast. This is often times perfect! Example, I take a picture in the woods...normally the sky is overexposed and the trees underexposed. This balances the sky and gives it a nicer darker blue. Then it brightens the forest flow, but keeps local contrast so say the bark on the trees really stands out. Great trick!

9a) Think gimp comes with a tone mapping filter, but wouldn't recommend it

9b) Advanced Tone Mapping Plugin: http://registry.gimp.org/node/5980 Very nice. Similar effect to a contrast mask...but perhaps doesn't recover as much detail from the shadows and doesn't add as much in saturation.

9c) This is a different variant that is manual but allows for some nice tweaking. I liked the results. http://www.youtube.com/watch?v=FMlKVDjJFfY It provides a little bit more saturation then the other tone mapping techniques.

9d) G'mic has a nice one. G'mic > Colors > Tone Mapping (lots of options)

10) Shadow recovery. Filters > Eg > Shadow Recovery. Not bad results for taking on shadows.

11) Use mid-tone selections for levels/curves to protect the extreme black/white ends of your picture. Often times you just want to bring out the detail in the image without messing up the extreme dark and light portions of the picture. Duplicate your picture and use an auto-normalize, to apply a quick but safe white-balance. Right click the top layer and create a new layer mask from a grey scale version of that layer. Edit the layer mask with curves to give it a pulse shape (0->255->0). This will now only select the midtones of your top layer. Now select the top layer itself (not the mask) and play with levels/curves. You can now increase the contrast of the midtones safely.

_________________
Image


Top
 Post subject: Selection Tool: Highlight and Guides
PostPosted: Mon Jun 17, 2013 12:18 am  (#53) 
Offline
GimpChat Member
User avatar

Joined: Nov 16, 2011
Posts: 5127
Location: Metro Vancouver, BC
Often overlooked, the two Selection Tool Options, Highlight and Guides.
[Tip] Both Highlight and Guides can be added and toggled after selection.

_________________
Image
Gimp 2.8.18, Linux, median user
Gimp Chat Tutorials Index
Spirit Bear (Kermode)


Top
 Post subject: Measure Tool & Guides
PostPosted: Mon Jun 17, 2013 1:40 am  (#54) 
Offline
GimpChat Member
User avatar

Joined: Nov 16, 2011
Posts: 5127
Location: Metro Vancouver, BC
Create guides at the Measure Tool end points.
Ctrl + Click, horizontal guide.
Alt + Click, vertical guide.

[Tip] Handy when using the Perceptive Tool.

_________________
Image
Gimp 2.8.18, Linux, median user
Gimp Chat Tutorials Index
Spirit Bear (Kermode)


Top
 Post subject: Re: Measure Tool & Guides
PostPosted: Mon Jun 17, 2013 2:17 am  (#55) 
Offline
Script Coder
User avatar

Joined: Oct 25, 2010
Posts: 4812
Odinbc wrote:
Create guides at the Measure Tool end point.
Ctrl + Click, horizontal guide.
Alt + Click, vertical guide.

This is the Cool Tip of The week but... adding the horizontal guide works for me, but not adding a vertical one (but when I depress the Alt key, I get a lateral arrow head... ) Am I alone in this case (2.8.2 on Linux)?

And now, the big surprise, Alt alone doesn't work, but Ctrl-Alt-click creates both vertical and horizontal guides!

_________________
Image


Top
 Post subject: Re: Measure Tool & Guides
PostPosted: Mon Jun 17, 2013 5:08 am  (#56) 
Offline
Script Coder
User avatar

Joined: Apr 23, 2010
Posts: 1553
Location: not from Guildford after all
ofnuts wrote:
This is the Cool Tip of The week but... adding the horizontal guide works for me, but not adding a vertical one (but when I depress the Alt key, I get a lateral arrow head... ) Am I alone in this case (2.8.2 on Linux)?

And now, the big surprise, Alt alone doesn't work, but Ctrl-Alt-click creates both vertical and horizontal guides!

Your window manager probably already has a function assigned to the ALT+click combination (KDE and Gnome use it for moving windows). If this is the case, you should be able to use ALT+SHIFT+click to create the vertical guide. Alternately, you could reassign your window manager's trapping of the ALT key to some other key (e.g., the "windows" key or a combination such as ALT+CTRL).

_________________
Any sufficiently primitive technology is indistinguishable from a rock.


Top
 Post subject: Re: Gimp Tips and Tricks
PostPosted: Mon Jun 17, 2013 5:41 pm  (#57) 
Offline
Script Coder
User avatar

Joined: Oct 25, 2010
Posts: 4812
A trick that was mentioned recently in the developer's list. When you use the brightness/contrast tool, you can click in the picture and move your cursor to do the adjustments, a vertical move changes the brightness and n horizontal one changes the contrast, and of course diagonal moves let you adjust both at the same time.

_________________
Image


Top
 Post subject: Re: Gimp Tips and Tricks
PostPosted: Sat Jun 29, 2013 9:49 am  (#58) 
Offline
GimpChat Member
User avatar

Joined: Sep 22, 2012
Posts: 2089
Location: US
Image in-session size indicates how much memory is being allocated in gimp swap space on your hard drive
(it is usually a lot bigger than the real size of saved gimp document)
It's shown in the information panel on the bottom of main window

Image


When working on your image info panel displays only active tool tips and image size is not shown.
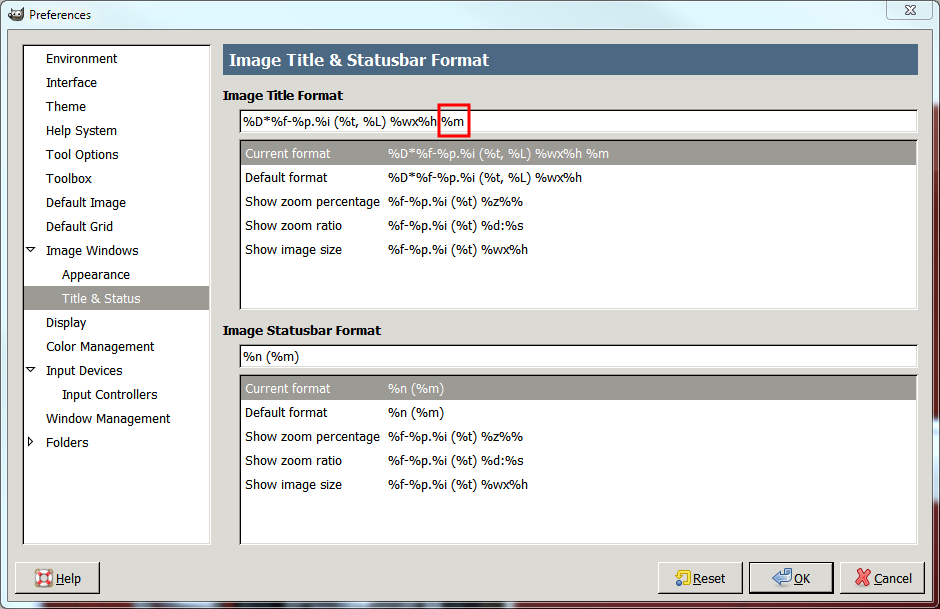
You can bring up image size info to the Image title bar (on the top of main menu) - so it's never hidden.

Image

All you need to do is to add (%m) to the Image Title format line in User Preferences.
No need to restart gimp - it will appear right away.

Image


Top
 Post subject: Easy Gimp Splash Screen
PostPosted: Thu Aug 01, 2013 3:04 am  (#59) 
Offline
GimpChat Member
User avatar

Joined: Nov 16, 2011
Posts: 5127
Location: Metro Vancouver, BC
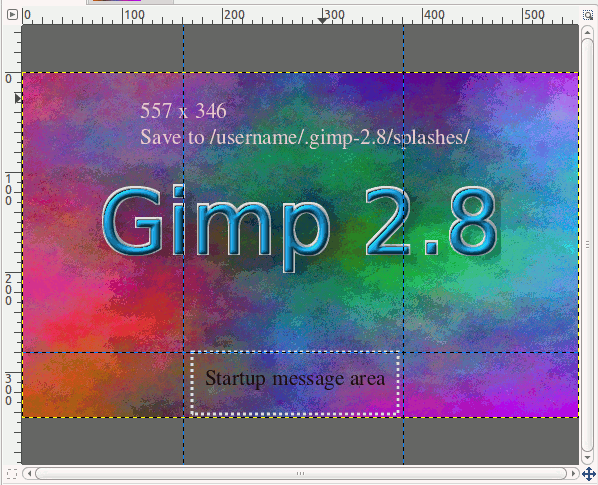
Easy Gimp Splash Screen
1. Make a graphic 557 x 346 px
2. Add vertical guides at, 160 & 380 px
3. Add horizontal guide at, 280 px
4. Start up text shows in the middle bottom area marked by the guides.
5. Export as, splash-screen.png. (multiple splash screen files will load at random) *
6. Save in [user_name] splashes folder.
  • Linux: /home/user_name/.gimp-2.8/splashes.
  • Windows: \user_name\.gimp-2.8\splashes

Image

* Splash Image(s) Loading Order
Customize Splash-Screen
GIMP Splash Archive

_________________
Image
Gimp 2.8.18, Linux, median user
Gimp Chat Tutorials Index
Spirit Bear (Kermode)


Top
 Post subject: Surround Selection Trick
PostPosted: Mon Aug 12, 2013 4:29 pm  (#60) 
Offline
GimpChat Member
User avatar

Joined: Nov 16, 2011
Posts: 5127
Location: Metro Vancouver, BC
The quickest way to surround select text.
1. Layers Dialog, Right click text layer, Alpha to Selection.
2. Select | Grow selection (type size).
3. Select | Shrink... (optional).
4. Select | Save to Channel (optional).

This technique can be useful removing errant pixels selected within a larger selection.

_________________
Image
Gimp 2.8.18, Linux, median user
Gimp Chat Tutorials Index
Spirit Bear (Kermode)


Top
Post new topic Reply to topic  [ 76 posts ]  Go to page Previous  1, 2, 3, 4  Next

All times are UTC - 5 hours [ DST ]


* Login  


Powered by phpBB3 © phpBB Group