It is currently Thu Jul 25, 2024 11:28 am


All times are UTC - 5 hours [ DST ]


Post new topic Reply to topic  [ 28 posts ]  Go to page 1, 2  Next
Author Message
 Post subject: Licensed To GIMP
PostPosted: Mon Oct 28, 2013 8:37 am  (#1) 
Offline
GimpChat Member

Joined: Aug 27, 2010
Posts: 491
Image


Share on Facebook Share on Twitter Share on Orkut Share on Digg Share on MySpace Share on Delicious Share on Technorati
Top
 Post subject: Re: Licensed To GIMP
PostPosted: Mon Oct 28, 2013 8:55 am  (#2) 
Offline
GimpChat Member
User avatar

Joined: Mar 23, 2012
Posts: 7316
Location: Göteborg at last!
Cool, great job!


Top
 Post subject: Re: Licensed To GIMP
PostPosted: Mon Oct 28, 2013 9:04 am  (#3) 
Offline
Global Moderator
User avatar

Joined: Apr 07, 2010
Posts: 14182
Very nice Mike.

_________________
Image


Top
 Post subject: Re: Licensed To GIMP
PostPosted: Mon Oct 28, 2013 10:07 am  (#4) 
Offline
GimpChat Member
User avatar

Joined: Aug 30, 2012
Posts: 2174
Nice.

_________________
Image


Top
 Post subject: Re: Licensed To GIMP
PostPosted: Mon Oct 28, 2013 11:05 am  (#5) 
Offline
GimpChat Member
User avatar

Joined: Jul 06, 2013
Posts: 2607
Location: California
Very nice, Mike.


Top
 Post subject: Re: Licensed To GIMP
PostPosted: Mon Oct 28, 2013 3:24 pm  (#6) 
Offline
GimpChat Member
User avatar

Joined: Aug 16, 2012
Posts: 4271
Location: Göteborg, Sweden
mike: nice job on the license plate :).

_________________


Top
 Post subject: Re: Licensed To GIMP
PostPosted: Fri Nov 01, 2013 10:08 pm  (#7) 
Offline
GimpChat Member
User avatar

Joined: Apr 08, 2010
Posts: 5420
Location: Northwest Ohio
That would make a nice tutorial!


Top
 Post subject: Re: Licensed To GIMP
PostPosted: Sat Nov 02, 2013 9:50 am  (#8) 
Offline
GimpChat Member
User avatar

Joined: Apr 08, 2010
Posts: 5420
Location: Northwest Ohio
The hardest part look to be making the lettering look realistically raised.


Top
 Post subject: Re: Licensed To GIMP
PostPosted: Sat Nov 02, 2013 12:21 pm  (#9) 
Offline
GimpChat Founder
User avatar

Joined: May 22, 2008
Posts: 5242
Location: Gimpville
Nice results, Mike!

_________________
“If you reach for the stars, you just might land on a decently sized hill.” - Stuart Hill


Top
 Post subject: Re: Licensed To GIMP
PostPosted: Sat Nov 02, 2013 9:05 pm  (#10) 
Offline
GimpChat Member

Joined: Aug 27, 2010
Posts: 491
Here's an attempt at a tutorial:

License Plate Tutorial

1) Open a new document of 550 pixels by 300 pixels at 300 Dots Per Inch resolution.
2) Fill BACKGROUND layer with any dark color (#000000 to #808080) or gradient (Tutorial uses linear gradient FG #788e9e To BG #263744).
3) Create a new 550 pixel by 300 pixel Transparent layer named "Plate."
4) Create a selection of 500 by 250 pixels using the Rectangle Select Tool with Rounded Corners set to a radius of 20.0 and Expand From Center selected.
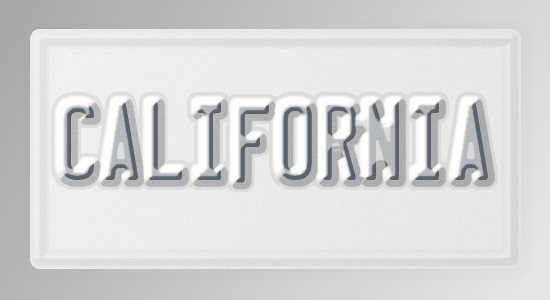
5) Fill the 500 by 250 pixels selection on the Plate layer with linear gradient FG #E9E9E9 To BG #D2D2D2. Select None.
6) "Plate" layer selected - Filters - Noise - HSV Noise - Holdness = 10 - Hue = 10 - Saturation = 50 - Value = 50 (Values are subjective. Purpose is to create the illusion of metallic reflection seen on most plates.)
7) "Plate" layer selected - Script-Fu - Layer Effects - Drop Shadow - Color = #000000 - Opacity = 20 - Contour = Linear - Noise = 0 - Blending Mode = Multiply - Spread = 0 - Size = 3 - Offset Angle = 130 - Distance = 2 - Layer Knocks Out Drop Shadow selected.
8) "Plate" layer selected - Script-Fu - Layer Effects - Bevel And Emboss - Style = Inner Bevel - Depth = 10 - Direction = Up - Size = 0 - Soften = 0 - Angle = 130 - Altitude = 15 - Gloss Contour = Linear - Highlight Color = White (#FFFFFF) - Highlight Mode = Screen - Highlight Opacity =75 - Shadow Color = Black (#000000) - Shadow Mode = Multiply - Shadow Opacity = 43.
9) Create a New 550 by 350 pixels Transparent layer named "Bevel."
10) Alpha-To-Selection on the "Plate" layer.
11) Select the "Bevel" layer. Shrink the selection by 5 pixels and bucket fill the selection with Black (#000000).
12) Shrink the selection by 10 pixels and press Delete OR Edit - Clear. Select None.
13) "Bevel" layer - Set Opacity to 0.
14) "Bevel" layer selected - Script-Fu - Layer Effects - Outer Glow - Color = Black (#000000) - Opacity = 10 - Contour = Half Round - Noise = 0 - Blending Mode = Normal - Spread = 0 - Size = 5.
15) "Bevel layer selected - Script-Fu - Layer Effects - Bevel And Emboss - Style = Inner Bevel - Depth = 35 - Direction = Up - Size = 8 - Soften = 2 - Angle = 130 - Altitude = 15 - Gloss Contour = Half Round - Highlight Color = White (#FFFFFF) - Highlight Mode = Normal - Highlight Opacity = 40 - Shadow Mode = Multiply = Shadow Opacity = 5 - Shadow Contour = Half Round.
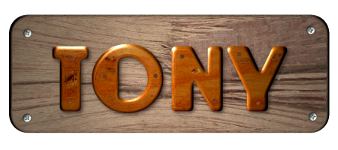
16) Text Tool - Color Of Choice (#404D5E used for Tutorial) - Type Text at Font Size Of Choice (135 pixels used for Tutorial). Layer - Autocrop Layer - Alignment Tool - Align Relative To Image - Align Center Of Target - Align Middle Of Target.
17) (OPTIONAL) Text Layer - Move Tool - Tool Toggle = Move The Active Layer - Move the Text layer down 25 pixels. (This step is necessary if you intend on adding State name text in Optional step #22)
18) Create a New Layer named "Text Bevel" under the Text layer.
19) Alpha To Selection the Text layer.
20) Select the "Text Bevel" layer. Grow the selection by 5 pixels. Fill the selection with Color Of Choice. (Tutorial uses #829DBF). Set the Opacity of the "Text Bevel" layer to 0.
21) "Text Bevel" layer selected - Script-Fu - Layer Effects - Bevel And Emboss - Style = Inner Bevel - Depth = 35 - Direction = Up - Size = 8 - Soften = 2 - Angle = 130 - Altitude = 15 - Gloss Contour = Half Round - Highlight Color = White (#FFFFFF) - Highlight Mode = Normal - Highlight Opacity = 100 - Shadow Mode = Multiply = Shadow Opacity = 10 - Shadow Contour = Half Round.
22) (OPTIONAL) Text Tool - Type State name in 50 point Mistral Color #C02922 or other font, color and size of choice.
23) (OPTIONAL) Layer - New From Visible - View - Show Grid - View - Snap To Grid - Image - Configure Grid - Spacing Width = 25 - Spacing Height = 25.
24) (OPTIONAL) Ellipse Select Tool - Select and Delete four 25 pixel circular selections (75,75) (75,250) (450,75) (450,250) to create the screw holes.
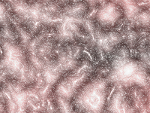
25) You can also create registration stickers or use grunge brushes to create dirt or grime or use rust textures to create various effects. The possible results are virtually limitless.

Image

If any part of this is confusing please let me know as I rarely do tutorials.


Top
 Post subject: Re: Licensed To GIMP
PostPosted: Sun Nov 03, 2013 9:24 am  (#11) 
Offline
GimpChat Member
User avatar

Joined: Apr 08, 2010
Posts: 5420
Location: Northwest Ohio
nice one Mike...I really like how the letters look like they are raised. All I need to find, now, is a bolt or screw top brush.


Top
 Post subject: Re: Licensed To GIMP
PostPosted: Sun Nov 03, 2013 9:33 am  (#12) 
Offline
GimpChat Member

Joined: Aug 27, 2010
Posts: 491
2-ton wrote:
nice one Mike...I really like how the letters look like they are raised. All I need to find, now, is a bolt or screw top brush.


I have some but apparently .gih files cannot be uploaded. :hoh


Top
 Post subject: Re: Licensed To GIMP
PostPosted: Sun Nov 03, 2013 9:35 am  (#13) 
Offline
Global Moderator
User avatar

Joined: Apr 07, 2010
Posts: 14182
Here are some nice screw to and other nice brushes by chris if you want them 2-ton, or anyone


Attachments:
Chris Stuff.tar.gz [5.88 MiB]
Downloaded 150 times

_________________
Image
Top
 Post subject: Re: Licensed To GIMP
PostPosted: Sun Nov 03, 2013 9:56 am  (#14) 
Offline
GimpChat Member

Joined: Aug 27, 2010
Posts: 491
Thank You, Molly :bigthup


Top
 Post subject: Re: Licensed To GIMP
PostPosted: Sun Nov 03, 2013 10:21 am  (#15) 
Offline
GimpChat Founder
User avatar

Joined: May 22, 2008
Posts: 5242
Location: Gimpville
Mike wrote:
I have some but apparently .gih files cannot be uploaded. :hoh

Mike,

Only image files can be "uploaded" via the upload button Image. Other files need to be attached. The following GIMP files formats can be attached directly.

gbr, ggr, gih, pat, scm, xcf

You can also attach compressed archives using the following formats: 7z, bz2, gtar, gz, tgz, tar, rar, and zip.

_________________
“If you reach for the stars, you just might land on a decently sized hill.” - Stuart Hill


Top
 Post subject: Re: Licensed To GIMP
PostPosted: Sun Nov 03, 2013 10:41 am  (#16) 
Offline
GimpChat Member

Joined: Aug 27, 2010
Posts: 491
Thank you, Tux. I knew it was most likely my fault. :oops:


Attachments:
Phillips Screw Head.gih [197.93 KiB]
Downloaded 127 times
Bolt Head Spaced.gih [351.72 KiB]
Downloaded 138 times
Top
 Post subject: Re: Licensed To GIMP
PostPosted: Sun Nov 03, 2013 2:09 pm  (#17) 
Offline
GimpChat Member
User avatar

Joined: Jun 25, 2013
Posts: 142
Location: Wyoming, Michigan
Nice_tutorial.


Attachments:
LICENSE2.png
LICENSE2.png [ 103.82 KiB | Viewed 2158 times ]

_________________
Image
http://tonysteeleebw.deviantart.com/
Top
 Post subject: Re: Licensed To GIMP
PostPosted: Sun Nov 03, 2013 6:36 pm  (#18) 
Offline
GimpChat Member
User avatar

Joined: Jul 06, 2013
Posts: 2607
Location: California
My plate turned out not so good.. I'll attempt it later.


Top
 Post subject: Re: Licensed To GIMP
PostPosted: Sun Nov 03, 2013 9:03 pm  (#19) 
Offline
GimpChat Member
User avatar

Joined: Apr 08, 2010
Posts: 5420
Location: Northwest Ohio
Thanks for those brushes, and Tony, that is an awesome looking license plate!


Top
 Post subject: Re: Licensed To GIMP
PostPosted: Sun Nov 03, 2013 10:50 pm  (#20) 
Offline
GimpChat Member
User avatar

Joined: Jul 06, 2013
Posts: 2607
Location: California
Here's my attempt. It doesn't look good since I tried combining both license plate tutorials.

Image


Top
Post new topic Reply to topic  [ 28 posts ]  Go to page 1, 2  Next

All times are UTC - 5 hours [ DST ]


* Login  


Powered by phpBB3 © phpBB Group