It is currently Mon Sep 21, 2026 12:14 pm


All times are UTC - 5 hours [ DST ]


Post new topic Reply to topic  [ 8 posts ] 
Author Message
 Post subject: Gradient stops
PostPosted: Sun Sep 15, 2013 8:28 am  (#1) 
Offline
GimpChat Member

Joined: Dec 27, 2012
Posts: 393
Location: England
GIMP Version: 2.8.6
Operating System: Linux
GIMP Experience: Intermediate Level


I'm trying to create a dark to light grey gradient that I can then change the stop point of. If the left endpoint's is 808080 and the right endpoint's colour is ffffff what I want to be able to do is change the right endpoint so that it's 40% away from ffffff. Then when I drag the gradient across the image I want it not to blend to white but to the point that is 40% away from white. I also will need to be able to alter the right and left end points so that they are different percentage points away from their left and right end points. There will be many different layers, all which will use different shades of grey.
I've been messing around with the gradient manager but so far have been unable to to set the end points so that they stop short of the original colours when the gradient is applied, other than by changing the shades of grey by using the change colours tool option. This isn't a great solution as it's mostly guess work as to the correct shade I need.
Also I was wondering if there's a way to choose the angle of the gradient other than by guessing, I've tried gradient overlay but that just produces a blend from one colour to the next which is abrupt, no smooth transition between the colours.

I hope this makes sense, and thanks for any help.

_________________
Image

DeviantArt gallery


Share on Facebook Share on Twitter Share on Orkut Share on Digg Share on MySpace Share on Delicious Share on Technorati
Top
 Post subject: Re: Gradient stops
PostPosted: Sun Sep 15, 2013 11:24 am  (#2) 
Offline
Script Coder
User avatar

Joined: Oct 25, 2010
Posts: 4812
By design the gradient is fully mapped between you start and stop points...

Two methods:

1):

- in a side image create a blend with your gradient
- set the active gradient for Foreground to Background
- before you strike a new blend, sample the start and top colors in the side image as the FG/BG colors with the color picker

2):

- Create a black-to-white gradient where you want your gradient
- use the curves tool to re-map the values (which are in direct relation with the position along the gradient) to the colors you want

_________________
Image


Top
 Post subject: Re: Gradient stops
PostPosted: Sun Sep 15, 2013 12:31 pm  (#3) 
Offline
GimpChat Member
User avatar

Joined: Sep 22, 2012
Posts: 2089
Location: US
I'd create and save custom grey to white gradient. Duplicate FG to BG HSV gradient in gradients palette.
Adjust end points from the Change FG/BG Color dialogue window. [set HTMLs for both, then use HSV's Value slider to
get to % you need].

GIMP gradient tool doesn't give the option to set gradient angle (like PS and AI) but pressing and holding Ctrl key while dragging will
constrain the angle to 15 degree increment. For more precision you have to use grid/guides.


Top
 Post subject: Re: Gradient stops
PostPosted: Sun Sep 15, 2013 12:58 pm  (#4) 
Offline
GimpChat Member

Joined: Dec 27, 2012
Posts: 393
Location: England
Thanks guys. Bit embarrassing but I misunderstood the tutorial I was trying to follow. What I was suppose to do was set the different shades of grey to percentage values. I figured it out in the end and with the help of a hex table for shades of grey was able to finish the tutorial. Each shade has to be set manually in the colour swatch so it quite time consuming but effective.
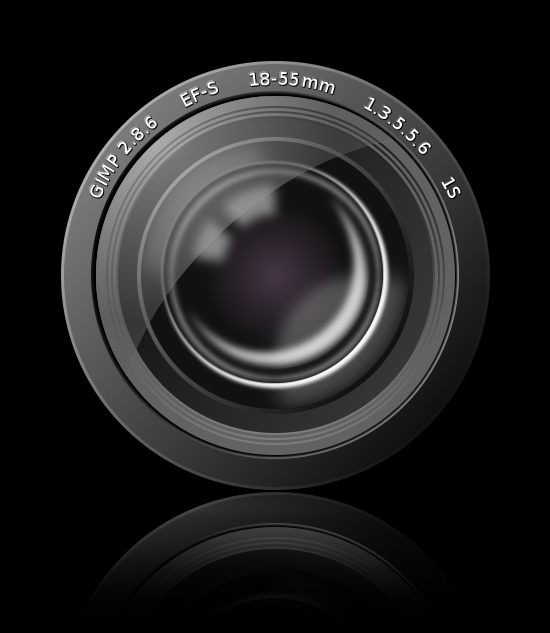
This is what I came up with. It's from a photoshop tutorial but works well in Gimp. Just have to see now if I can turn it into a vector graphic.Image

_________________
Image

DeviantArt gallery


Top
 Post subject: Re: Gradient stops
PostPosted: Sun Sep 15, 2013 2:03 pm  (#5) 
Offline
Script Coder
User avatar

Joined: Oct 25, 2010
Posts: 4812
Caz wrote:
Thanks guys. Bit embarrassing but I misunderstood the tutorial I was trying to follow. What I was suppose to do was set the different shades of grey to percentage values. I figured it out in the end and with the help of a hex table for shades of grey was able to finish the tutorial. Each shade has to be set manually in the colour swatch so it quite time consuming but effective.
This is what I came up with. It's from a photoshop tutorial but works well in Gimp. Just have to see now if I can turn it into a vector graphic.[ Image ]


The lens marking should read 1/3.5-5.6.

Also, there is absolutely nothing blurry in a camera lens. All the reflections are very sharp, even if distorted. Any blur makes the lens appear dusty or misted(*).

(*) Strangely, when looking for lens pictures on Google, all the ones with blurry reflections where actually CGI...

_________________
Image


Top
 Post subject: Re: Gradient stops
PostPosted: Sun Sep 15, 2013 3:10 pm  (#6) 
Offline
GimpChat Member
User avatar

Joined: Jul 17, 2012
Posts: 2769
that came out great !
you should have done this as a vector from the start, now you will have to do it all over again ;)


Top
 Post subject: Re: Gradient stops
PostPosted: Sun Sep 15, 2013 5:13 pm  (#7) 
Offline
GimpChat Member
User avatar

Joined: Aug 30, 2012
Posts: 2174
Caz, nice results.

_________________
Image


Top
 Post subject: Re: Gradient stops
PostPosted: Mon Sep 16, 2013 12:03 pm  (#8) 
Offline
GimpChat Member

Joined: Dec 27, 2012
Posts: 393
Location: England
ofnuts wrote:
Caz wrote:
Thanks guys. Bit embarrassing but I misunderstood the tutorial I was trying to follow. What I was suppose to do was set the different shades of grey to percentage values. I figured it out in the end and with the help of a hex table for shades of grey was able to finish the tutorial. Each shade has to be set manually in the colour swatch so it quite time consuming but effective.
This is what I came up with. It's from a photoshop tutorial but works well in Gimp. Just have to see now if I can turn it into a vector graphic.[ Image ]


The lens marking should read 1/3.5-5.6.

Also, there is absolutely nothing blurry in a camera lens. All the reflections are very sharp, even if distorted. Any blur makes the lens appear dusty or misted(*).

(*) Strangely, when looking for lens pictures on Google, all the ones with blurry reflections where actually CGI...


I got it wrong and this was a tutorial for Illustrator and the point that I was lost on was for the reflections. I used the path tool and then filled with white as per the instructions, but after filling with white the instructions were to feather the selection by 3 pixels. That didn't seem to make any change in Gimp so I figured I'd blur the reflection instead, probably a bad move. Going to experiment some more on the reflections and sharpen them up, and change the lens markings to what they should be.

Esper wrote:
that came out great !
you should have done this as a vector from the start, now you will have to do it all over again ;)


Cheers.
I was hoping I might be able to use the xcf in Inkscape, or import the image in some way, probably not though. I'm a once in a blue moon user of Inkscape and if I used it for a long tutorial like the lens one I'd probably give up half way through. I just don't know it well enough.

he4rty wrote:
Caz, nice results.


Cheers. I thought it turned out well too.

_________________
Image

DeviantArt gallery


Top
Post new topic Reply to topic  [ 8 posts ] 

All times are UTC - 5 hours [ DST ]


* Login  


Powered by phpBB3 © phpBB Group