It is currently Tue Sep 15, 2026 9:48 am


All times are UTC - 5 hours [ DST ]


Post new topic Reply to topic  [ 9 posts ] 
Author Message
 Post subject: The Empire Strikes Back Tutorial By ESPER...
PostPosted: Sat Nov 23, 2013 3:54 am  (#1) 
Offline
Administrator
User avatar

Joined: Aug 10, 2012
Posts: 14204
Location: Native to NYC living in Arizona, Gimp 2.8 - 3.0, Win 11 PC.
Here is my try at the 'The Empire Strikes Back' tutorial by Esper. It's one crazy good tutorial that I enjoyed very much.
Image

http://gimp-science-labs.blogspot.de/20 ... -back.html

_________________
Image
"A wise man learns more from a foolish question than a fool can learn from a wise answer"
Image


Share on Facebook Share on Twitter Share on Orkut Share on Digg Share on MySpace Share on Delicious Share on Technorati
Top
 Post subject: Re: The Empire Strikes Back Tutorial By ESPER...
PostPosted: Sat Nov 23, 2013 8:28 am  (#2) 
Offline
GimpChat Member
User avatar

Joined: Jul 17, 2012
Posts: 2769
thanks for the kind words, Wallace !!

yours came out a lot crisper than mine, im impressed

people like you are the reason im still doing this blog


Top
 Post subject: Re: The Empire Strikes Back Tutorial By ESPER...
PostPosted: Sat Nov 23, 2013 5:26 pm  (#3) 
Offline
Administrator
User avatar

Joined: Aug 10, 2012
Posts: 14204
Location: Native to NYC living in Arizona, Gimp 2.8 - 3.0, Win 11 PC.
Esper wrote:
thanks for the kind words, Wallace !!

yours came out a lot crisper than mine, im impressed

people like you are the reason im still doing this blog


Thanks!
The last thing I did was to add a little sharpening, which mad it look nice and 'crisp' like you say.

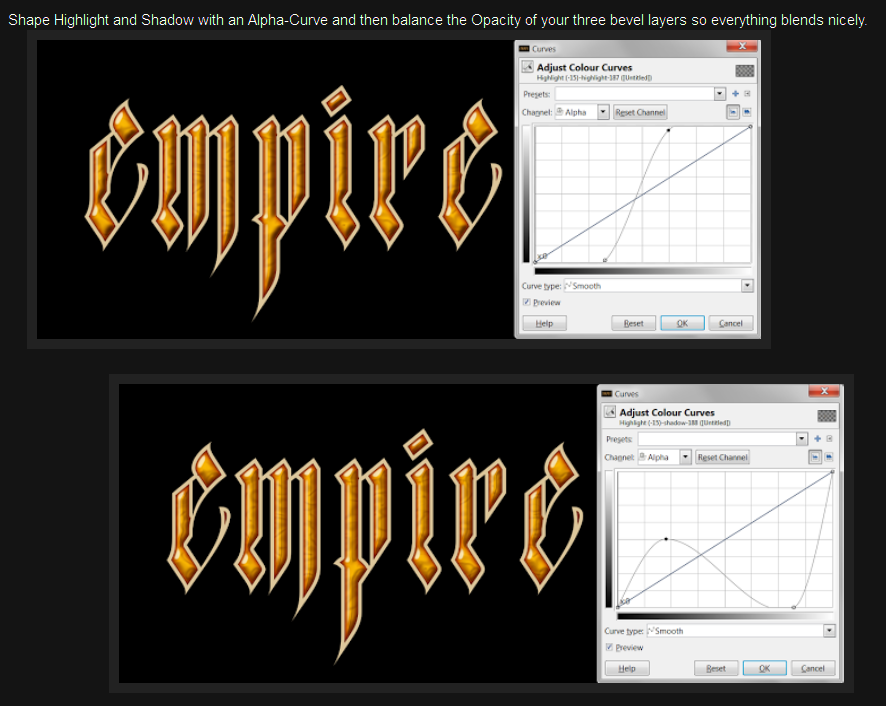
One thing that I had issues with was step 09., shaping the highlight and shadows with an alpha-curve.
I could not select 'alpha' in the curves dialog on any of the highlight or shadow layers of the bevels.
I had to merge them together in order for me to apply an alpha curve to these layers.

This is a screen shot of what was causing me the issues.
Everything else went smoothly, until this step. The number of layers you say is three and I applied 2 separate bevels, each with a shadow layer and a highlight layer making that 4 layers. I was confused, but I continued on with my own solution.
Did I do something wrong or did I misunderstand this step?

Image

_________________
Image
"A wise man learns more from a foolish question than a fool can learn from a wise answer"
Image


Top
 Post subject: Re: The Empire Strikes Back Tutorial By ESPER...
PostPosted: Sat Nov 23, 2013 9:18 pm  (#4) 
Offline
GimpChat Member
User avatar

Joined: Jul 17, 2012
Posts: 2769
Wallace i dont know what the problem is here
normally a layerfx bevel has the highlight/shadow on a transparent layer, so you shoud be able to apply an alpha-curve

my guess is, you are using the layerfx version that creates the bevel with layermasks
we had that problem before

you can shape the layermask of a bevel with a value-curve, but i cant guarantee you that you will get the exact same effect

otherwise apply the layermask before you go to the alpha-curve step
or
install the python layerfx that im using


about step 9 and the three layers
it says in step 8:
"We dont need the highlight, thats why the Opacity was set to 0%. You can delete it."
so you have two bevel (= four layers), but you delete one highlight, so that makes three


Top
 Post subject: Re: The Empire Strikes Back Tutorial By ESPER...
PostPosted: Sat Nov 23, 2013 9:24 pm  (#5) 
Offline
Administrator
User avatar

Joined: Aug 10, 2012
Posts: 14204
Location: Native to NYC living in Arizona, Gimp 2.8 - 3.0, Win 11 PC.
Esper wrote:
Wallace i dont know what the problem is here
normally a layerfx bevel has the highlight/shadow on a transparent layer, so you shoud be able to apply an alpha-curve

my guess is, you are using the layerfx version that creates the bevel with layermasks
we had that problem before

you can shape the layermask of a bevel with a value-curve, but i cant guarantee you that you will get the exact same effect

otherwise apply the layermask before you go to the alpha-curve step
or
install the python layerfx that im using


about step 9 and the three layers
it says in step 8:
"We dont need the highlight, thats why the Opacity was set to 0%. You can delete it."
so you have two bevel (= four layers), but you delete one highlight, so that makes three


Yes I understand.
My layerfx version does create the bevels with a layer mask.
Also about the three layers, got it...

By combining the beveled layers, I was able to adjust them with alpha curves and It seemed to worked out well.

I tried to get the python layerfx from the Gimp Registry, but when I go there I get a '500 - Internal Server Error' and then nothing.

Can you give me the file/files I need for the python layerfx that you're using, or do you know of another place I can download it other then the Gimp Registry? Never mind, I found it at Gimp Scripts.com

_________________
Image
"A wise man learns more from a foolish question than a fool can learn from a wise answer"
Image


Top
 Post subject: Re: The Empire Strikes Back Tutorial By ESPER...
PostPosted: Sat Nov 23, 2013 9:43 pm  (#6) 
Offline
GimpChat Member
User avatar

Joined: Jul 17, 2012
Posts: 2769
here you go

its the version that doesnt make use of layergroups
its a python file, so you have to put it in the plug-ins folder


Attachments:
layerfx.rar [271.23 KiB]
Downloaded 118 times
Top
 Post subject: Re: The Empire Strikes Back Tutorial By ESPER...
PostPosted: Sat Nov 23, 2013 10:18 pm  (#7) 
Offline
Administrator
User avatar

Joined: Aug 10, 2012
Posts: 14204
Location: Native to NYC living in Arizona, Gimp 2.8 - 3.0, Win 11 PC.
Esper wrote:
here you go

its the version that doesnt make use of layergroups
its a python file, so you have to put it in the plug-ins folder


I looked through my plug-ins folder and it is already there. I also have 2 kinds of layer effects listings, but they are under scrip-fu.
I removed the layerfx.py file from my plug-ins folder folder as a test and nothing changed.
Where should layerfx show up in gimp? This is confusing me.
And another thing... I tried both the bevel & emboss from each listing and they both use layer masks to create the bevel, even with the layerfx.py file installed.
Maybe that is how Gimp 2.6 works, but I don't know.

_________________
Image
"A wise man learns more from a foolish question than a fool can learn from a wise answer"
Image


Top
 Post subject: Re: The Empire Strikes Back Tutorial By ESPER...
PostPosted: Sat Nov 23, 2013 10:35 pm  (#8) 
Offline
GimpChat Member
User avatar

Joined: Jul 17, 2012
Posts: 2769
thats not a 2.6 thing, Wallace
i've had layerfx in 2.6 and it never made use of layermasks to create a bevel

i activate layerfx by rightclicking on the textlayer (but its also under Layers -> Layer Effects)

i made a few rantings in the past about alpha-curves and layerfx here:
http://gimp-science-labs.blogspot.de/20 ... w-you.html


Top
 Post subject: Re: The Empire Strikes Back Tutorial By ESPER...
PostPosted: Sat Nov 23, 2013 11:14 pm  (#9) 
Offline
Administrator
User avatar

Joined: Aug 10, 2012
Posts: 14204
Location: Native to NYC living in Arizona, Gimp 2.8 - 3.0, Win 11 PC.
Esper wrote:
thats not a 2.6 thing, Wallace
i've had layerfx in 2.6 and it never made use of layermasks to create a bevel

i activate layerfx by rightclicking on the textlayer (but its also under Layers -> Layer Effects)

i made a few rantings in the past about alpha-curves and layerfx here:
http://gimp-science-labs.blogspot.de/20 ... w-you.html


Thanks for the link I'll check that out.
I'm going to reinstall the layerfx.py file and see if I can find it under layers or by a right click.

_________________
Image
"A wise man learns more from a foolish question than a fool can learn from a wise answer"
Image


Top
Post new topic Reply to topic  [ 9 posts ] 

All times are UTC - 5 hours [ DST ]


* Login  


Powered by phpBB3 © phpBB Group