It is currently Tue Nov 17, 2026 1:13 am


All times are UTC - 5 hours [ DST ]


Post new topic Reply to topic  [ 73 posts ]  Go to page Previous  1, 2, 3, 4  Next
Author Message
 Post subject: Re: Embroidery Stitcher V-1.0
PostPosted: Fri Jan 31, 2014 2:35 pm  (#41) 
Offline
GimpChat Member

Joined: Jan 31, 2014
Posts: 53
Location: Johannesburg, South Africa
I have just installed Gimp 2.8 the first time. Where do I install the Embroidery Stitcher since I don't know this program at all? I am a total newbie to Gimp. :oops:


Top
 Post subject: Re: Embroidery Stitcher V-1.0
PostPosted: Fri Jan 31, 2014 2:42 pm  (#42) 
Offline
GimpChat Member
User avatar

Joined: Mar 23, 2012
Posts: 7388
Location: Göteborg at last!
All scm files go in your user scripts folder. If you are using windows this will be in C-users-your name-Gimp 2.8-scripts


Top
 Post subject: Re: Embroidery Stitcher V-1.0
PostPosted: Fri Jan 31, 2014 3:48 pm  (#43) 
Offline
GimpChat Member
User avatar

Joined: Jul 06, 2013
Posts: 2667
Location: California
I place all my scripts here: GIMP 2>share>gimp>2.0>scripts.

The other scripts folder: Users>Mackenzie>.gimp-2.8 is empty.


Top
 Post subject: Re: Embroidery Stitcher V-1.0
PostPosted: Fri Jan 31, 2014 6:33 pm  (#44) 
Offline
Global Moderator
User avatar

Joined: May 16, 2010
Posts: 16274
mackenzieh wrote:
I place all my scripts here: GIMP 2>share>gimp>2.0>scripts.

The other scripts folder: Users>Mackenzie>.gimp-2.8 is empty.


You should always use the resource USER/.gimp-2.8 sub directories to add new resources to your GIMP install. This way when you update your filters are kept intact.
The install instructions are included in the first post. You will find it here.
Filters/Artistic/Embroidery-Stitcher

There is no dialog it just runs and displays the new image. Using colors on a white bg gives best results. Or colors on a transparent bg should look good also.

_________________
Image


Top
 Post subject: Re: Embroidery Stitcher V-1.0
PostPosted: Fri Jan 31, 2014 7:02 pm  (#45) 
Offline
GimpChat Member
User avatar

Joined: Jun 02, 2013
Posts: 2090
I'm trying to use this feature on an Old English font "H". I need a red H. When I run the script, it turns the letter black. If I merge the red letter on a white background, it turns the letter blue, and the white background to black. Am I doing something wrong? I'm doing a mock up for a guy, that want's to have an H embroidered on a black hat. This is what I'm trying to accomplish. Cool that this script got bumped up when it did. Thanks.

_________________
Image


Top
 Post subject: Re: Embroidery Stitcher V-1.0
PostPosted: Fri Jan 31, 2014 8:31 pm  (#46) 
Offline
Script Coder
User avatar

Joined: Feb 18, 2011
Posts: 4826
Location: Bendigo Vic. Australia
The best way to use Embroidery Stitcher on text is to bevel the text first as below
Before↓
Image
After↓
Image

_________________
Image
No matter how much you push the envelope, it'll still be stationery.


Top
 Post subject: Re: Embroidery Stitcher V-1.0
PostPosted: Fri Jan 31, 2014 8:47 pm  (#47) 
Offline
GimpChat Member
User avatar

Joined: Jun 02, 2013
Posts: 2090
That does look better Graechan, but by the time I put that on a black hat, all the black on the lettering will be too much. Definitely better than what I had though.

_________________
Image


Top
 Post subject: Re: Embroidery Stitcher V-1.0
PostPosted: Fri Jan 31, 2014 9:49 pm  (#48) 
Offline
Script Coder
User avatar

Joined: Feb 18, 2011
Posts: 4826
Location: Bendigo Vic. Australia
Warrior nothing is ever a problem, (it's just a solution waiting to be found) how about this
Before↓
Image
After↓
Image

_________________
Image
No matter how much you push the envelope, it'll still be stationery.


Top
 Post subject: Re: Embroidery Stitcher V-1.0
PostPosted: Fri Jan 31, 2014 11:11 pm  (#49) 
Offline
GimpChat Member
User avatar

Joined: Jul 06, 2013
Posts: 2667
Location: California
Rod wrote:
mackenzieh wrote:
I place all my scripts here: GIMP 2>share>gimp>2.0>scripts.

The other scripts folder: Users>Mackenzie>.gimp-2.8 is empty.


You should always use the resource USER/.gimp-2.8 sub directories to add new resources to your GIMP install. This way when you update your filters are kept intact.
The install instructions are included in the first post. You will find it here.
Filters/Artistic/Embroidery-Stitcher

There is no dialog it just runs and displays the new image. Using colors on a white bg gives best results. Or colors on a transparent bg should look good also.


I don't use that folder. When ever a script is updated I just grab the new one and replace it with the old one in the 2.0 scripts folder. I already have the script installed and it works.


Top
 Post subject: Re: Embroidery Stitcher V-1.0
PostPosted: Sat Feb 01, 2014 7:35 am  (#50) 
Offline
GimpChat Member

Joined: Jan 31, 2014
Posts: 53
Location: Johannesburg, South Africa
Rod wrote:
mackenzieh wrote:
I place all my scripts here: GIMP 2>share>gimp>2.0>scripts.

The other scripts folder: Users>Mackenzie>.gimp-2.8 is empty.


You should always use the resource USER/.gimp-2.8 sub directories to add new resources to your GIMP install. This way when you update your filters are kept intact.
The install instructions are included in the first post. You will find it here.
Filters/Artistic/Embroidery-Stitcher

There is no dialog it just runs and displays the new image. Using colors on a white bg gives best results. Or colors on a transparent bg should look good also.


Rod, thank you for the tip. I had no idea where to look for the embroidery-stitcher after installation. I was searching under scripts but never thought of to look under filters. And there it is!! :hehe

Here is my first attempt! I tried it on my own lesson which I have done for MarvelousArtworks in PSP. Gosh, Gimp is so much different than PSP but I will crack it at some time or the other - just have to play with it more. :paint

Laura


Attachments:
Making A Pearl lesson 3 by launok.png
Making A Pearl lesson 3 by launok.png [ 1.84 MiB | Viewed 2663 times ]
Making A Pearl lesson 3 by launok (original).jpg
Making A Pearl lesson 3 by launok (original).jpg [ 170.64 KiB | Viewed 2663 times ]
Top
 Post subject: Re: Embroidery Stitcher V-1.0
PostPosted: Sat Feb 01, 2014 10:56 am  (#51) 
Offline
Global Moderator
User avatar

Joined: May 16, 2010
Posts: 16274
launok wrote:
Rod wrote:
mackenzieh wrote:
I place all my scripts here: GIMP 2>share>gimp>2.0>scripts.

The other scripts folder: Users>Mackenzie>.gimp-2.8 is empty.


You should always use the resource USER/.gimp-2.8 sub directories to add new resources to your GIMP install. This way when you update your filters are kept intact.
The install instructions are included in the first post. You will find it here.
Filters/Artistic/Embroidery-Stitcher

There is no dialog it just runs and displays the new image. Using colors on a white bg gives best results. Or colors on a transparent bg should look good also.


Rod, thank you for the tip. I had no idea where to look for the embroidery-stitcher after installation. I was searching under scripts but never thought of to look under filters. And there it is!! :hehe

Here is my first attempt! I tried it on my own lesson which I have done for MarvelousArtworks in PSP. Gosh, Gimp is so much different than PSP but I will crack it at some time or the other - just have to play with it more. :paint

Laura

Those look great! :)

_________________
Image


Top
 Post subject: Re: Embroidery Stitcher V-1.0
PostPosted: Sat Feb 01, 2014 10:57 am  (#52) 
Offline
Global Moderator
User avatar

Joined: May 16, 2010
Posts: 16274
mackenzieh wrote:
Rod wrote:
mackenzieh wrote:
I place all my scripts here: GIMP 2>share>gimp>2.0>scripts.

The other scripts folder: Users>Mackenzie>.gimp-2.8 is empty.


You should always use the resource USER/.gimp-2.8 sub directories to add new resources to your GIMP install. This way when you update your filters are kept intact.
The install instructions are included in the first post. You will find it here.
Filters/Artistic/Embroidery-Stitcher

There is no dialog it just runs and displays the new image. Using colors on a white bg gives best results. Or colors on a transparent bg should look good also.


I don't use that folder. When ever a script is updated I just grab the new one and replace it with the old one in the 2.0 scripts folder. I already have the script installed and it works.

Yes they will run in either location but if you ever update GIMP-2.8.10 to a newer version you will most likely lose your entire script folder with all your new scripts. Then you will have to re install them all.

_________________
Image


Top
 Post subject: Re: Embroidery Stitcher V-1.0
PostPosted: Sat Feb 01, 2014 4:46 pm  (#53) 
Offline
Global Moderator
User avatar

Joined: May 16, 2010
Posts: 16274
The Warrior wrote:
I'm trying to use this feature on an Old English font "H". I need a red H. When I run the script, it turns the letter black. If I merge the red letter on a white background, it turns the letter blue, and the white background to black. Am I doing something wrong? I'm doing a mock up for a guy, that want's to have an H embroidered on a black hat. This is what I'm trying to accomplish. Cool that this script got bumped up when it did. Thanks.


Best to use the Text Embroider script for text instead.
viewtopic.php?f=9&t=4869

_________________
Image


Top
 Post subject: Re: Embroidery Stitcher V-1.0
PostPosted: Sun Feb 02, 2014 12:44 pm  (#54) 
Offline
GimpChat Member

Joined: Jan 31, 2014
Posts: 53
Location: Johannesburg, South Africa
Rod,

Here is another 3D art of mine I was playing with to see what will happen when I use the Embroidery Stitcher on it. One can see clearly the embroidered stitches but the colors are way out from the original. What can I do to try and keep the original colors as close as possible to the original? I am posting the original and the embroidered version. All the lighter colors are mostly black! I would love to retain colours as near as possible to original, if it's in any way possible. Is it because the original format is saved in .jpg format? Which formats is best to use with the embroidery stitcher?

Thanks,

Laura


Attachments:
Victoria and Michael 4 Embroidered.png
Victoria and Michael 4 Embroidered.png [ 544.02 KiB | Viewed 2441 times ]
Launok12.jpg
Launok12.jpg [ 66.87 KiB | Viewed 2441 times ]
Top
 Post subject: Re: Embroidery Stitcher V-1.0
PostPosted: Mon Feb 03, 2014 8:30 am  (#55) 
Offline
GimpChat Member

Joined: Jan 31, 2014
Posts: 53
Location: Johannesburg, South Africa
Today I have played a bit more with the embroidery stitcher and got some better results, as yesterday I was not testing it out fully! It was too late at night and almost bedtime. Now I had some more time to see all options such as "colour - hue and saturation" which I have added. :)

I have even tried the already embroidered image (attached) also with the text embroiderer (vertical) and got some other type of sewing effects - kind of a mix and match effect! Both images attached. :paint

Though I still would prefer an embroidered image very close to the real colours of the original but with an embroidered touch to it. I want to start making all kinds of scrapbook embellishments with an embroidered touch. Rod, I assume you are still working on your script. Unfortunately I have not a clue of script making in any way, not even with PSP's scripts too - it really looks complicated! :oops:


Attachments:
Victoria and Michael 4 embroidered together with text embroider vertical.png
Victoria and Michael 4 embroidered together with text embroider vertical.png [ 133.02 KiB | Viewed 2435 times ]
Victoria and Michael 4 embroidered2.png
Victoria and Michael 4 embroidered2.png [ 584.56 KiB | Viewed 2435 times ]
Top
 Post subject: Re: Embroidery Stitcher V-1.0
PostPosted: Mon Feb 03, 2014 9:30 am  (#56) 
Offline
Global Moderator
User avatar

Joined: May 16, 2010
Posts: 16274
Those look very nice. :)
Scripting is not as hard as you might think. Fencepost posted some very good lessons to start with. I also would recommend monsoonami's scripting lesson's here. (this is lesson one and their are four)
http://www.youtube.com/watch?v=dAuJJ6P8Jxs

As for working on the script, probably a work in progress. The filter uses neon edges to get the lines to start the effect and unfortunately neon switches all the colors around. The effects can still look pretty good though even though the original colors can be lost. :) I will post any updates in the future.

As a side note you could try colors>invert on the resulting effected layer and see what happens. :)
I would also try a few layer modes on a duplicate top layer.

_________________
Image


Top
 Post subject: Re: Embroidery Stitcher V-1.0
PostPosted: Mon Feb 03, 2014 10:47 am  (#57) 
Offline
GimpChat Member

Joined: Jan 31, 2014
Posts: 53
Location: Johannesburg, South Africa
Thank you Rod! I have downloaded all 4 the video tutorials and will go and check out the scripting lessons by Fencepost. :)


Top
 Post subject: Re: Embroidery Stitcher V-1.0
PostPosted: Mon Feb 03, 2014 11:29 am  (#58) 
Offline
GimpChat Member
User avatar

Joined: Aug 16, 2012
Posts: 4271
Location: Göteborg, Sweden
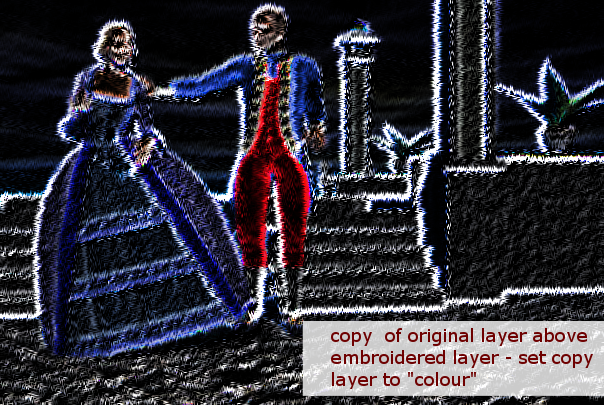
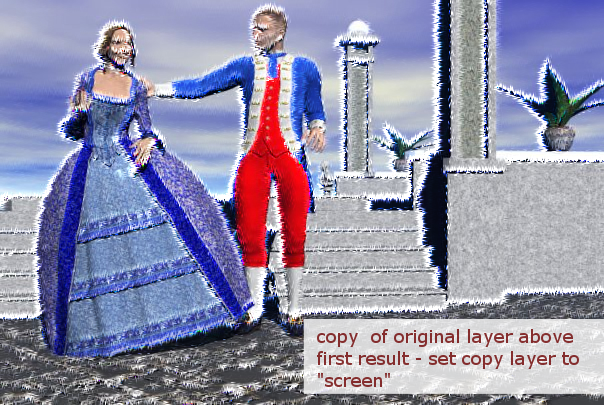
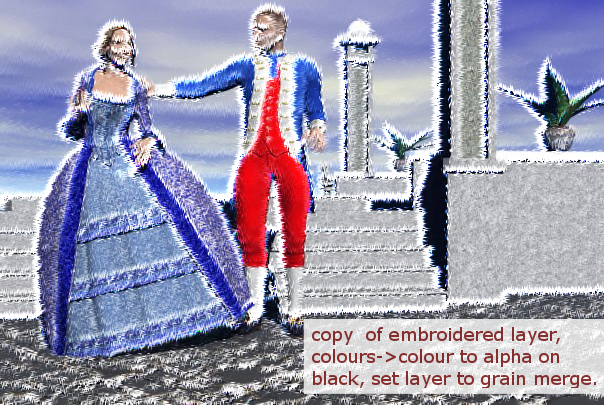
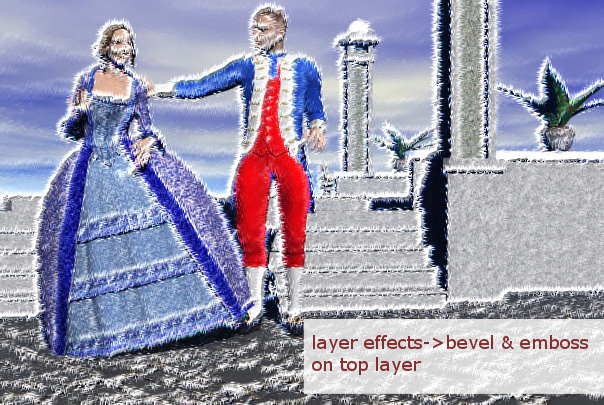
launok: i've played around a bit with your embroidery and i think the results look quite good. i've posted all four steps of my experiment for you:
Image
Image
Image
Image

_________________


Top
 Post subject: Re: Embroidery Stitcher V-1.0
PostPosted: Mon Feb 03, 2014 12:54 pm  (#59) 
Offline
GimpChat Member

Joined: Jan 31, 2014
Posts: 53
Location: Johannesburg, South Africa
AnMal wrote:
launok: i've played around a bit with your embroidery and i think the results look quite good. i've posted all four steps of my experiment for you:
Image
Image
Image
Image


AnMal,

This is perfect! :bigthup Thank you so much for sharing the steps of how you have done these, much appreciated! :)

Laura


Top
 Post subject: Re: Embroidery Stitcher V-1.0
PostPosted: Mon Feb 03, 2014 3:48 pm  (#60) 
Offline
GimpChat Member

Joined: Jan 31, 2014
Posts: 53
Location: Johannesburg, South Africa
Hi AnMal,

I have tried to follow your steps but I have only installed Gimp 3 days ago and knows very little about it. I assume I must do this in layers? I have figured out to put the 1st 2 images (original and my 1st embroidered version) as 2 separate layers, am I correct? With the original image above the embroidered version? If so, how do I choose to "set copy layer to colour"? And for the second set "set copy to screen"? Where do I set the colour and screen? I have seen along the line the "colour to alpha" but not sure about the colour and screen? This is a total new program than PSP I am used to.:oops:


Top
Post new topic Reply to topic  [ 73 posts ]  Go to page Previous  1, 2, 3, 4  Next

All times are UTC - 5 hours [ DST ]


* Login  


Powered by phpBB3 © phpBB Group