It is currently Mon Sep 21, 2026 6:12 am


All times are UTC - 5 hours [ DST ]


Post new topic Reply to topic  [ 14 posts ] 
Author Message
 Post subject: How To Make Simple Batch Process
PostPosted: Fri Oct 28, 2016 6:13 pm  (#1) 
Offline
GimpChat Member

Joined: Oct 28, 2016
Posts: 14
GIMP Version: 2.8.14
Operating System: Windows
GIMP Experience: New User


I would like to batch process the correcting of images with color/levels/sliding the blackness and whiteness bars.

Very simple process but it gets tedious and I have a lot of files to do. The scanner was poor and the images - greyscale - should be black and white but instead are universally grey.

I got that plug-in batch processor but I wasn't able to find this ability in it.


Share on Facebook Share on Twitter Share on Orkut Share on Digg Share on MySpace Share on Delicious Share on Technorati
Top
 Post subject: Re: How To Make Simple Batch Process
PostPosted: Fri Oct 28, 2016 8:24 pm  (#2) 
Offline
Global Moderator
User avatar

Joined: May 16, 2010
Posts: 16173
Install G'MIC 1.7.9 beta pre release - http://gmic.eu/gimp.shtml

I don't really see a levels adjustment in the G'MIC plug-in but you can
1) open all your images as layers in GIMP
2) open G'MIC and select the "Colors" menu drop down and play around with those filters. You may find something usable. Example for the settings to change ALL layers at one time below.

Image

_________________
Image


Top
 Post subject: Re: How To Make Simple Batch Process
PostPosted: Fri Oct 28, 2016 9:18 pm  (#3) 
Offline
Global Moderator
User avatar

Joined: May 16, 2010
Posts: 16173
You can try this filter also.

Image

_________________
Image


Top
 Post subject: Re: How To Make Simple Batch Process
PostPosted: Fri Oct 28, 2016 10:51 pm  (#4) 
Offline
GimpChat Member

Joined: Oct 28, 2016
Posts: 14
Rod wrote:
You can try this filter also.

[ Image ]


Yes that begins to look good. I had some apparent success there for a while with G'mic when I selected black and white. But it didn't take. Didn't appear in the GIMP screen.

Excuse my ignorance but could you spell it out for me? Open a bunch (for testing I opened only two) files as layers. Then open G'mic. Then find a layer in g'mic that seems to work. Then click 'apply' in g'mic (which I did and it reported how many seconds it was working) and then it will automatically apply that filter to all the files I've selected?

Or it then needs to be told which to apply it to?

Or it does nothing failing some other instruction (i.e. it apparently did nothing for me) ?

I guess I don't need to say that the colors/levels/slide the pointers thing is right there in gimp and that's what I'm currently doing, one file at a time? Like it's not some idea off the top of my head... I might look for a macro tool...


Top
 Post subject: Re: How To Make Simple Batch Process
PostPosted: Sat Oct 29, 2016 4:57 am  (#5) 
Offline
GimpChat Member

Joined: Mar 04, 2011
Posts: 2615
Quote:
I got that plug-in batch processor but I wasn't able to find this ability in it.


Which batch processor, DBP or BIMP?

Assuming BIMP http://www.alessandrofrancesconi.it/projects/bimp/
Determine the values required using the Gimp levels tool on an image.

In BIMP
When adding a procedure choose other gimp procedure
Search for the levels option.
Fill in the values from the Gimp levels.
Apply BIMP

All-in-one screenshot showing the releationship.
Attachment:
other-gimp-procedure.jpg
other-gimp-procedure.jpg [ 215.45 KiB | Viewed 8195 times ]


Using g'mic with BIMP
G'mic can create a logfile recording the parameters used. In linux it is in ~/.confic/gmic In Windows, something called APPDATA\gmic.

Find the values to use from the running the filter and looking in the logfile gimp_log

example
Attachment:
gmic01.jpg
gmic01.jpg [ 157.67 KiB | Viewed 8195 times ]


In BIMP
Choose other gimp procedure and search for gmic
In the values, enter 1 for a new image and the gmic command line, type it in or better copy/paste.

example.
Attachment:
gmic02.jpg
gmic02.jpg [ 135.86 KiB | Viewed 8195 times ]


Top
 Post subject: Re: How To Make Simple Batch Process
PostPosted: Sat Oct 29, 2016 9:13 am  (#6) 
Offline
Global Moderator
User avatar

Joined: May 16, 2010
Posts: 16173
abrogard wrote:
Rod wrote:
You can try this filter also.

[ Image ]


Yes that begins to look good. I had some apparent success there for a while with G'mic when I selected black and white. But it didn't take. Didn't appear in the GIMP screen.

Excuse my ignorance but could you spell it out for me? Open a bunch (for testing I opened only two) files as layers. Then open G'mic. Then find a layer in g'mic that seems to work. Then click 'apply' in g'mic (which I did and it reported how many seconds it was working) and then it will automatically apply that filter to all the files I've selected?

Or it then needs to be told which to apply it to?

Or it does nothing failing some other instruction (i.e. it apparently did nothing for me) ?

I guess I don't need to say that the colors/levels/slide the pointers thing is right there in gimp and that's what I'm currently doing, one file at a time? Like it's not some idea off the top of my head... I might look for a macro tool...

Install this filter (export_layers.py and the export_layers folder it requires restart of GIMP) They both go in the plug-ins folder.
https://github.com/khalim19/gimp-plugin ... rs-2.4.zip
This exports all the layers as the extension of your choice to a present or new directory folder.


1) Open images in GIMP as LAYERS - Edit>Open as layers
2) After GIMP opens all the images on separate layers - Filters>G'MIC
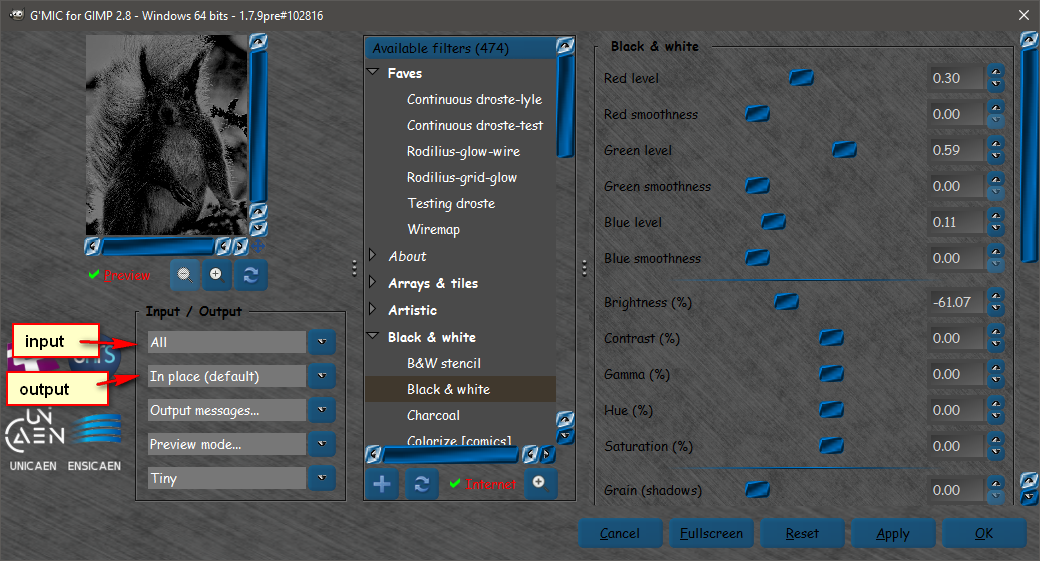
3) Go to the "Black and White" menu and select ALL for input layers and IN PLACE for output layers
4) Set your values with the slider controls and preview of your choice (i use FULL)
5) DO NOT adjust the + - in preview zoom or you'll get different results then previewed after the filter is finished running
Image

CLICK OK
Image

6)File>Export Layers.

7) Select an extension type (jpg, png, gif...ect) and select where to save the images
8) Select "Export Layers"

Done

_________________
Image


Top
 Post subject: Re: How To Make Simple Batch Process
PostPosted: Sat Oct 29, 2016 9:20 am  (#7) 
Offline
Global Moderator
User avatar

Joined: May 16, 2010
Posts: 16173
More info on the export layers plug-in can be found here
viewtopic.php?f=9&t=11429

_________________
Image


Top
 Post subject: Re: How To Make Simple Batch Process
PostPosted: Sat Oct 29, 2016 5:21 pm  (#8) 
Offline
GimpChat Member

Joined: Oct 28, 2016
Posts: 14
Thank you for that.

I went fairly well. I download and copied those files into the Gimp2 folder. (it says Gimp2, not gimp2.8).

Then I went through the procedure and found an excellent filter in 'charcoal'. And exported one file successfully.

That's the only snag. It exports only one file. I have to do it one file at a time. It processes all files (I only imported 2), but I don't see any 'export layers' choices and just must use 'export' and I get the required file exported (into jpg I chose) but only it, just the one.

Something I've done wrong here I can see. But what?

Trying to work through post #5 :

Yes, it is BIMP I've got. Apparently. Screenshots check out. Says the same thing at the top of its window.

But:

.BIMP procedure - inputting values - seems to go okay but nothing comes out at the end. One unchanged file.

.That logfile doesn't appear on the screen and I can't find it in my machine (win10 x64).

So I currently still can't get it done as a batch procedure.


Top
 Post subject: Re: How To Make Simple Batch Process
PostPosted: Sun Oct 30, 2016 1:08 am  (#9) 
Offline
Global Moderator
User avatar

Joined: May 16, 2010
Posts: 16173
abrogard wrote:
Thank you for that.

I went fairly well. I download and copied those files into the Gimp2 folder. (it says Gimp2, not gimp2.8).

Then I went through the procedure and found an excellent filter in 'charcoal'. And exported one file successfully.

That's the only snag. It exports only one file. I have to do it one file at a time. It processes all files (I only imported 2), but I don't see any 'export layers' choices and just must use 'export' and I get the required file exported (into jpg I chose) but only it, just the one.

Something I've done wrong here I can see. But what?

Trying to work through post #5 :

Yes, it is BIMP I've got. Apparently. Screenshots check out. Says the same thing at the top of its window.

But:

.BIMP procedure - inputting values - seems to go okay but nothing comes out at the end. One unchanged file.

.That logfile doesn't appear on the screen and I can't find it in my machine (win10 x64).

So I currently still can't get it done as a batch procedure.

First you should place all your new filters and scm files as well as patterns, gradients, brushes in the USER/YOURNAME/.gimp-2.8 sub directories
Or you could lose them in the next version you install.

The python file and export_layers folder go in the USER/YOURNAME/.gimp-2.8/plug-ins folder
You do not have a File>Export Layers option in GIMP after installing the python filter "export_layers" ?

_________________
Image


Top
 Post subject: Re: How To Make Simple Batch Process
PostPosted: Sun Oct 30, 2016 2:18 am  (#10) 
Offline
GimpChat Member

Joined: Oct 28, 2016
Posts: 14
Quote:
The python file and export_layers folder go in the USER/YOURNAME/.gimp-2.8/plug-ins folder
You do not have a File>Export Layers option in GIMP after installing the python filter "export_layers" ?


This was the problem. I put them in a folder I found down the Program Files path and it hasn't been the right one. Followed these instructions and got a win. Two files properly processed! Wonderful. Thank you.

Quote:
First you should place all your new filters and scm files as well as patterns, gradients, brushes in the USER/YOURNAME/.gimp-2.8 sub directories
Or you could lose them in the next version you install.


Where do I find them? Where'd they come from? My BIMP and GMIC import? What directories to put them in? How come they're working now (are they?) if they're not in the right directories and if they are in the right directories how come they'll still work when moved?

Just a tad confused. (as usual).

:) Going well, though. Much appreciate your help. Your patience and careful and considerate picture/text explanations. I do. I would never have got there/here by myself.

p.s. Just processed 70 files flawlessly. Beautiful. That's a heap of work done/avoided (whichever way you look at it) and more: a skill learned, a new tool in the toolbox.

:)


Top
 Post subject: Re: How To Make Simple Batch Process
PostPosted: Sun Oct 30, 2016 9:28 am  (#11) 
Offline
Global Moderator
User avatar

Joined: May 16, 2010
Posts: 16173
abrogard wrote:
Quote:
The python file and export_layers folder go in the USER/YOURNAME/.gimp-2.8/plug-ins folder
You do not have a File>Export Layers option in GIMP after installing the python filter "export_layers" ?


This was the problem. I put them in a folder I found down the Program Files path and it hasn't been the right one. Followed these instructions and got a win. Two files properly processed! Wonderful. Thank you.

Quote:
First you should place all your NEW filters and scm files as well as patterns, gradients, brushes in the USER/YOURNAME/.gimp-2.8 sub directories
Or you could lose them in the next version you install.


Where do I find them? Where'd they come from? My BIMP and GMIC import? What directories to put them in? How come they're working now (are they?) if they're not in the right directories and if they are in the right directories how come they'll still work when moved?

Just a tad confused. (as usual).

:) Going well, though. Much appreciate your help. Your patience and careful and considerate picture/text explanations. I do. I would never have got there/here by myself.

p.s. Just processed 70 files flawlessly. Beautiful. That's a heap of work done/avoided (whichever way you look at it) and more: a skill learned, a new tool in the toolbox.

:)


Happy to know you got them worked out! :)


All your filters will still work in the PROGRAM directory sub folders, (GIMP-2/).
BUT it is a good habit to keep all NEW resources in the sub folders under USER/USERNAME/.gimp-2.8 sub folders where they belong. :bigthup

If you need more help with that let me know. I would be more than happy to help you out.
Cheers.

_________________
Image


Top
 Post subject: Re: How To Make Simple Batch Process
PostPosted: Mon Oct 31, 2016 3:56 am  (#12) 
Offline
GimpChat Member

Joined: Sep 13, 2016
Posts: 137
abrogard wrote:
GIMP Version: 2.8.14\
<snip>
I would like to batch process the correcting of images with color/levels/sliding the blackness and whiteness bars.

Very simple process but it gets tedious and I have a lot of files to do. The scanner was poor and the images - greyscale - should be black and white but instead are universally grey.

I got that plug-in batch processor but I wasn't able to find this ability in it.


If the original pictures are all OK and if they are all scanned the same way you could/should give us an example of the bad one and a handmade one optimization and maybe what you have done.

I am very fond of batch process myself using PythonFu ;-) at least if the needed way of working is not to be found in the "fixed" batch-processing options.

Though the idea to use Gmic on all pictures loaded each in an layer and apply the "black&white" suitable option to all layers at once and then using a 'tool' to export each layer as new picture looks appealing to me.

I tryed the squarrel (below ) only with the Color->Levels from gimp. If that would work for all examples with same parameter, it would be 'peanuts' to do it in the Python-Console oneself (or as a plugin built oneself) ;-).
Attachment:
zwart_wit_eekhoorn.jpg
zwart_wit_eekhoorn.jpg [ 71.61 KiB | Viewed 3565 times ]


Top
 Post subject: Re: How To Make Simple Batch Process
PostPosted: Mon Oct 31, 2016 3:58 am  (#13) 
Offline
GimpChat Member
User avatar

Joined: Oct 20, 2016
Posts: 34
rich2005 wrote:
Quote:
I got that plug-in batch processor but I wasn't able to find this ability in it.


Which batch processor, DBP or BIMP?

Assuming BIMP http://www.alessandrofrancesconi.it/projects/bimp/
Determine the values required using the Gimp levels tool on an image.

In BIMP
When adding a procedure choose other gimp procedure
Search for the levels option.
Fill in the values from the Gimp levels.
Apply BIMP

All-in-one screenshot showing the releationship.
Attachment:
other-gimp-procedure.jpg


Using g'mic with BIMP
G'mic can create a logfile recording the parameters used. In linux it is in ~/.confic/gmic In Windows, something called APPDATA\gmic.

Find the values to use from the running the filter and looking in the logfile gimp_log

example
Attachment:
gmic01.jpg


In BIMP
Choose other gimp procedure and search for gmic
In the values, enter 1 for a new image and the gmic command line, type it in or better copy/paste.

example.
Attachment:
gmic02.jpg

So nice theme you got for GIMP!!!


Top
 Post subject: Re: How To Make Simple Batch Process
PostPosted: Tue Nov 01, 2016 6:06 pm  (#14) 
Offline
GimpChat Member

Joined: Oct 28, 2016
Posts: 14
Quote:
If the original pictures are all OK and if they are all scanned the same way you could/should give us an example of the bad one and a handmade one optimization and maybe what you have done.


O.K. :

hmmm... well it wouldn't let me. Inserting image links or web site addresses makes it say that my post looks too spamy (sic) for a new user. and asks me to remove them.

Try attaching files:

Attachment:
deckthehallsp1.jpg
deckthehallsp1.jpg [ 499.36 KiB | Viewed 3551 times ]


Attachment:
deckthehallsp1.png
deckthehallsp1.png [ 359.6 KiB | Viewed 3551 times ]


How's that?

I see you suggest a 'handmade one' and then I guess a batch processed example.

Well what you've got there is a batch processed example.

There'd really be no difference whatever. The two processes the same - whether batch or 'by hand'. I simply selected the 'charcoal' filter in black and white and changed nothing. It was good as it was. Making more or less grainy was problematic. I finished up changing nothing.

I did find another method, didn't I? Or use one, rather, I didn't find it, it was pointed out to me. Using Color levels. For that one, which turned out precisely the same result as well as I can see, I found a 'black point' of 180 and a 'white point' of about 230 to be fine. Gamma unchanged at 1.0.

That method can be batch processed too using BIMP but this means teaching it another procedure and if I remember right that's where I fell down. This 'layers' method came up and I adopted it. Simpler.


Top
Post new topic Reply to topic  [ 14 posts ] 

All times are UTC - 5 hours [ DST ]


* Login  


Powered by phpBB3 © phpBB Group