It is currently Tue Sep 22, 2026 2:58 pm


All times are UTC - 5 hours [ DST ]


Post new topic Reply to topic  [ 17 posts ] 
Author Message
 Post subject: Scanning Negatives
PostPosted: Sat Dec 17, 2016 1:14 pm  (#1) 
Offline
New Member

Joined: Dec 17, 2016
Posts: 4
I have to convert around 200 pictures from negatives. Some of them are very precious, with my brother who was on the Indian Army and was killed fighting terrorists in 2000.

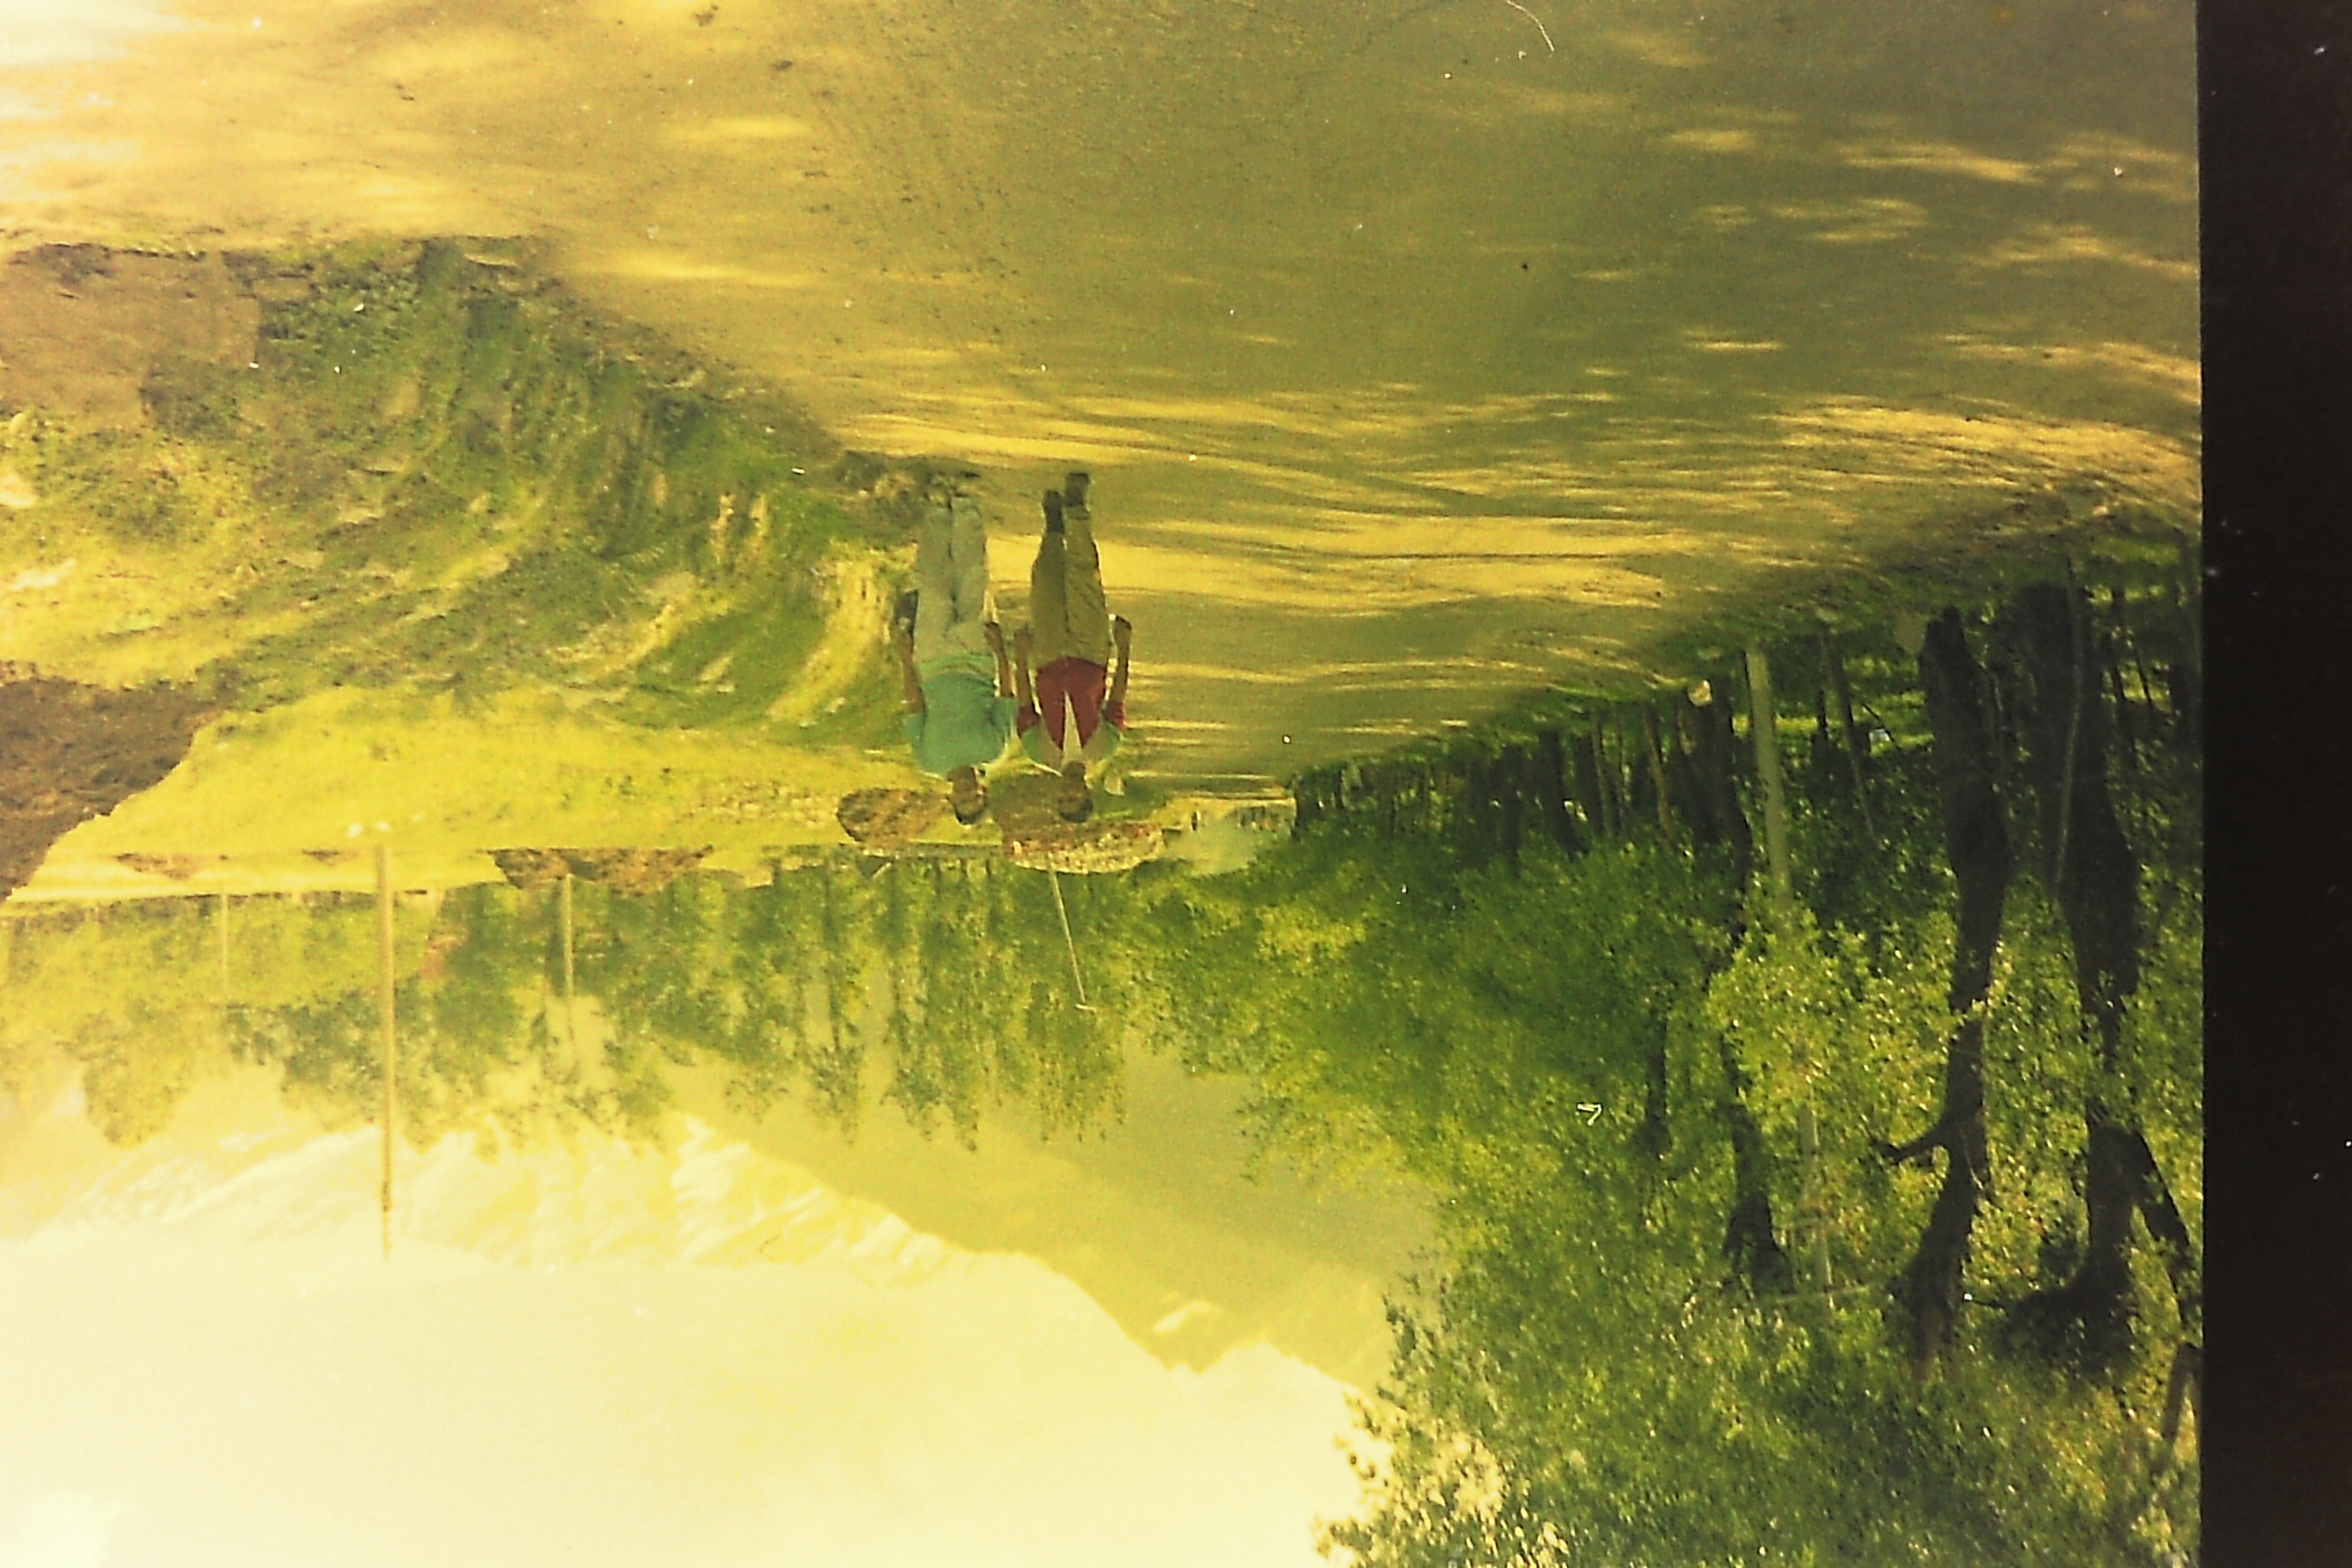
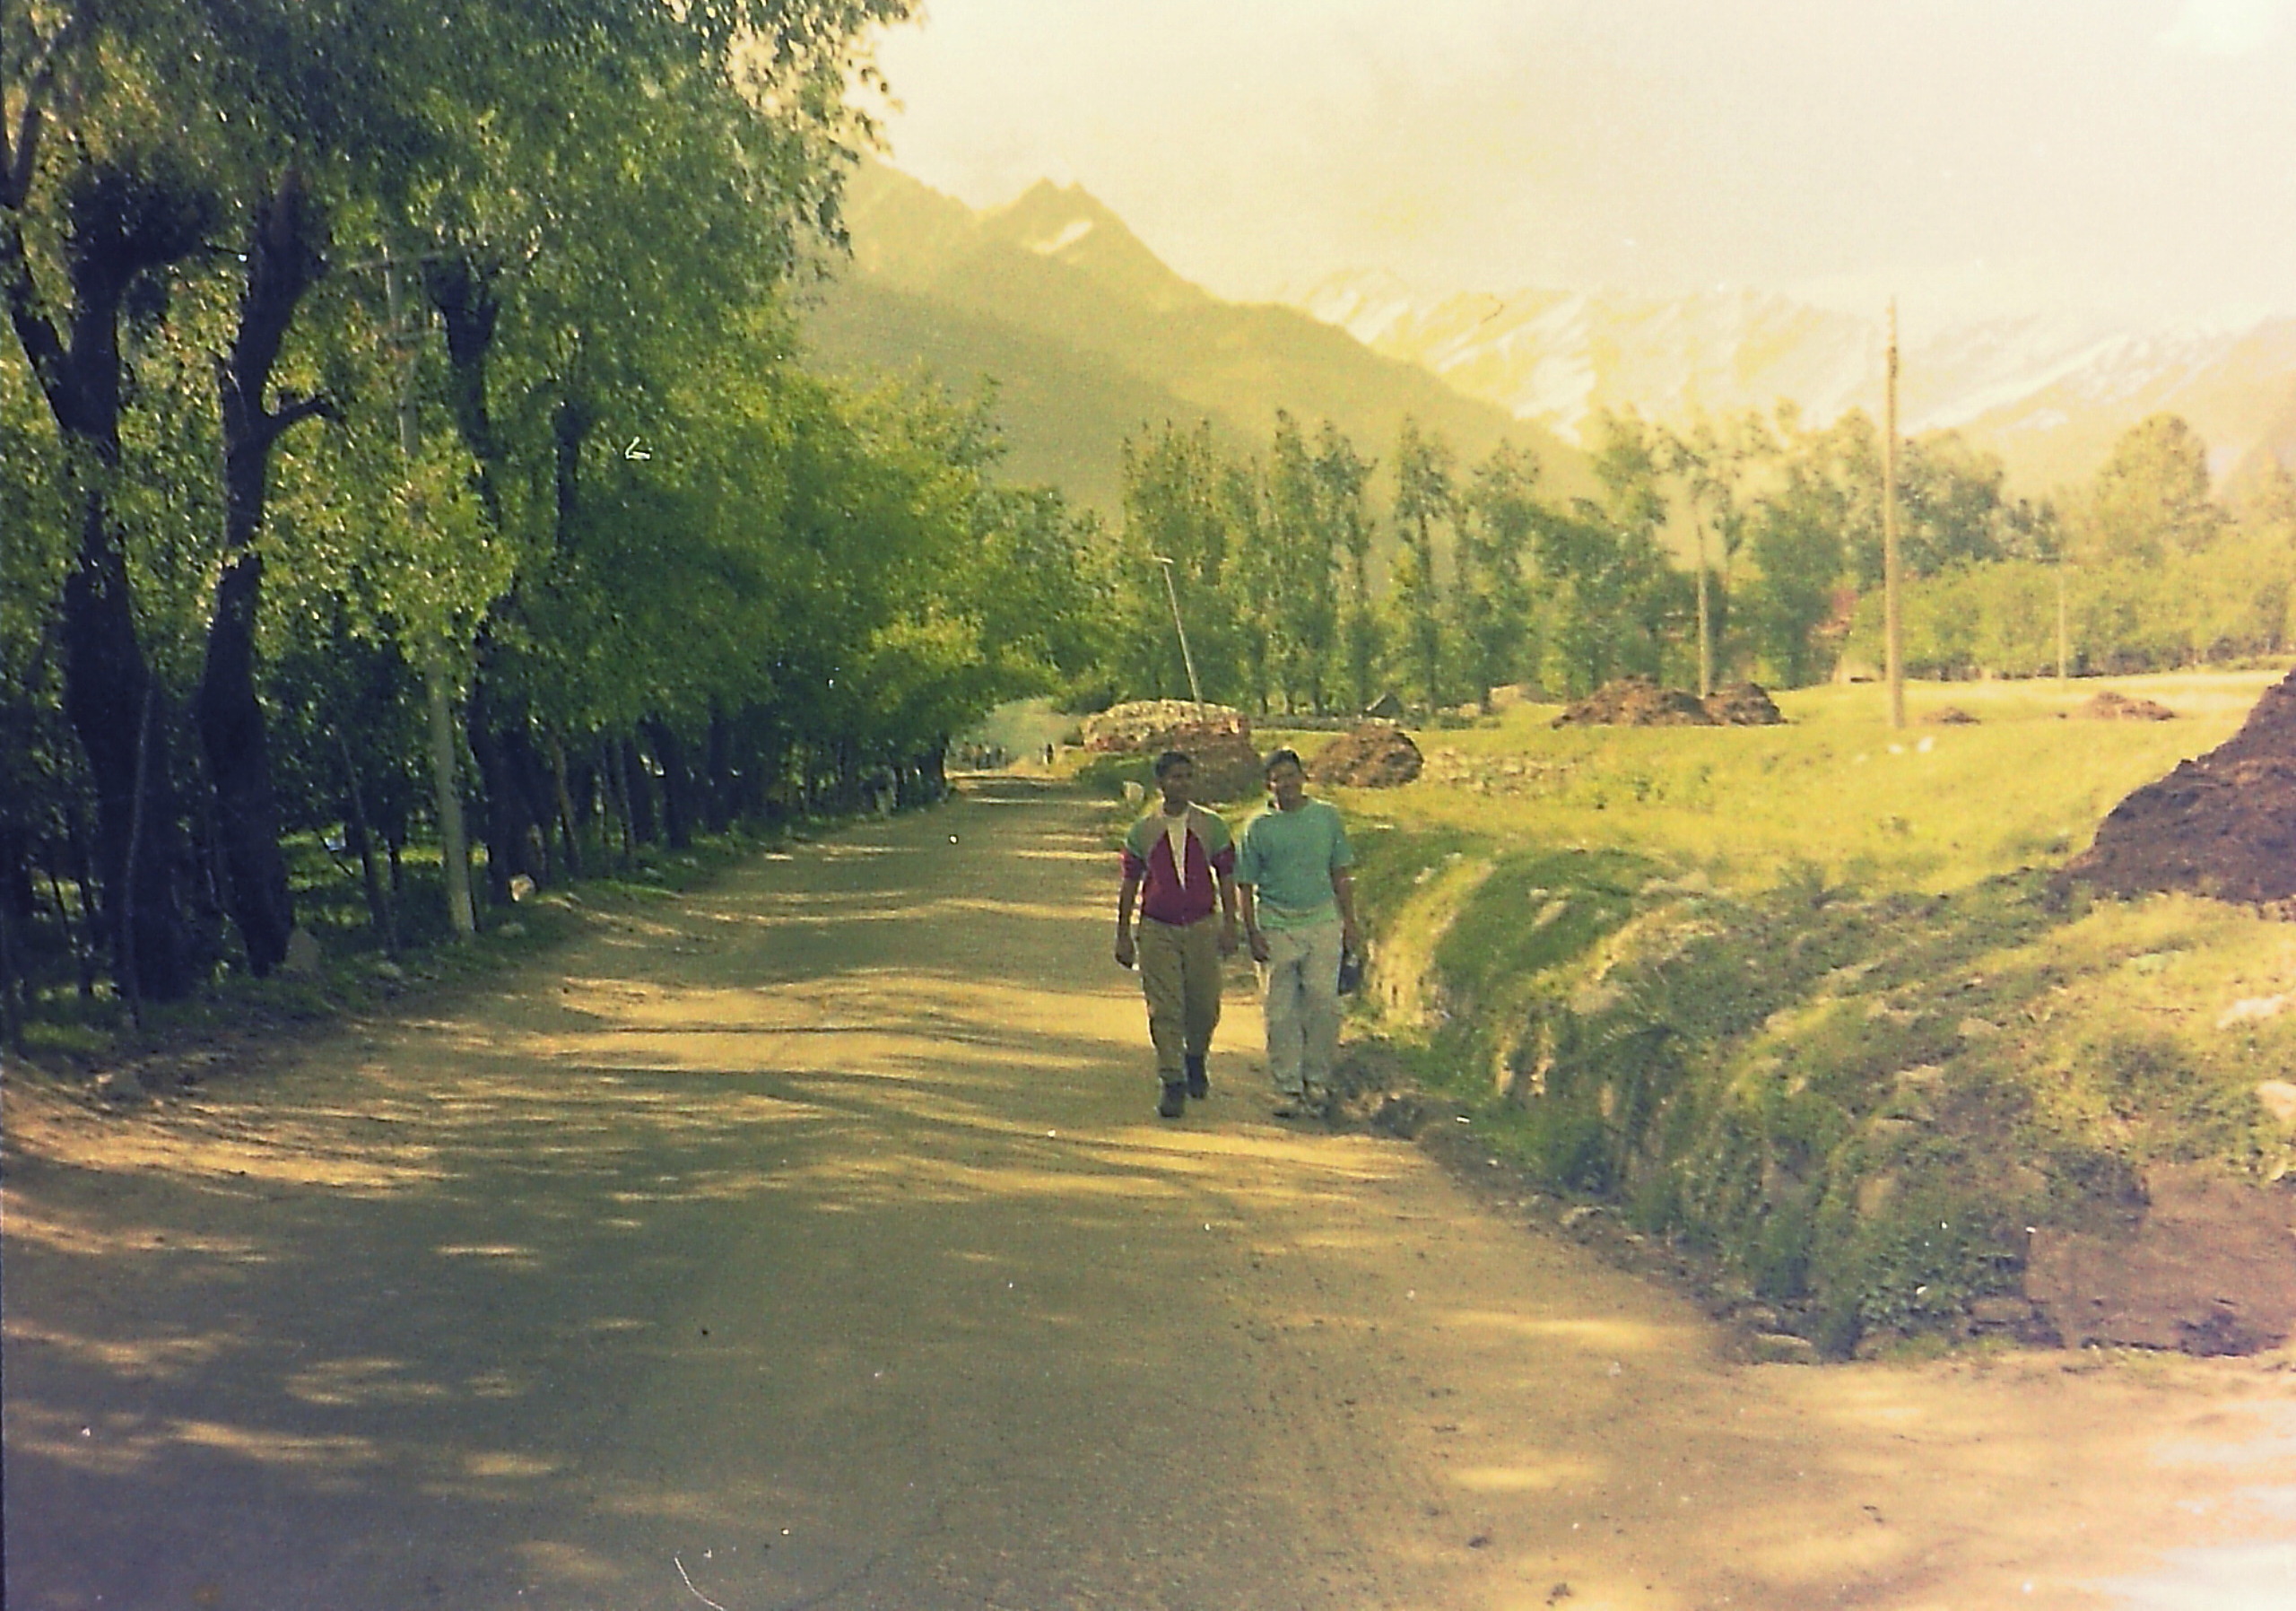
I have bought a negative scanner but the images are very yellow. I have tried the colour average method but does not seem to get it done. Any other way and is there a way to automate the process so I don't have to do it 200 times?

Original File

Image

With the Average Layer method
Image


Share on Facebook Share on Twitter Share on Orkut Share on Digg Share on MySpace Share on Delicious Share on Technorati
Top
 Post subject: Re: Scanning Negatives
PostPosted: Sat Dec 17, 2016 1:18 pm  (#2) 
Offline
New Member

Joined: Dec 17, 2016
Posts: 4
I must mention that I am an absolute newbie at using GIMP. So far, all I have done is crop and rotate images. Would be grateful for any help


Top
 Post subject: Re: Scanning Negatives
PostPosted: Sat Dec 17, 2016 1:27 pm  (#3) 
Offline
GimpChat Member
User avatar

Joined: Apr 08, 2010
Posts: 5420
Location: Northwest Ohio
maybe try some kind of tone mapping? I don't know how, but I am sure there are tutorials on the inter webs.


Top
 Post subject: Re: Scanning Negatives
PostPosted: Sat Dec 17, 2016 3:07 pm  (#4) 
Offline
GimpChat Member
User avatar

Joined: Mar 28, 2016
Posts: 312
Location: Netherlands
Welcome Sonam,

Here is a topic about "color cast":

viewtopic.php?f=18&t=14147
In this topic I forgot to mention the G'MIC>Colors>Mixer [...] filters, they are very useful too.

I recommend to instal G'MIC.

With 200 images, I would prefer to do process them one by one. You said the pictures were precious, so I would give them a special treatment. If you use G'MIC in GIMP, the sliders will stay in their position (in that session), so you can repeat those settings for other images.

The next example is not perfect (upper image is last edited, more red). But a nice begin. With repairing a strong color cast, you will always lose some colors. Here is a strong yellow color cast. When repairing, you will lose some of the original yellow in the image.
Here I used G'MIC>Colors>Specific saturation
G'MIC curves
GIMP color balance:


Attachments:
walking2.jpg
walking2.jpg [ 1.04 MiB | Viewed 14821 times ]
walking.jpg
walking.jpg [ 1 MiB | Viewed 14843 times ]


Last edited by iarga on Sat Dec 17, 2016 4:27 pm, edited 3 times in total.
Top
 Post subject: Re: Scanning Negatives
PostPosted: Sat Dec 17, 2016 3:44 pm  (#5) 
Offline
GimpChat Member
User avatar

Joined: Mar 01, 2014
Posts: 14198
Location: Spain, Aragón
Welcome Sonam, iarga did a very nice treatment on your image. I only applied the new filter Crazy Tone Map on her result.

Don't forget Sonam that iarga gave you a nice tip, when you apply any action in Gimp, the programme keeps the last filter/script used for your next photos to mend. It is under Filters at the first upper option.


Attachments:
walking-CrazyToneMap.jpg
walking-CrazyToneMap.jpg [ 1.49 MiB | Viewed 14835 times ]

_________________
Image

Gimp 2.10.36 (samj) portable _ OS Windows 10 Home_ 64bits
Don’t be afraid to start over. It’s a new chance to rebuild what you want.
Top
 Post subject: Re: Scanning Negatives
PostPosted: Sat Dec 17, 2016 9:27 pm  (#6) 
Offline
New Member

Joined: Dec 17, 2016
Posts: 4
Thank you for your advice, I am going to spend today working with these options to find out what works best and then start to do the 200 images.


Top
 Post subject: Re: Scanning Negatives
PostPosted: Sun Dec 18, 2016 1:11 am  (#7) 
Offline
GimpChat Member
User avatar

Joined: Jan 20, 2013
Posts: 14835
Location: roma, italy
Iarga, you did an excellent enhancement.
Thanks Issabella for "adding" to that one the effect of my CrazyTonMap.
I agree with Iarga, if those photos are important for you, Sonam, each one deserves a "personal" treatment, maybe similar to others but not always exactly the same. Good luck

_________________
"Where am I ?"


Top
 Post subject: Re: Scanning Negatives
PostPosted: Sun Dec 18, 2016 2:29 am  (#8) 
Offline
GimpChat Member
User avatar

Joined: Jan 20, 2013
Posts: 14835
Location: roma, italy
As Issabella, I started from Iarga's outcome(2) and played a bit.
Just to see another look...

Attachment:
walking-dn1.jpg
walking-dn1.jpg [ 1.41 MiB | Viewed 14771 times ]

_________________
"Where am I ?"


Top
 Post subject: Re: Scanning Negatives
PostPosted: Sun Dec 18, 2016 3:45 am  (#9) 
Offline
GimpChat Member

Joined: Sep 23, 2016
Posts: 317
Negatives are very orange. When the colours are inverted the resultant image lacks orange.

Does your scanner have software that came with it? Does this software have a feature to correct colours (especially the orange)? This would probably be the easiest way to go.


Top
 Post subject: Re: Scanning Negatives
PostPosted: Sun Dec 18, 2016 4:10 am  (#10) 
Offline
GimpChat Member
User avatar

Joined: Mar 28, 2016
Posts: 312
Location: Netherlands
The most important thing is to know how to work with colors:

Here,
viewtopic.php?f=18&t=14147&start=10#p193728 ,
I point to the excellent tutorials by Pat David.

You can use this in every photo editing software. In RawTherapee, you can save a profile after editing an image. Then you can use that profile on other images.

If you have a specific question about the process (in GIMP-G'MIC), please ask. Then I will try to give a step-by-step explanation.


Top
 Post subject: Re: Scanning Negatives
PostPosted: Sun Dec 18, 2016 5:50 am  (#11) 
Offline
GimpChat Member

Joined: Mar 04, 2011
Posts: 2615
Without going into the rights and wrongs of applying the same correction to many images.

Back to the original question,

Quote:
...Any other way and is there a way to automate the process so I don't have to do it 200 times?..


Using Gimp the plugins gmic and BIMP
http://www.gmic.eu and http://www.alessandrofrancesconi.it/projects/bimp/

Find a suitable gmic filter and determine the settings. This one is short, and can be copied from the layer name, others might need the gmic logfile if they are long.

Attachment:
gmiccommand.jpg
gmiccommand.jpg [ 210.53 KiB | Viewed 9784 times ]


In this case I get:

-gimp_tk_colortemp -3.73206,1,0


In BIMP, enter that as 'other Gimp procedure' with values '1' and the above string. Add the folder of files and an output folder.

Attachment:
bimp-gmic.jpg
bimp-gmic.jpg [ 185.07 KiB | Viewed 9784 times ]


best of luck.

edit: A different gmic filter similar result to tweaking the color curves: boost-fade with default setting works ok with the sample image
-gimp_boost_fade 5,0

Attachment:
boost-fade.jpg
boost-fade.jpg [ 960.93 KiB | Viewed 9778 times ]


Top
 Post subject: Re: Scanning Negatives
PostPosted: Sun Dec 18, 2016 9:23 am  (#12) 
Offline
GimpChat Member
User avatar

Joined: Jan 20, 2013
Posts: 14835
Location: roma, italy
New outcome, obtained using Gimp functions/filters.

Attachment:
5329_PICT0039 auto white balanced.jpg
5329_PICT0039 auto white balanced.jpg [ 1.07 MiB | Viewed 9771 times ]

_________________
"Where am I ?"


Top
 Post subject: Re: Scanning Negatives
PostPosted: Sun Dec 18, 2016 3:56 pm  (#13) 
Offline
GimpChat Member

Joined: Sep 26, 2015
Posts: 74
There are some setting in software that is based on the film type used. If you've not found those check the scanning software settings to see if they are available. This can make a significant difference on the initial scan.
You will still have to do some adjustments to compensate for the age of the negatives.


Top
 Post subject: Re: Scanning Negatives
PostPosted: Sun Dec 18, 2016 6:06 pm  (#14) 
Offline
New Member

Joined: Dec 17, 2016
Posts: 4
Thanks iarga, I am trying to install G'MIC and getting the hang of the tool. I think am getting somewhere and seeing results close to what I want

Also trying out the DSLR + Lighbox to scan the -ves in case the issue is with the negative scanner.


Top
 Post subject: Re: Scanning Negatives
PostPosted: Wed Oct 17, 2018 12:52 am  (#15) 
Offline
New Member

Joined: Oct 17, 2018
Posts: 1
Hello,

If your scanner doesn't give you result properly then you have to upgrade in the new version or you can reinstall the whole software...yet if it is not working properly then you have to take help of professional service provider.
Thanks...


Top
 Post subject: Re: Scanning Negatives
PostPosted: Wed Oct 17, 2018 3:41 am  (#16) 
Offline
Global Moderator
User avatar

Joined: Apr 01, 2012
Posts: 8471
Location: On the other side of your screen
Unfortunately your 'sky' is blown out. This is the best I could do with it.
Image

Oh forgot to mention
That was just using hue/saturation on the yellow
Contrast to embolden what was there then I enhanced the colour to brighten the green.

_________________
Image
Free Fun Photo Editing & resources
Poems from the Lord
Gimp Newby
Gimp version 3.2.4 and GMIC-Qt 4.0.2 OS :- Windows 10 Home 64


Top
 Post subject: Re: Scanning Negatives
PostPosted: Sat Nov 10, 2018 1:23 am  (#17) 
Offline
New Member

Joined: Nov 06, 2018
Posts: 1
Hey,

I have a query about negative scanning, Which side do you scan negatives? could you guys please suggest me something good for this query?????

Thank you in advance.


Top
Post new topic Reply to topic  [ 17 posts ] 

All times are UTC - 5 hours [ DST ]


* Login  


Powered by phpBB3 © phpBB Group