It is currently Sun Nov 08, 2026 2:53 am


All times are UTC - 5 hours [ DST ]


Post new topic Reply to topic  [ 16 posts ] 
Author Message
 Post subject: Editing Photos - help needed ASAP please
PostPosted: Mon Jan 28, 2019 1:34 pm  (#1) 
Offline
GimpChat Member

Joined: Feb 26, 2014
Posts: 248
GIMP Version: 2.8.14
Operating System: Windows
GIMP Experience: Basic Level

List any relevant plug-ins or scripts:
heal tool


Hi there,

I’d like to make the attached photos look better and I’d very much appreciate your experienced and quick help (little time left to edit).

I’ve attached a photo named Wildlife Rescue.

I’ve tried all sorts of Heal Selection tool settings to make the photo look like there is no phone on the wall. It just makes a weird dark grey spot. Is there a way to “grab” the grey color on the wall beside the phone and just cover over the phone? If so, can you pls share the step-by-step? Ex. 1. Click Tools>Selection tool, etc.

Are there any GIMP tools I could try using to make the subjects in the photos less blurry? I had to take these photos on the run with a cheap cell phone camera. Again, if you could pls. share the precise steps that would be so appreciated.

Also, I’ve attached a photo titled “Maker Space Sewing” and a subject was gesticulating with their hand so it produces a “vibration-looking” image in the photo. Is there anyway to correct that or edit it so it’s not so awkward-looking?
Exact steps would be greatly appreciated.

Thank you all so very much (up against my deadline)!


Attachments:
Maker Space - Sewing.jpg
Maker Space - Sewing.jpg [ 1.54 MiB | Viewed 3087 times ]
WildLife Rescue.png
WildLife Rescue.png [ 4.54 MiB | Viewed 3087 times ]
Florida Friendly Landscaping - Eliminate sink - garbage can.png
Florida Friendly Landscaping - Eliminate sink - garbage can.png [ 4.79 MiB | Viewed 3087 times ]
Share on Facebook Share on Twitter Share on Orkut Share on Digg Share on MySpace Share on Delicious Share on Technorati
Top
 Post subject: Re: Editing Photos - help needed ASAP please
PostPosted: Mon Jan 28, 2019 1:59 pm  (#2) 
Online
GimpChat Member
User avatar

Joined: Mar 01, 2014
Posts: 14227
Location: Spain, Aragón
Is this one alright for you?


Attachments:
WildLife Rescue_E.jpg
WildLife Rescue_E.jpg [ 972.96 KiB | Viewed 3076 times ]

_________________
Image

Gimp 2.10.36 (samj) portable _ OS Windows 10 Home_ 64bits
Don’t be afraid to start over. It’s a new chance to rebuild what you want.
Top
 Post subject: Re: Editing Photos - help needed ASAP please
PostPosted: Mon Jan 28, 2019 2:14 pm  (#3) 
Offline
GimpChat Member
User avatar

Joined: May 10, 2013
Posts: 1443
Location: Finland
Is this one okay? I removed the phone but left the grain on the wall so that it's harder to spot something was wiped off.
The blur is so bad you can't fix it.

Tools used: Resynthesizer heal selection. Sample from sides, not all around which is default setting.
Tip: Try to make the area you want to heal as small as possible.
Fixed couple spots with clone tool.


Attachments:
Untitled001.jpg
Untitled001.jpg [ 899.36 KiB | Viewed 3072 times ]


Last edited by Nidhogg on Mon Jan 28, 2019 2:23 pm, edited 1 time in total.
Top
 Post subject: Re: Editing Photos - help needed ASAP please
PostPosted: Mon Jan 28, 2019 2:16 pm  (#4) 
Offline
GimpChat Member

Joined: Feb 26, 2014
Posts: 248
Hi Issabella,

Tank you so much!!

Can you pls share the steps you took to cover over the phone?

Also, is there any way to make the photo less blurry?

My bad with the cheap cell.

Thank you again for your kind and swift help!


Top
 Post subject: Re: Editing Photos - help needed ASAP please
PostPosted: Mon Jan 28, 2019 2:18 pm  (#5) 
Offline
GimpChat Member

Joined: Feb 26, 2014
Posts: 248
Hi nidhogg,

Thank you so much as well!!

Can you pls share the steps you took to cover over the phone?

Also, is there any way to make the photo less blurry?

My bad with the cheap cell.

Thank you again for your kind and swift help as well!


Top
 Post subject: Re: Editing Photos - help needed ASAP please
PostPosted: Mon Jan 28, 2019 2:39 pm  (#6) 
Offline
GimpChat Member
User avatar

Joined: May 10, 2013
Posts: 1443
Location: Finland
You're welcome, added my steps.
You can't fix the blur so that the outcome would be satisfying.
There is no way to bring lost details back. If you sharpen the image, it will turn out even more unnatural and uglier.


Top
 Post subject: Re: Editing Photos - help needed ASAP please
PostPosted: Mon Jan 28, 2019 3:03 pm  (#7) 
Offline
GimpChat Member

Joined: Feb 26, 2014
Posts: 248
I used the heal selection with sides chosen with as low as a 5 setting (how close to choose color from) but got dark blotches.

I used the rectangular Tool to create the smallest box around the phone ... still dark blotches.

Can you pls share re: Clone Tool...
1. where it's selected in GIMP (I'n not at a PC with GIMP now)
2. which settings you used in the Clone Tool?
3. Did you have to use the Clone Tool several times? To "brush" away the phone residue?

I'm trying to do this on the fly.

Thank you.


Top
 Post subject: Re: Editing Photos - help needed ASAP please
PostPosted: Mon Jan 28, 2019 3:19 pm  (#8) 
Offline
GimpChat Member
User avatar

Joined: May 10, 2013
Posts: 1443
Location: Finland
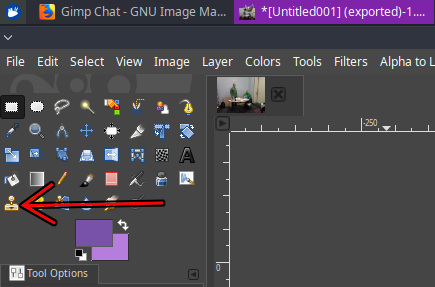
Clone tool looks like a stamp.
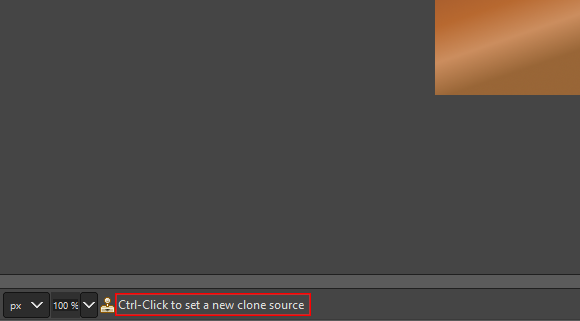
Activate it, ctrl-click in a spot where from you want to copy.
And brush, or single click in a place where you want to clone.
In your image on either side of the phone at same height is the best place to clone from, because of the lighting.
I used the round brush that has a hardness of 075, size was around 50px. Just couple clicks on the places that did not look good after heal selection.

Image


Top
 Post subject: Re: Editing Photos - help needed ASAP please
PostPosted: Mon Jan 28, 2019 3:31 pm  (#9) 
Offline
GimpChat Member

Joined: Feb 26, 2014
Posts: 248
Thank you ever so much for sharing those details and graphics.

The challenge I faced was that I;d steady my cell phone camera and hit the camera icon to shoot the photo but there would sometimes be a 10-15 second delay before I'd hear the click and little flash signifying the photo was taken.

I have no idea why there was a delay but it seems that may have caused the blurring as 15 seconds is a long time to hold a cell perfectly steady.

Not sure ho to avoid that.

Very much appreciate all your kind help.


Top
 Post subject: Re: Editing Photos - help needed ASAP please
PostPosted: Mon Jan 28, 2019 3:41 pm  (#10) 
Offline
GimpChat Member
User avatar

Joined: May 10, 2013
Posts: 1443
Location: Finland
No problem, that's pretty basic editing you should get the hang of it in no time.
Best way is just to test with some random images.
I wonder how it takes so long, maybe you have timer on? Or very old cellphone.
Taking photos inside can be challenging, especially with cellphone.


Top
 Post subject: Re: Editing Photos - help needed ASAP please
PostPosted: Mon Jan 28, 2019 4:03 pm  (#11) 
Offline
GimpChat Member

Joined: Feb 26, 2014
Posts: 248
Phone is 7 months old and no timer setting.

I Googled this and many users experience this lagging with seemingly no definitive answers.

Thanks for all your GIMP help!!


Top
 Post subject: Re: Editing Photos - help needed ASAP please
PostPosted: Mon Feb 04, 2019 4:13 pm  (#12) 
Offline
GimpChat Member

Joined: Feb 26, 2014
Posts: 248
Hi Nidhogg,

I’m trying to recreate the steps you followed.
1. Click (left) the Clone tool (Stamp icon)
2. Click (RIGHT) on an area close to where the phone is but blank on the wall
3. Choose Edit>Copy
4. Click (RIGHT) on the Paintbrush icon
5. Select which in the drop-down menu to reach Hardness? Size
6. Use mouse cursor to brush with Paintbrush over the phone??

Thank you!!


Top
 Post subject: Re: Editing Photos - help needed ASAP please
PostPosted: Tue Feb 05, 2019 5:54 am  (#13) 
Offline
GimpChat Member
User avatar

Joined: May 10, 2013
Posts: 1443
Location: Finland
Select your brush, and brush size first.
Then switch to clone stamp tool.
The source is selected with mouse and ctrl pressed down, then you can brush with your mouse (left button pressed down) over the phone.
No need to edit>copy anything.

Image


Top
 Post subject: Re: Editing Photos - help needed ASAP please
PostPosted: Thu Feb 14, 2019 11:54 am  (#14) 
Offline
GimpChat Member

Joined: Feb 26, 2014
Posts: 248
Can you pls. share the step-by-steps to "cover up" the sink in that photo I uploaded with a guy wearing a hat?

Thank you!


Top
 Post subject: Re: Editing Photos - help needed ASAP please
PostPosted: Thu Feb 14, 2019 2:39 pm  (#15) 
Offline
GimpChat Member
User avatar

Joined: May 10, 2013
Posts: 1443
Location: Finland
Yes I can. I'll be using different method with that image though. Will post a step-by-step asap.


Top
 Post subject: Re: Editing Photos - help needed ASAP please
PostPosted: Sat Feb 16, 2019 6:06 am  (#16) 
Offline
GimpChat Member
User avatar

Joined: May 10, 2013
Posts: 1443
Location: Finland
Okay.
Here is a quick tut how I would remove the sink behind the poster.
I'm going to do this differently than the phone image, and use Gimp 2.10 because of the improved gradient tool.
The light source is coming from above, so we also need to get rid of the shadow below the sink.

1. Use color picker somewhere around number "1" to define your foreground color.
2. Hit x (exchanges foreground-background colors) and use color picker close to the floor (where I have marked 2).
3. Create a new transparent layer. Use free selection tool to create the area that will be fixed.
Note! I have my free selection tool set with antialias and 1px feather by default because I use it to make png cutouts.
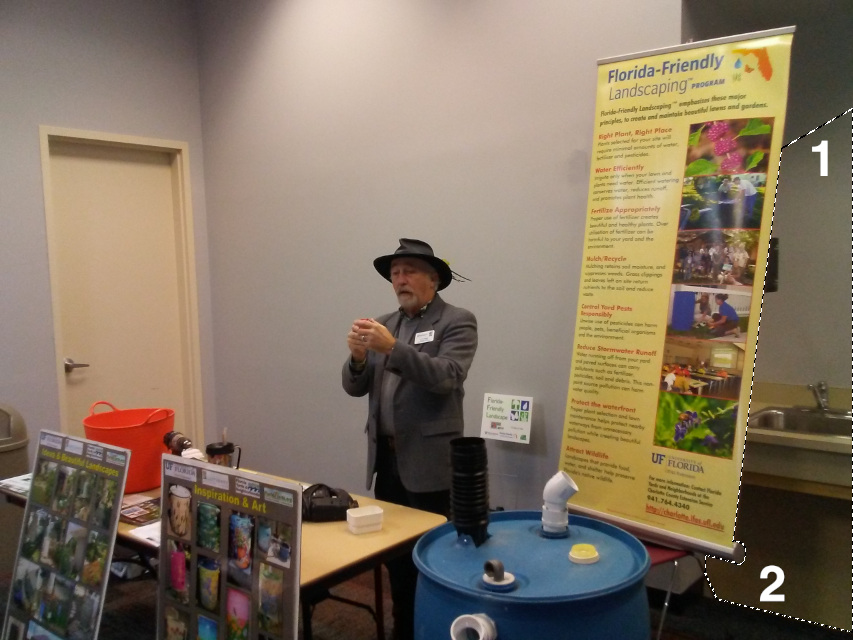
Image

4. Switch to the transparent new layer and select gradient tool from your tool box. (FG to BG, shape linear)
Drag and draw a gradient from the lower point to the upper point, slightly askew.
Move and play with the end points after drawing the gradient for best possible blend with the original wall color in the upper edge area.
Add 2 stops in the gradient line (you do this by clicking on the line) and change the color to a lighter tone.
You can pick the exact colors from the original layer, and make the gradient much better. I just picked a lighter tone for this example.
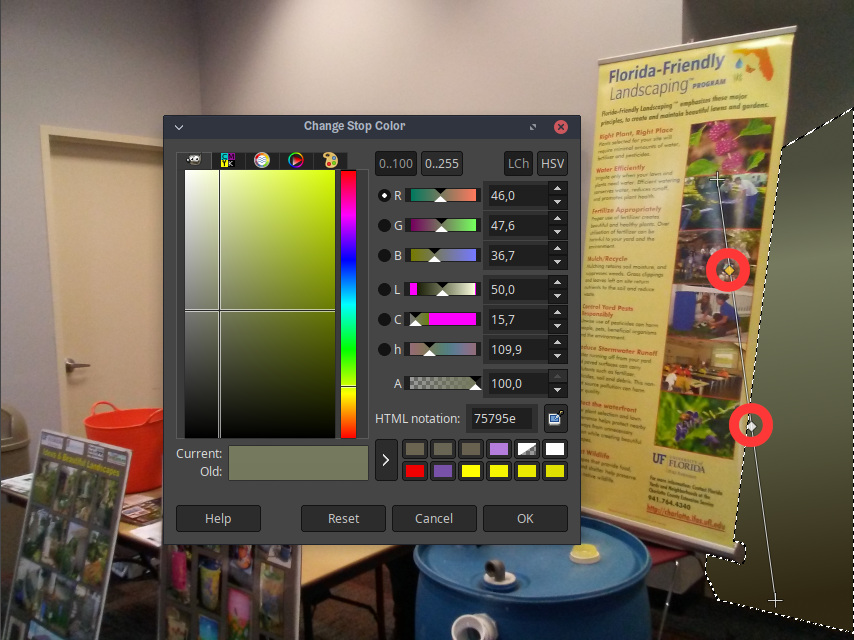
Image

But there will be a visible difference anyway. Main problem is the grain of the original image.
Adding noise and a small blur.

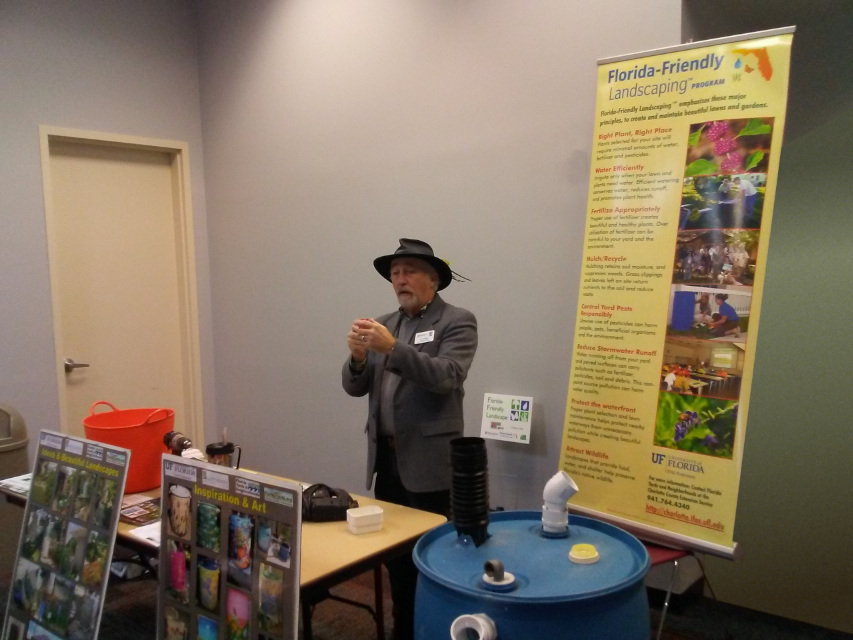
5. Duplicate the gradient layer first and switch to it.
6. Filters/Noise/CIE Ich noise. Drop lightness to around 8-10, click OK.
7. Filters/Blur/Gaussian Blur. Size X 1.20, Size Y 1.20. Click OK.
Image

A lot depends how well you got the gradient originally to blend in the upper area of the selection.
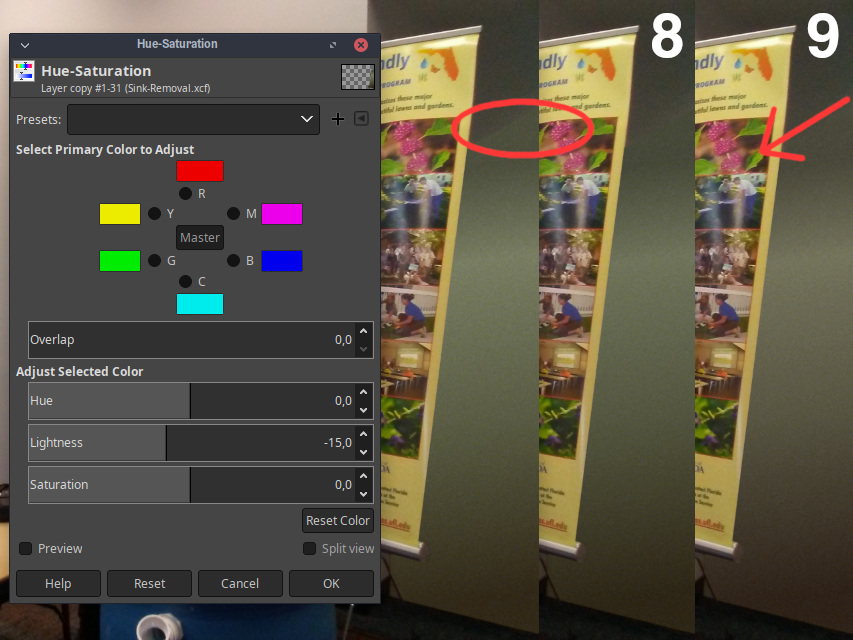
My gradient became too light, which is why I'm using Hue-Saturation to fix the lightness and possible hue change.
You could also use the Hue-Chroma or Brightness-Contrast if the difference is small.

8. Colors/Hue-Saturation. Lightness -15 seems okay for this. Play with hue if needed. You may need to use different values.
9. Final touch. Select eraser tool and the softest round brush that has 025 hardness. Size around 100.
Swipe across the upper edge so that half of the eraser tip is over the gradient.
You can also experiment, and try to clean a larger area to expose more of the original image but be careful.
Image

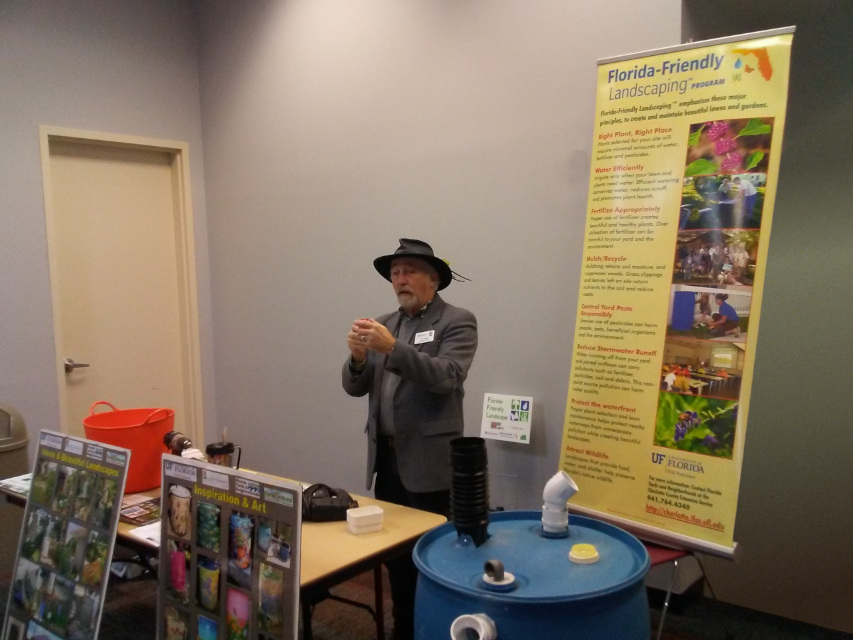
One more step to fix the sharper edge compared to the edge of the poster.
Layer/Transparency/Alpha to Selection. Select/Invert.
Select/Feather: 3px, click Delete.
There's some black box behind the poster, if it comes into view use 2px for feather.
You can also use small soft eraser and go along the edge.

The gradient could be better but it was just a small tut.
Image

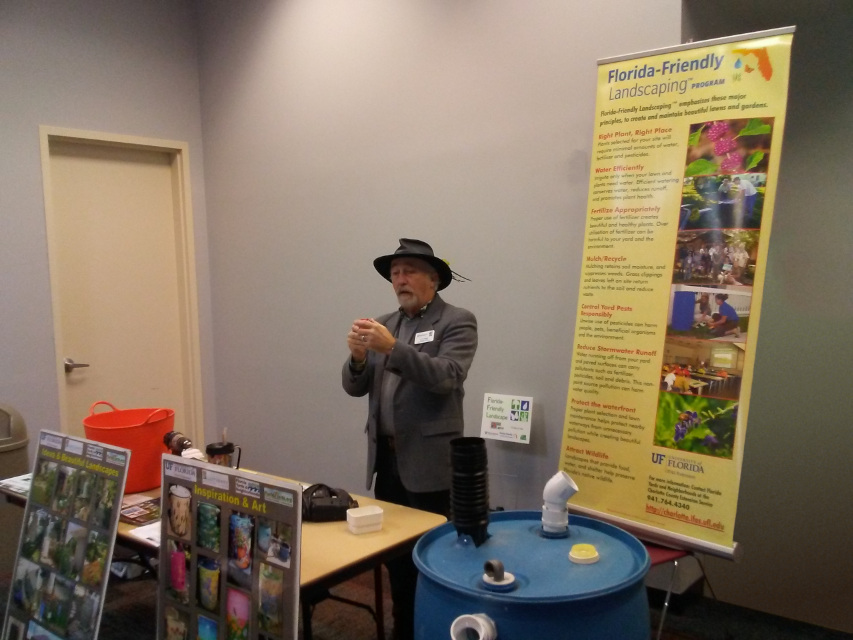
Alternate version, erased more aside of the poster in step 9.
Image

If you don't mind the black box, or whatever that is behind the Florida poster you could make the selection area just above the sink.
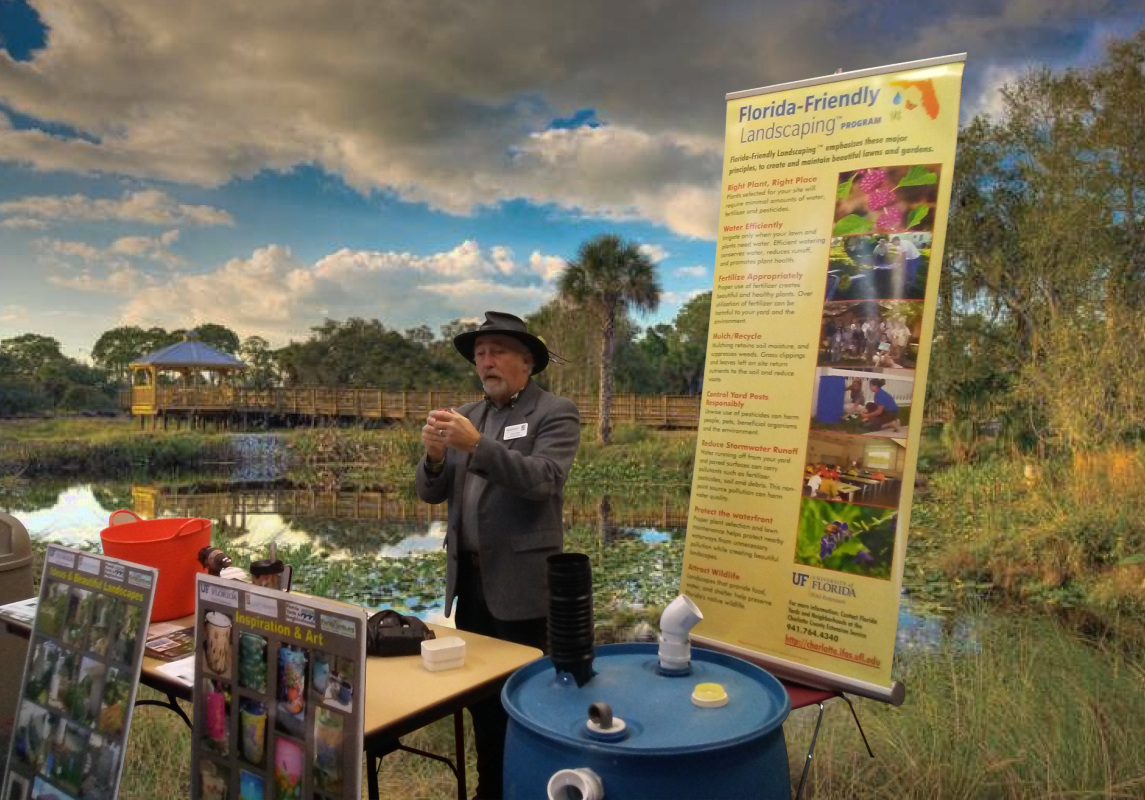
Or you could get rid of whole background...and throw him in the Everglades.
Image


Top
Post new topic Reply to topic  [ 16 posts ] 

All times are UTC - 5 hours [ DST ]


* Login  


Powered by phpBB3 © phpBB Group