It is currently Mon Sep 21, 2026 1:44 am


All times are UTC - 5 hours [ DST ]


Post new topic Reply to topic  [ 6 posts ] 
Author Message
 Post subject: Ultrabeginners: how to set a marker (see video)
PostPosted: Sat Feb 09, 2019 3:52 am  (#1) 
Offline
GimpChat Member

Joined: Nov 29, 2018
Posts: 6
GIMP Version: 2.8.10
Operating System: Windows
GIMP Experience: New User


I am with 2.10 on Windows 10. I wanted to restore some negative scans with a really bad green/yellow cast.

That video is quite good, I just wonder, how they set the markers? He said SHIFT+CLICK, but that seems not to work in 2.10

Have can it be done?

He does it a few Seconds after 3:00

youtube. com/watch?v=a3qxVWeQDho&t=180s


Share on Facebook Share on Twitter Share on Orkut Share on Digg Share on MySpace Share on Delicious Share on Technorati
Top
 Post subject: Re: Ultrabeginners: how to set a marker (see video)
PostPosted: Sat Feb 09, 2019 5:48 am  (#2) 
Offline
GimpChat Member
User avatar

Joined: May 10, 2013
Posts: 1442
Location: Finland
I think the workflow would be slightly different on Gimp, he's using older version of Photoshop.
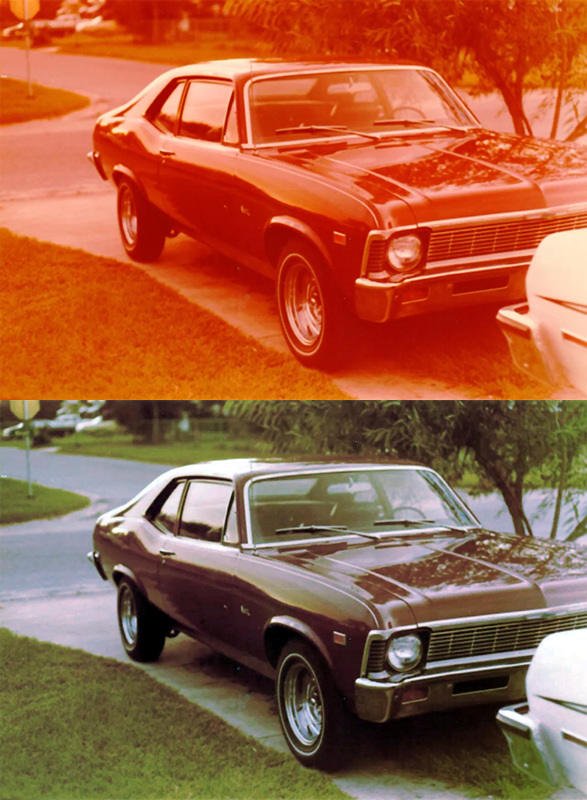
Never tried to fix color cast image, so I gave it a try.
First I used Gmic/Colors/Autobalance, and then Colors/levels.

https://www.lifewire.com/correct-white- ... mp-1701672

Image


Top
 Post subject: Re: Ultrabeginners: how to set a marker (see video)
PostPosted: Sat Feb 09, 2019 7:15 am  (#3) 
Offline
GimpChat Member

Joined: Mar 04, 2011
Posts: 2615
Quote:
...I just wonder, how they set the markers? He said SHIFT+CLICK, but that seems not to work in 2.10..


The answer to that is the 'markers' are sample points. see: https://docs.gimp.org/2.10/en/gimp-samp ... ialog.html
Ctrl-drag-in-from-ruler In your image https://i.imgur.com/iknm5fz.jpg

There is no equivalent way (that I know of) in Gimp to directly set a sample point from within the threshold dialogue.
Levels -> Auto Input Levels does a pretty good initial fix.


Top
 Post subject: Re: Ultrabeginners: how to set a marker (see video)
PostPosted: Sat Feb 09, 2019 7:57 am  (#4) 
Offline
GimpChat Member

Joined: Nov 29, 2018
Posts: 6
Nidhogg wrote:
I think the workflow would be slightly different on Gimp, he's using older version of Photoshop.


I am really sorry, I overlooked the Photoshop part. I googled for "GIMP" in quotes. Google results getting more and more unreliable.

I will follow up on what you guys wrote.

Thank you!


Top
 Post subject: Re: Ultrabeginners: how to set a marker (see video)
PostPosted: Mon Feb 11, 2019 1:05 am  (#5) 
Offline
GimpChat Member

Joined: Nov 29, 2018
Posts: 6
@Nidhogg
I tried you method on a faded positive and it works quite well. Mine are way worse though, so I need more fine tuning.

When I start with a negative I have problems to invert it. Darktable has a function to 'offset' the film color (usually brownish orange). Seems GIMP does not have that auto function. Methods that I have seen in an 2008 tutorial seems not to work in 2.10.8

Anybody here working the negative film?

(the idea why negative is to trick out the auto correction that scanners have)


Top
 Post subject: Re: Ultrabeginners: how to set a marker (see video)
PostPosted: Mon Feb 11, 2019 12:57 pm  (#6) 
Offline
GimpChat Member

Joined: Mar 04, 2011
Posts: 2615
You could try this old plugin as a starting point. ColourNegativeInverter.py - attached, unzip, pop into plugins folder.

The home page is long gone: http://www.rayadagio.de/manufacture.html

Example is some ancient negative I just pulled out and scanned in a regular flatbed, so not wonderful ;)

1. The plugin. Colour pick unexposed orange and turn off Auto seems to work best here. https://i.imgur.com/1qAUIFY.jpg

2. Which gets me to this: https://i.imgur.com/O576Jzy.jpg

3. Levels, Auto Input Levels, gets to this. https://i.imgur.com/ijoTt5N.jpg

Best of luck.


Attachments:
ColourNegativeInverter.zip [1.72 KiB]
Downloaded 170 times
Top
Post new topic Reply to topic  [ 6 posts ] 

All times are UTC - 5 hours [ DST ]


* Login  


Powered by phpBB3 © phpBB Group