It is currently Sun Sep 13, 2026 3:51 am


All times are UTC - 5 hours [ DST ]


Post new topic Reply to topic  [ 26 posts ]  Go to page 1, 2  Next
Author Message
 Post subject: Cloudy Foreboding Moon Animation
PostPosted: Sat Oct 29, 2011 12:50 pm  (#1) 
Offline
GimpChat Member

Joined: Dec 20, 2010
Posts: 174
Location: Wherever the voices in my head tell me I am.
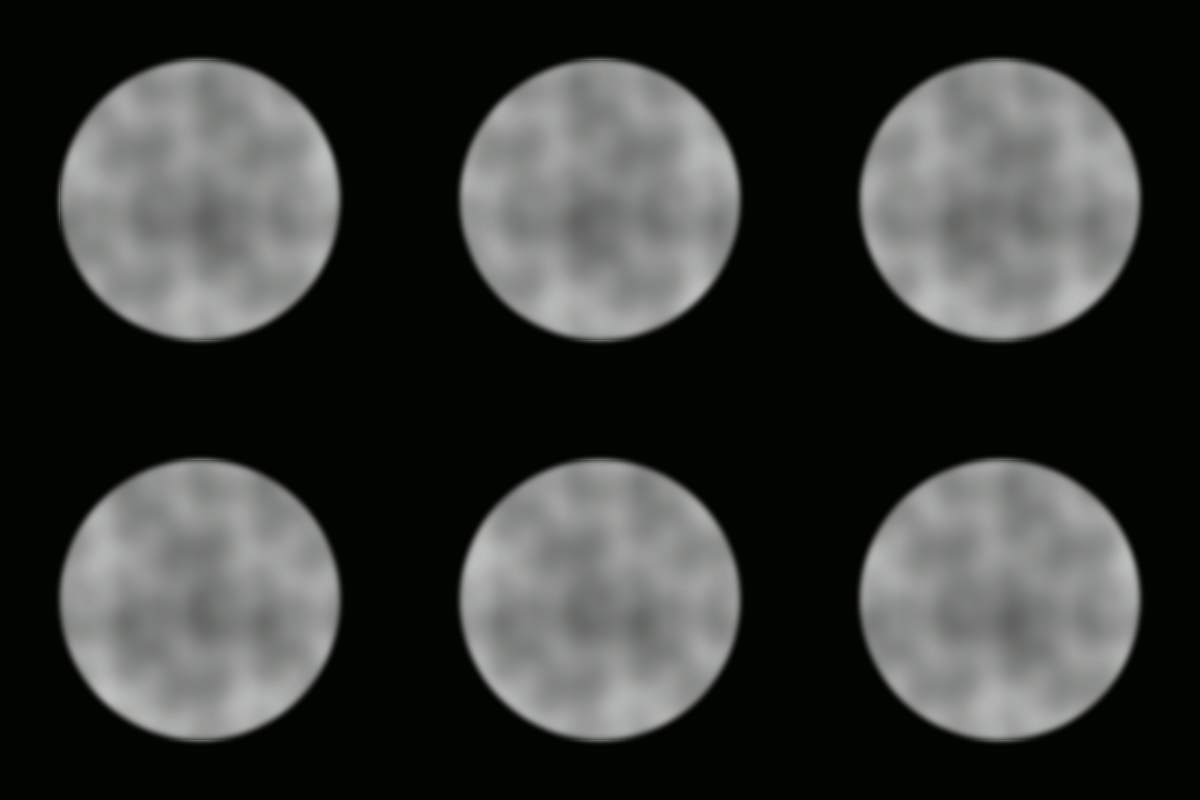
This tutorial will show you how to make the cloudy foreboding moon object that was used in the hovering owl animation.
Image

Making The Moon and Clouds Layers


Open a New 400x400 image (File | New)

Save it into a working folder (maybe named foreboding moon) and name the image file parts.xcf

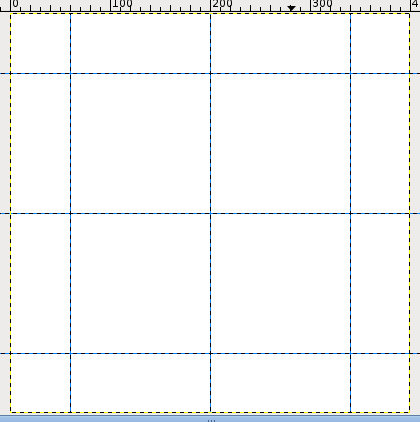
Drag horizontal guidelines down from the ruler bar at the top of the image window to positions 340, 200, and 60. If you look at the bottom of your image window frame, as you drag the guideline, you should see a continually updated Add Guide message telling you what position your guideline is at.

Drag vertical guidelines from the ruler bar on the left side of your image to positions 340, 200, and 60.

Alternatively, from your image window you can select (Image | Guides | New Guide) to set the various guidelines if you have a hard time setting them up using your mouse.

Your guides should be arranged as shown in the image below.
Image

Add a New Layer to the image (Layer | New Layer) and name the layer Moon.

Select the Ellipse Select Tool.

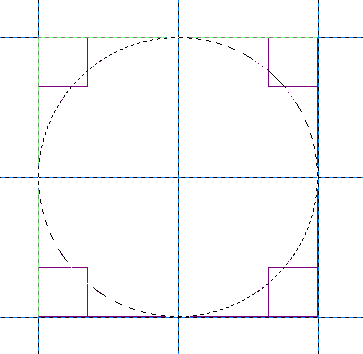
In the Tool Options Dialog window for the Ellipse Select Tool, make sure that the following are checked (activated): Antialiasing, Feather edges (use a Radius value of 10.0), Expand From Center, Fixed Aspect Ratio and make sure the Aspect Ratio is 1:1.

Place your mouse cursor at the point where the two center guidelines intersect in the middle of the screen at x,y position 200,200. Hold down your left mouse button and drag the mouse cursor down and towards the left until the circular selection is touching all four outer guidelines as shown below:
Image

Change the Foreground Color to a5a5a5 and the Background Color to e9e9e9

Select the Blend Tool. For the Tool Options for the Blend Tool, set Shape to Radial.

Place your mouse cursor at the point where the two center guidelines intersect at the middle of the image and hold down your left mouse button while dragging it to the right along the middle horizontal guideline until you reach the far right vertical guideline.

Then select

Select | None

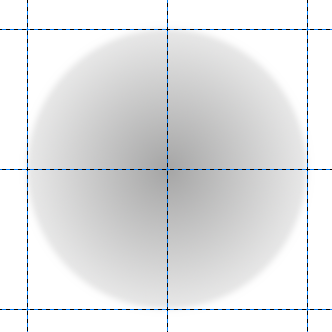
The circular selection will now have a gradient fill as shown below:
Image

That will be used as the moon object in the animation.

Add another New Layer to the image (Layer | New Layer) and name it Clouds.

Select the Rectangle Select Tool.

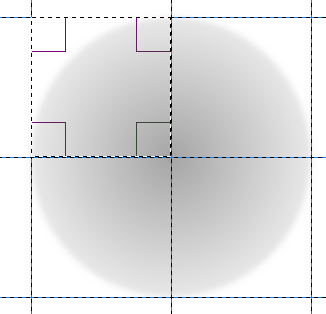
Beginning at the upper left corner where the left Vertical and top Horizontal guidelines intersect, drag a rectangular selection by dragging down to the middle horizontal guideline and right to the middle vertical guideline creating a small square selection:
Image

Then select

Layer | Crop To Selection

Then

Select | None

Then select

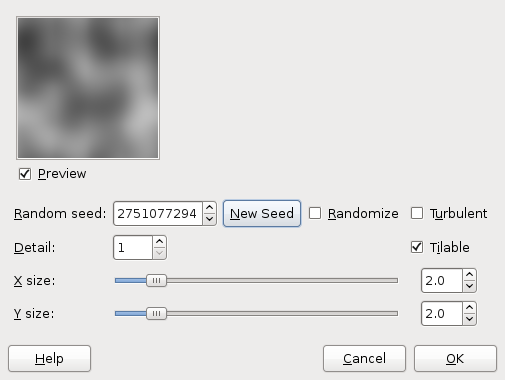
Filters | Render | Clouds | Solid Noise
Image

As shown above, set the X size and Y size each to 2.0.
Activate Tilable.
Click New Seed until you end up with a design you like.
Click OK.

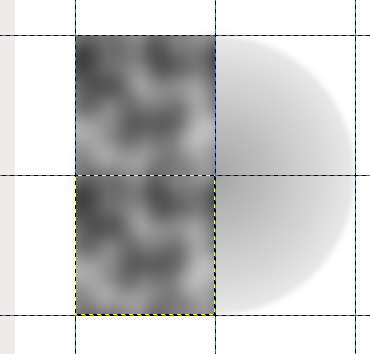
Duplicate the Clouds Layer and using the Move Tool, move it down to the square below bound by the outer and center guidelines:
Image

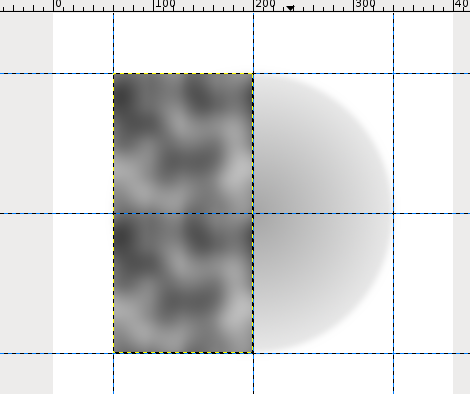
Place your mouse cursor inside the Layers Dialog window over the Clouds Copy Layer and right-click and from the menu that opens select Merge Down. You will then have a rectangular Clouds Layer as shown below:
Image

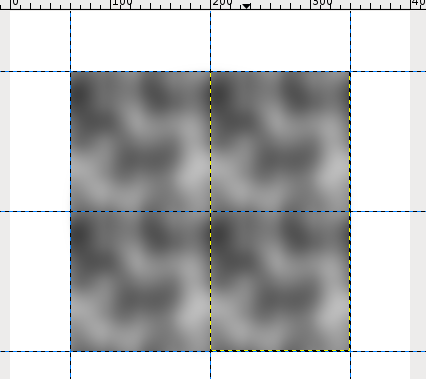
Duplicate that Layer twice.

Using the Move Tool, move Clouds Copy#1 of the duplicated Layers over to the right to be bounded by the vertical center and outer guidelines and the two outer horizontal guidelines as shown below:
Image

Move Cloud Copy, the other duplicated Layer so that it's left side is touching the outer Vertical guideline. It will extend beyond the boundary of the image boundary as shown below:
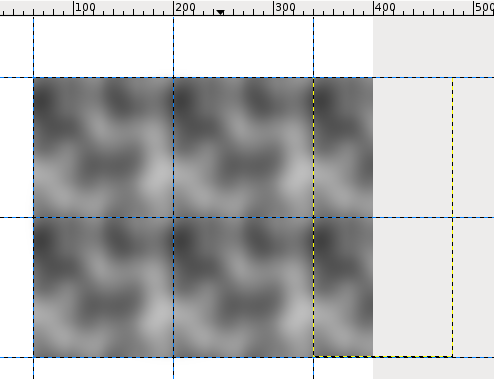
Image

In the Layers Dialog Window turn off the visibility (eyeball icons) of all Layers except for the three Cloud Layers:
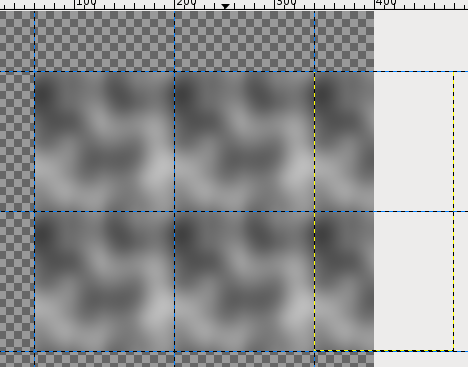
Image

In the Layers Dialog Window, right-click on one of the visible Cloud Layers and from the menu that opens select Merge Visible Layers.

In the Dialog Box that opens, accept the default of Expand as necessary.

Then click on Merge.

Your final Clouds Layer will now look like this in your image window:
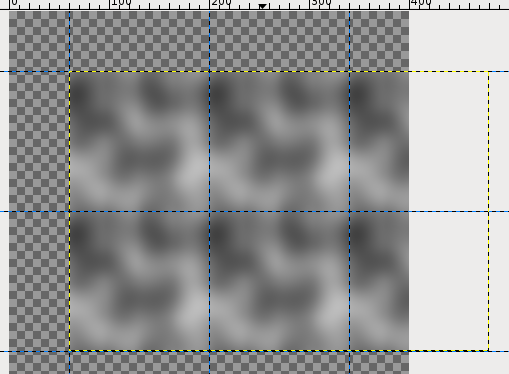
Image

In the above image, notice the yellow dotted outline showing the border of the Cloud Layer after the merge.

In the Layers Dialog Window, turn on the visibility of all Layers.

Setting Up The Animation


Open a new 400x400 image (File | New)

Bucket Fill the Background Layer with color Black.

Save the image into your working folder as background_000001.xcf

Select

Video | Duplicate Frames

In the Duplicate Frames Dialog window, set N times to a value of 29.
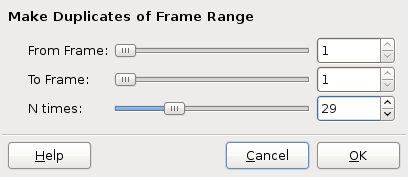
Image

That will give us a total of 30 frames. The one we already have and the 29 copies that will be made.

Select Video | Move Path
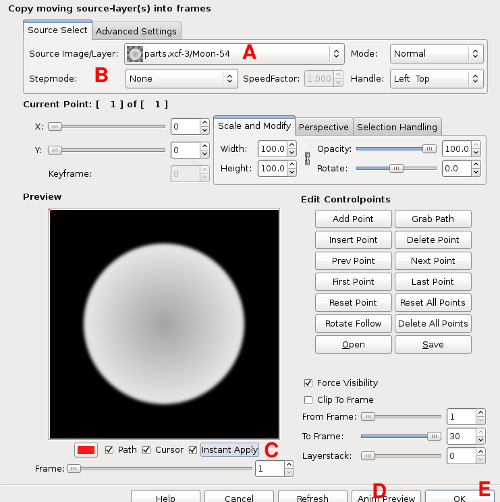
Image

In the Move Path Dialog window:

1.) Set the Source Image/Layer (A) to Moon
2.) Set Stepmode (B) to None
3.) Activate Instant Apply ( C )
4.) Click on Anim Preview (D)
5.) For the small window that opens, select Exact Object on Frames
6.) GAP will render the preview. You may watch the preview. You will see no animation since we are just placing the moon into the scene. However, animation or not, I still always use the Anim Preview button just to make sure the animation is playing as expected. With so many controls to use in Move Path, it can be easy to make a mistake. Easier to fix it from a preview than after adding it to the actual image.
7.) After viewing the preview, close out the preview and the small image file that GAP creates. Select Don't Save.
8.) If the preview went as expected, then you can Click OK (E)

Select Video | Move Path
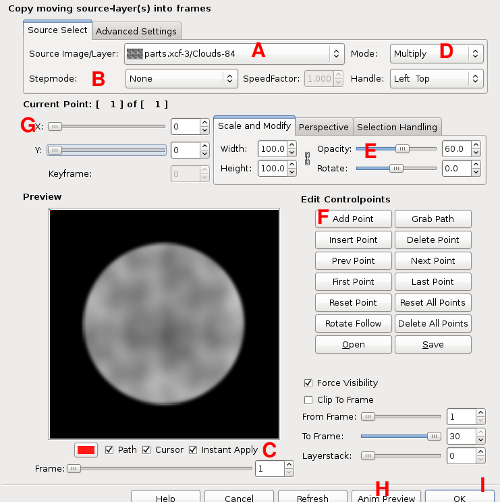
Image

This time we set up the clouds moving past the moon.

1.) Set Source Image/Layer (A) to Clouds
2.) Set Stepmode (B) to None
3.) Activate Instant Apply ( C ) It's always good to see the effect of changes real time.
4.) Set the Mode (D) to Multiply
5.) Set the Opacity (E) value to 60.0
6.) Click once on the Add Point Button (F)
7.) Double-click inside the X position (G) white text box and change the zero to -140 (minus 140). Then click either your TAB key or Enter key to set this value in memory.
8.) Click on the Anim Preview Button (H). In the small window that opens, select Exact Object On Frames. Change the Framerate to 10.0.
9.) When you watch the animation, you will see the clouds slowly moving across the moon. When you are finished watching the preview, close out the preview window and the little image file that GAP creates. Select Don't Save.
10.) If the preview looked OK, click OK (I) in the Move Path window.

Once GAP finishes rendering the scene select:

Video | Frames to Image
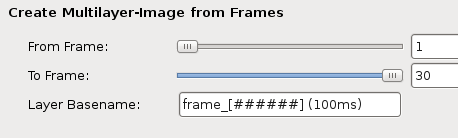
Image

Leave all of the default settings in the Frames to Image Dialog Window, but change the timing in Layer Basename to 100ms as shown above. Then click OK.

A new 30 layered image is created. From that image's window, If you select

Filters | Animation | Playback

and watch the animation. You will see that it stops momentarily at each cycle of the animation.

This occurs because the bottom and top layers are identical in that 30 layer image. In the Layers Dialog window, select and delete the top layer. This will leave 29 layers remaining.

At this point, you can save this image as an animated GIF image. Since we are not working with a lot of colors and limited detail, I recommend following the next step of optimizing the image file to reduce it's final file size:

In the now 29 layer image window, select

Filters | Animation | Optimize (for GIF)

This creates another multi-layered image file. You can now close out the previously created 29 layer one and select Don't Save.

Save your optimized animated image file as clouds_over_moon.gif, or whatever name you want. Just make sure to use the .gif suffix at the end of the filename. Then click Save.

The Export Dialog window will open. Make sure that you set it to Save As Animation:
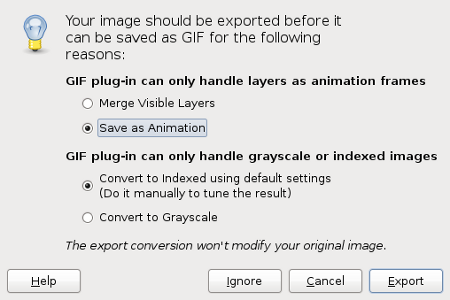
Image

Click on the Export button.

Another Save window will open, just accept the default options and click Save.

Congratulations, you have just created a foreboding moon animation.

One could then add a foreground animation to the above scene. I made a hovering bat, but imagine having another silhouette object passing in front of the moon, maybe a witch on a broomstick or whatever you might imagine.

Finally, since the present builds on the past, I wish to give credit to fencepost. He originally created a snow animation scene where he used tiled layers to create a seamless snow animation scene. I adapted his concept for this particular animation. The use of tiled repetitive images has lots of uses in animation.

Thank you for checking out this tutorial.

:)


Last edited by ccbarr on Thu Nov 03, 2011 8:21 am, edited 3 times in total.

Share on Facebook Share on Twitter Share on Orkut Share on Digg Share on MySpace Share on Delicious Share on Technorati
Top
 Post subject: Re: Cloudy Foreboding Moon Animation
PostPosted: Sat Oct 29, 2011 1:23 pm  (#2) 
Offline
GimpChat Member
User avatar

Joined: Apr 07, 2010
Posts: 14182
Thank you ccbarr.

_________________
Image


Top
 Post subject: Re: Cloudy Foreboding Moon Animation
PostPosted: Sat Oct 29, 2011 8:58 pm  (#3) 
Offline
GimpChat Member
User avatar

Joined: Jul 04, 2011
Posts: 395
Location: Indianapolis, IN
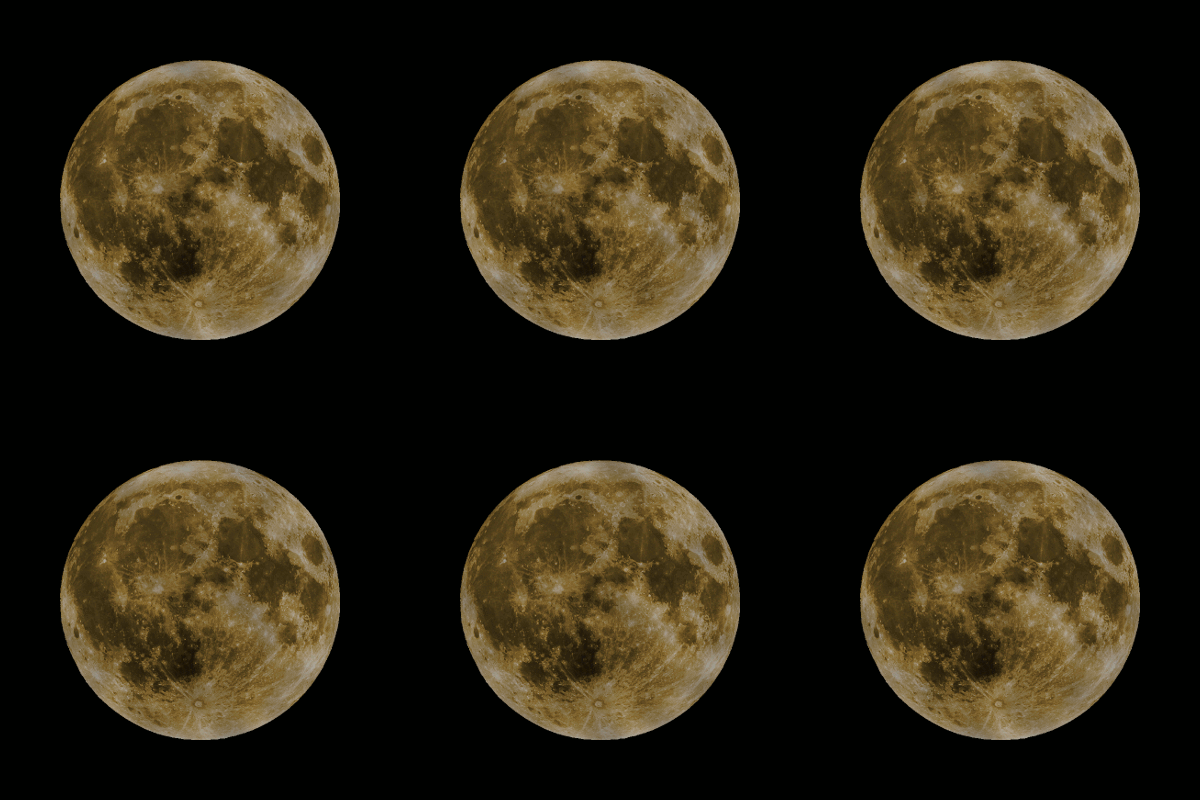
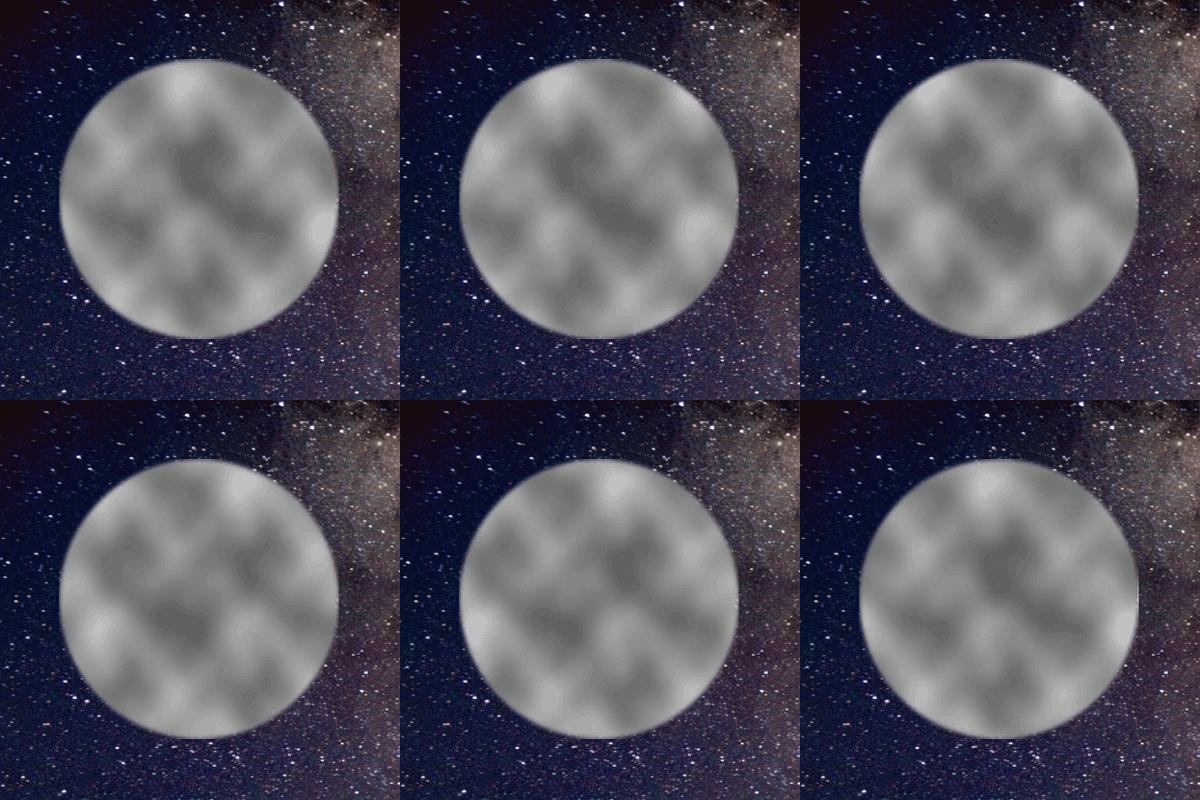
Pretty cool! Only thing what would make it even sweeter is .. to use the actual moon!

Courtesy of NASA:
Image

_________________
"That which does not kill us makes us stronger." ~ Friedrich Nietzsche


Top
 Post subject: Re: Cloudy Foreboding Moon Animation
PostPosted: Sun Oct 30, 2011 9:11 am  (#4) 
Offline
GimpChat Member

Joined: Dec 20, 2010
Posts: 174
Location: Wherever the voices in my head tell me I am.
@molly thanks for commenting

@MrBiggz, thanks for commenting. I had thought about using an image of the real moon, but decided to concentrate on the effect and how to achieve it without a real moon image. Nice NASA image of the moon by the way. Thanks for sharing that.


Top
 Post subject: Re: Cloudy Foreboding Moon Animation
PostPosted: Sun Oct 30, 2011 11:50 am  (#5) 
Offline
GimpChat Member

Joined: Aug 27, 2010
Posts: 491
Tried this both ways, as per the tutorial and with a real image of the moon.
Color values need to be changed for the real moon image.
Having an issue with the clouds layer.
The animation line is visible.
Need to try this again to see if I missed a setting somewhere.


Top
 Post subject: Re: Cloudy Foreboding Moon Animation
PostPosted: Sun Oct 30, 2011 12:07 pm  (#6) 
Offline
GimpChat Member
User avatar

Joined: Apr 07, 2010
Posts: 14182
I am having a dreadful time with the clouds layer, I have done it over so many times I lost count. I posted my xcf file in the attachments below.
I would appreciated if someone could please tell me what I am doing wrong. Also this is what happened because of it

Image


Attachments:
forebodless-moon.xcf [946.04 KiB]
Downloaded 550 times

_________________
Image
Top
 Post subject: Re: Cloudy Foreboding Moon Animation
PostPosted: Sun Oct 30, 2011 3:00 pm  (#7) 
Offline
GimpChat Member

Joined: Dec 20, 2010
Posts: 174
Location: Wherever the voices in my head tell me I am.
molly wrote:
I am having a dreadful time with the clouds layer, I have done it over so many times I lost count. I posted my xcf file in the attachments below.
I would appreciated if someone could please tell me what I am doing wrong. Also this is what happened because of it

[ Image ]


molly,

First, thank you for trying the tutorial. Always appreciated. :)

I looked at your XCF file. When you make the first rectangle selection, where you begin building what will become the eventual Cloud layer, the tutorial states to begin at the upper left corner of where the two guidelines meet. The rectangular selection will look like in the image below:

Image

The selection in your XCF file begins at the upper left corner of the image. However, that will still work fine. You will just need to use the number -200 (minus 200) instead of the -140 value used in the tutorial for your X value.

Again, thank you for trying the tutorial.

@Mike, thanks also for trying the tutorial. Since you mentioned the line issue, wonder if you began that rectangle selection at the top left of the image too? If so, you should be able to plug in the same number, -200, as I recommended to her.

I appreciate the feedback. I will look into seeing if I can make that part of the tutorial clearer. Hope this information helps both of you.

:)


Top
 Post subject: Re: Cloudy Foreboding Moon Animation
PostPosted: Sun Oct 30, 2011 5:03 pm  (#8) 
Offline
GimpChat Member
User avatar

Joined: Apr 07, 2010
Posts: 14182
Well I guess I will give up for today. I started again with the cloud layer and I just can't get it. I did start at the top left corner, made my rectangle, duplicated it,pulled the duped layer down to space below, merged the top one to the bottom one, I then duplicated the cloud layer x 2. I then pulled the second from the top duped layer to the right to fill the other two spaces. Then I tried putting the next (top) dupe everywhere, I just can't get it. The second one turns invisible. I will try again tomorrow. :oops:

Image

_________________
Image


Top
 Post subject: Re: Cloudy Foreboding Moon Animation
PostPosted: Sun Oct 30, 2011 7:26 pm  (#9) 
Offline
GimpChat Member

Joined: Dec 20, 2010
Posts: 174
Location: Wherever the voices in my head tell me I am.
molly wrote:
Well I guess I will give up for today. I started again with the cloud layer and I just can't get it. I did start at the top left corner, made my rectangle, duplicated it,pulled the duped layer down to space below, merged the top one to the bottom one, I then duplicated the cloud layer x 2. I then pulled the second from the top duped layer to the right to fill the other two spaces. Then I tried putting the next (top) dupe everywhere, I just can't get it. The second one turns invisible. I will try again tomorrow. :oops:

[ Image ]


molly,

Thanks for trying. Sometimes it is best to call it a day and try when fresh the next day. I have adjusted the directions in that section in an attempt to make it clearer.

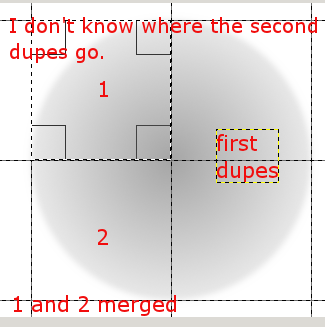
To answer your question about not knowing where the dupes go, the tutorial shows you an image of where to place the second dupe after you make the first small Cloud Layer:

Image

In the above image, see the square just below where the first square Cloud Layer was? That is where you place the Cloud Layer Copy.

You then Merge it Down on to the Cloud Layer.

Then you duplicate that new layer now called Cloud two times.

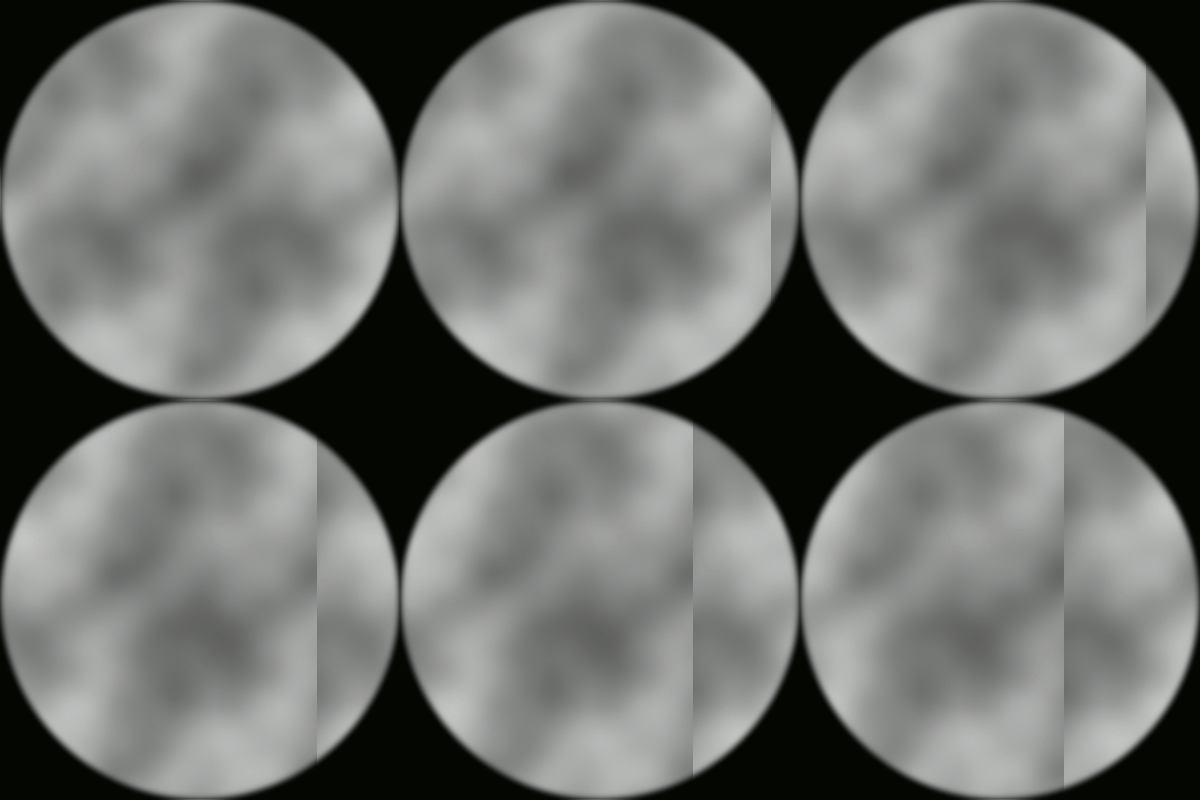
I then explain in the tutorial how to arrange each of the two Cloud Layer duplicates and to then merge them together to give you one long layer. Once you arrange them (and before they are merged together), part of the layer that is to the far right is going to lay beyond the border of the image window. It will still be there, but all that Gimp will show is a small part of that layer being visible:

Image

Notice the gray region on the right of the image above? That is right side border of the image. Notice how the last layer's yellow dotted lines extends beyond that border? Only a small part of it shows as visible. The rest is still there, but it is beyond the border of the image window, so you just cannot see it.

Once the three layers are arranged as shown above, they can be merged together. I changed the tutorial to have you turn off visibility of all the other layers except the Cloud Layers and to right-click inside the Layers Dialog Window and select Merge Visible Layers.

I'll try adding another image to the tutorial to clarify placement of the Layers a little better.

Having questions is always a good thing. It helps me to look at the tutorial to see if I can make it clearer. So not only are your questions helping me to help you, they are helping me to improve the tutorial, to make it clearer in places it may be confusing, so that you and others can successfully complete it. Thank you for the feedback molly.


Top
 Post subject: Re: Cloudy Foreboding Moon Animation
PostPosted: Mon Oct 31, 2011 11:44 pm  (#10) 
Offline
GimpChat Member
User avatar

Joined: Jul 04, 2011
Posts: 395
Location: Indianapolis, IN
Although .. Halloween is over I gave my hand at this! This is what I came up with!

Image

Clouds have to be darker, perhaps doubling the layer and merging down? I tried just leaving the opacity in the move path at 100 basically got the same results.

I did give the moon more of a orangy tint.

_________________
"That which does not kill us makes us stronger." ~ Friedrich Nietzsche


Top
 Post subject: Re: Cloudy Foreboding Moon Animation
PostPosted: Tue Nov 01, 2011 3:27 am  (#11) 
Offline
GimpChat Member
User avatar

Joined: Apr 07, 2010
Posts: 14182
Very good MrBiggz,
I don't know what I am doing wrong but I still can't get my moon to come out right. Worked all day yesterday on it until I got myself frustrated.
I would like to try it with a transparent background also

_________________
Image


Top
 Post subject: Re: Cloudy Foreboding Moon Animation
PostPosted: Tue Nov 01, 2011 7:57 am  (#12) 
Offline
GimpChat Member
User avatar

Joined: Jul 04, 2011
Posts: 395
Location: Indianapolis, IN
molly wrote:
Very good MrBiggz,
I don't know what I am doing wrong but I still can't get my moon to come out right. Worked all day yesterday on it until I got myself frustrated.
I would like to try it with a transparent background also


Molly .. even though I used the real moon. My original image before doing all the video stuff had a transparent background. Matter of fact, it only had two layers the moon and the clouds + alpha channel. Your problem is probably like most of mine, there's some really small step you're over looking. I had to read the animation part twice (move path) and low and behold I was missing just a small detail!

Like I always tell myself .. just put it down for a few minutes, go back to it, slow down a little bit and read. Sometime it works, sometimes I just get plain ol' lucky! :) You'll get it!

_________________
"That which does not kill us makes us stronger." ~ Friedrich Nietzsche


Top
 Post subject: Re: Cloudy Foreboding Moon Animation
PostPosted: Tue Nov 01, 2011 8:09 am  (#13) 
Offline
GimpChat Member
User avatar

Joined: Apr 07, 2010
Posts: 14182
thank you. I did not change my original layer to alpha channel, I wonder if that could be the problem. In my clouds layer in the second video > move path just shows a square with clouds. It should show the square with the moon inside the square so the error is somewhere that I can't find. I didn't change mine to alpha channel because I didn't see that on the tute. I am on a mission now, if it takes a month, I have to solve that one step. grrrrrrr
Image

_________________
Image


Top
 Post subject: Re: Cloudy Foreboding Moon Animation
PostPosted: Tue Nov 01, 2011 8:39 am  (#14) 
Offline
GimpChat Member
User avatar

Joined: Jul 04, 2011
Posts: 395
Location: Indianapolis, IN
molly wrote:
[ Image ]


No problem, glad I could give you a little push! And were'd you get that little animation of me? That's what I spend my day doing at home, work and in the car.

_________________
"That which does not kill us makes us stronger." ~ Friedrich Nietzsche


Top
 Post subject: Re: Cloudy Foreboding Moon Animation
PostPosted: Tue Nov 01, 2011 12:35 pm  (#15) 
Offline
GimpChat Member

Joined: Aug 27, 2010
Posts: 491
Finally figured it out. Think there might be a step missing from the tutorial.

Image

Molly, if you are still stuck try clicking the "Add Point" button after you enter the "-120" value in X. That resolved my issue.


Top
 Post subject: Re: Cloudy Foreboding Moon Animation
PostPosted: Tue Nov 01, 2011 1:03 pm  (#16) 
Offline
GimpChat Member
User avatar

Joined: Apr 07, 2010
Posts: 14182
ok Mike, that is what I was wondering. I have everything going right up to that point and then it screws up. Did you click the add point before and after, or just the once?

EDIT: I tried that Mike. I got closer this time BUT the playback just does about a quarter turn then stops between each turn. The steps below are where I am stuck, I get that far and something in there screws me up


6.) In order for there to be animation, things need to appear to move from one point to another. With the above options and leaving all other settings at default in Move Path, we have just set the first animation point. We must now set the ending point for the animation. To do so click once on the Add Point Button (F). This animation only needs a starting and ending point. More complex animations will have multiple points.
7.) OK, we created our ending point, so what do we want to change. We are going to have the Cloud Layer move across the moon layer. The original Cloud layer was a small square, it's dimensions were 140x140. When it was created by the Solid Noise filter, it was made tileable, meaning it had a repeatable pattern, so that if you placed two or three side by side, top to bottom, and shifted them by the amount of the original layer, 140, it would all look the same. That is what we do here, so double-click inside the X position (G) white text box and change 1.) the zero to -140 (minus 140). Then click either your TAB key or Enter key to set this value in memory.

_________________
Image


Top
 Post subject: Re: Cloudy Foreboding Moon Animation
PostPosted: Tue Nov 01, 2011 2:10 pm  (#17) 
Offline
GimpChat Member

Joined: Aug 27, 2010
Posts: 491
I clicked "Add Point" both per the tutorial and immediately after entering "-140" and pressing the Tab key once.

I also had 16 frames and found I had to delete frame #16 to obtain a smooth animation.

I am just blindly guessing but it is possible that your first and last frames are identical which would give the appearance of "stopping." You might try deleting the last frame and running the animation preview. That should give an indication as to whether or not I have any idea what I'm talking about here. :D


Top
 Post subject: Re: Cloudy Foreboding Moon Animation
PostPosted: Tue Nov 01, 2011 2:13 pm  (#18) 
Offline
GimpChat Member
User avatar

Joined: Apr 07, 2010
Posts: 14182
Ok Mike,
I forgot to click the tab this time. I was also so upset that it didn't work after 3 days trying I deleted it. I will try those after supper, I am in the midst of cooking (UGH) right now. I will post back and let you know after supper how I make out. thank you.

Edit:
I did the whole thing again. I added the point in the second move path, then changed the X to -140, then pressed add point again then pressed the tab key once, (in that order)
After I finished, I played it back and it still stops, before and after I deleted a frame. I am going to start it one more time then I will give up until those two steps are more clear to me.

_________________
Image


Top
 Post subject: Re: Cloudy Foreboding Moon Animation
PostPosted: Wed Nov 02, 2011 6:19 am  (#19) 
Offline
GimpChat Member
User avatar

Joined: Apr 07, 2010
Posts: 14182
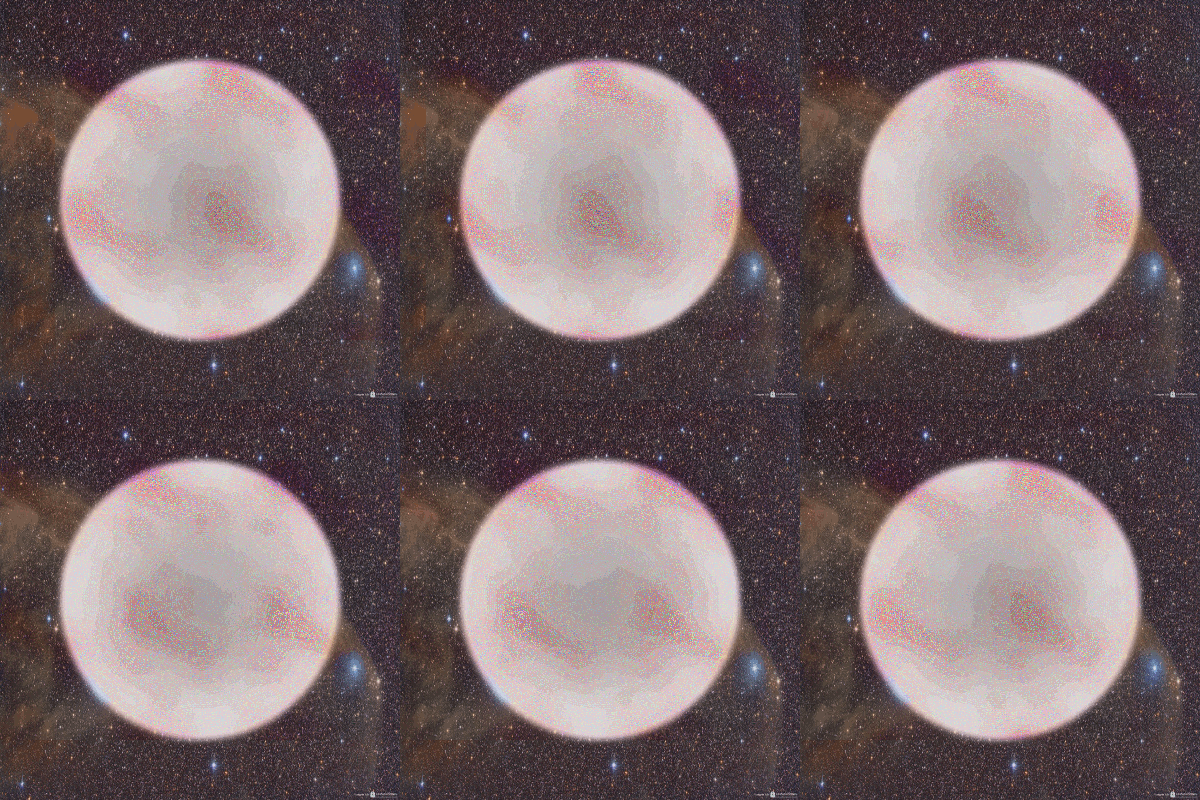
I finally after 4 days got it solved. I didn't click the add point twice, I pressed enter instead of tab for record the -140 X. That is the only thang I did differently. Anyway, it worked and I am happy :gimp
Image

Image

_________________
Image


Top
 Post subject: Re: Cloudy Foreboding Moon Animation
PostPosted: Wed Nov 02, 2011 7:32 pm  (#20) 
Offline
GimpChat Member
User avatar

Joined: Apr 08, 2010
Posts: 5420
Location: Northwest Ohio
congratulations on you stick-to-it-iveness! And that red seedy looking cloud on the second pic is very cool and alien looking!


Top
Post new topic Reply to topic  [ 26 posts ]  Go to page 1, 2  Next

All times are UTC - 5 hours [ DST ]


* Login  


Powered by phpBB3 © phpBB Group