It is currently Wed Sep 16, 2026 3:09 am


All times are UTC - 5 hours [ DST ]


Post new topic Reply to topic  [ 76 posts ]  Go to page Previous  1, 2, 3, 4  Next
Author Message
 Post subject: Re: Gimp Tips and Tricks
PostPosted: Fri Dec 21, 2012 4:50 pm  (#21) 
Offline
Retired Staff
User avatar

Joined: May 22, 2008
Posts: 6946
Location: Somewhere in GIMP
K1TesseraEna wrote:
You're welcome, O!
Did it work?

Oh, yes. First I managed to make the scroll down one to increase the size. Actually, I made it decrease size, then made it increase size. Last one became Alt-Scroll Down Increase ... had to go fix it.

I really love it. I like the fact that it increases/decreases in whole number amounts instead of using the scroll bars in the size window which do it in fractional amounts like .01 (Urg. :/) at a time. (They changed to whole numbers in the Opacity settings in v2.8 which I was REALLY happy about instead of .01 amounts.)

Anyway, it works beautifully and I will certainly utilize it a lot. Thank you very much. :wh

_________________
Image
World War IV will be fought with sticks and stones. - Albert Einstein


Top
 Post subject: Easy Eyeballs
PostPosted: Mon Dec 24, 2012 1:26 pm  (#22) 
Offline
GimpChat Member
User avatar

Joined: Nov 16, 2011
Posts: 5127
Location: Metro Vancouver, BC
For easy eyeballs use Radial Eyeball Blue, Brown or Green gradients. Set the Shape drop-down menu to Radial, on a new transparent layer draw from the center of the pupil. Use guides to find the center and perimeter of the pupil before you start. To set the eyeball on an existing photograph try using the Smudge tool where the eyeball and eyelid meet. Layer modes and opacity can also be useful.
Image

Guides and Oregonian's Adaptive supersampling tip mentioned below.
Image

_________________
Image
Gimp 2.8.18, Linux, median user
Gimp Chat Tutorials Index
Spirit Bear (Kermode)


Top
 Post subject: Adapative Supersampling for smoother gradients
PostPosted: Mon Dec 24, 2012 2:17 pm  (#23) 
Offline
Retired Staff
User avatar

Joined: May 22, 2008
Posts: 6946
Location: Somewhere in GIMP
Here's looking at you, Odin. BTW, if you select adaptive supersampling in the options, you will get a smoother eyeball.

If I'd find the center of the circle, I'd get more even eyeballs.

Image

_________________
Image
World War IV will be fought with sticks and stones. - Albert Einstein


Top
 Post subject: Bloodshot eyes.
PostPosted: Mon Dec 24, 2012 6:48 pm  (#24) 
Offline
GimpChat Member
User avatar

Joined: Sep 24, 2010
Posts: 12845
Cool tut; never even noticed the radial eyes gradient til now. lol

Added Render>Lava (followed by lumna invert>invert and setting that result to Difference with blended opacity) and used the eyeball result as a mask for this one. Thought about doing radial rays for the pupil area but got lazy. lol

:)


Attachments:
bse.png
bse.png [ 354.66 KiB | Viewed 8483 times ]

_________________
Lyle

Psalm 109:8

Image
Top
 Post subject: Luma Invert Script-fu
PostPosted: Mon Dec 24, 2012 8:01 pm  (#25) 
Offline
GimpChat Member
User avatar

Joined: Sep 24, 2010
Posts: 12845
You can get the Luma Invert Script-fu here Graechan (use it all the time; one of my favorites. Luma Invert overlay is a way too cool way to simulate a Contrast mask by the way). All you have to do is create a mask layer and paste the eyeball result into the mask layer. Pretty simple. :)

_________________
Lyle

Psalm 109:8

Image


Top
 Post subject: Gimp Document History
PostPosted: Mon Dec 31, 2012 1:43 pm  (#26) 
Offline
GimpChat Member
User avatar

Joined: Nov 16, 2011
Posts: 5127
Location: Metro Vancouver, BC
Gimp Document History in the “Open Recent” list contains the last 10 files (If you have, Document History, Keep records... checked in Preferences). At the bottom of the “Open Recent” list if you select, Document History you can get 100+ recent files in the Document History Dialog. The Document History Dialog can also be accessed from, Windows menu, Dockable Dialogs, Document History.

_________________
Image
Gimp 2.8.18, Linux, median user
Gimp Chat Tutorials Index
Spirit Bear (Kermode)


Top
 Post subject: Google Search Gimp Help with keywords
PostPosted: Thu Jan 17, 2013 12:56 pm  (#27) 
Offline
GimpChat Member
User avatar

Joined: Nov 16, 2011
Posts: 5127
Location: Metro Vancouver, BC
Google Search Gimp Help with keywords.
This works in a Google search box or any browser address bar.

Examples;
  • keyboard site:gimp.org
  • keyboard shortcuts site:gimp.org
  • filters site:gimp.org
  • selection tools site:gimp.org
  • animation site:gimp.org
  • drawing shapes site:gimp.org

_________________
Image
Gimp 2.8.18, Linux, median user
Gimp Chat Tutorials Index
Spirit Bear (Kermode)


Top
 Post subject: Gimp Chat Tips and Tricks Tip
PostPosted: Thu Jan 17, 2013 1:14 pm  (#28) 
Offline
GimpChat Member
User avatar

Joined: Nov 16, 2011
Posts: 5127
Location: Metro Vancouver, BC
Gimp Tips and Tricks authors, change your Post subject to your tip title.
Post subject: Re: Gimp Tips and Tricks
To: 'Your Tip Title'

_________________
Image
Gimp 2.8.18, Linux, median user
Gimp Chat Tutorials Index
Spirit Bear (Kermode)


Top
 Post subject: Path to selection Shortcut
PostPosted: Wed Feb 06, 2013 1:42 pm  (#29) 
Offline
GimpChat Member
User avatar

Joined: Feb 14, 2012
Posts: 426
There's a trick I find myself using quite a bit lately. After using the pen tool to outline a shape, hit Shift+V to quickly turn it into a selection.

Also you can turn that selection into a layer mask by hitting H and choosing from selection.

I bet PS can't do that.

Alan


Last edited by PegLeg44 on Sat Apr 13, 2013 4:46 pm, edited 1 time in total.

Top
 Post subject: Zoom In and Out with the mouse wheel
PostPosted: Wed Feb 06, 2013 1:57 pm  (#30) 
Offline
Retired Staff
User avatar

Joined: May 22, 2008
Posts: 6946
Location: Somewhere in GIMP
Odinbc wrote:
Gimp Tips and Tricks authors, change your Post subject to your tip title.
Post subject: Re: Gimp Tips and Tricks
To: 'Your Tip Title'
Excellent idea Odin! The more key words for Google, the better the searches are.

Everyone probably knows this but I'm putting it in anyway.

Activate the Image window, hold down the Ctrl key and roll your mouse wheel up to zoom in, roll it down to zoom out.

Put the mouse pointer on an area you want to zoom into and it will zoom into that area.

_________________
Image
World War IV will be fought with sticks and stones. - Albert Einstein


Top
 Post subject: Center a Path with the Alignment Tool
PostPosted: Sat Mar 23, 2013 2:19 pm  (#31) 
Offline
Retired Staff
User avatar

Joined: May 22, 2008
Posts: 6946
Location: Somewhere in GIMP
I wanted to center a path and when I clicked the Alignment Tool :alntool there was no path option. I opened the Paths window, made the path visible by clicking on the Eye next to the path.

Then clicked the Alignment Tool, clicked the visible path in the Image window and the squares in the corners showed up. I clicked the :alncent and the :alnmid and the path moved to the center. :mrgreen:

Later Edit: Guess I wasn't so clever after all. In the Alignment Tool dialog where it says Relative to click the button by it and a drop down list shows up and Active Path is an option in there. :oops:

Image

_________________
Image
World War IV will be fought with sticks and stones. - Albert Einstein


Top
 Post subject: Bucket-fill a third color, without changing FG / BG
PostPosted: Sun Mar 24, 2013 12:08 pm  (#32) 
Offline
GimpChat Member

Joined: Mar 04, 2013
Posts: 105
A couple of people mentioned that you can drag-and-drop the FG / BG colors, rather than use the Bucket tool (or you can use Ctrl + , [comma] to fill from FG and Ctrl + . [period] for BG).

If it's convenient to keep the FG and BG colors the same for a later step, you can also drag-and-drop a third color. Select the color in the 'Change FG (or BG) Color' dialog, and drag it from 'Current' to your selection. Then click cancel to return the FG to the original color.

Also, you can click the 'Palette' tab and drag-and-drop directly from it.

Image


Top
 Post subject: Pick a Color Outside the Gimp Environment
PostPosted: Fri Mar 29, 2013 11:33 am  (#33) 
Offline
GimpChat Member

Joined: Mar 04, 2013
Posts: 105
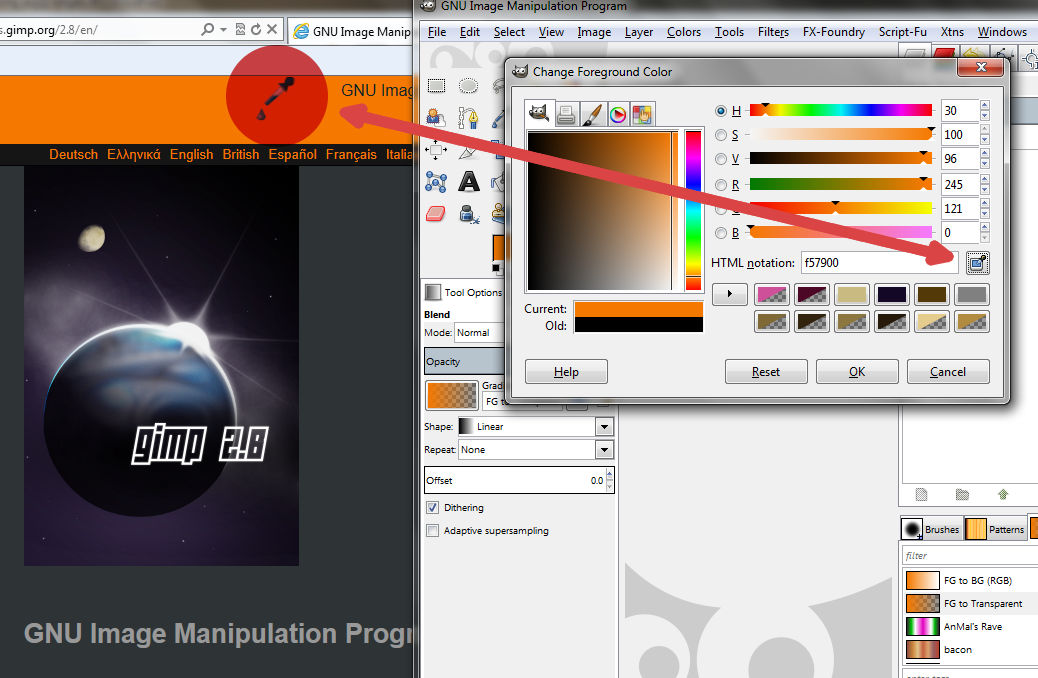
Probably this is well known, but about a month ago I realized that the “color picker” on the “Change FG / BG Color” dialog is not restricted to Gimp. I use this a lot now, and thought it would be useful to anyone who may not be aware of it.

You can temporarily resize Gimp and pick the color from pdf's, websites etc that you have open. Click, then release the color picker once to show the eyedropper. Then click-and-drag it to get the color, just as you would in Gimp.

This works in some other dialogs such as “Color to Alpha” (although I have not found a use for that), but it does not work with the Color Picker Tool in the toolbox.

As an example:

Image


Top
 Post subject: Track Directions in Brush Dynamics
PostPosted: Sat Apr 13, 2013 1:15 pm  (#34) 
Offline
Retired Staff
User avatar

Joined: May 22, 2008
Posts: 6946
Location: Somewhere in GIMP
These were done by stroking a path, but you can use just a brush to stroke with, also.

Image

_________________
Image
World War IV will be fought with sticks and stones. - Albert Einstein


Top
 Post subject: Re: Gimp Tips and Tricks
PostPosted: Sat Apr 13, 2013 2:45 pm  (#35) 
Offline
Retired Staff
User avatar

Joined: May 22, 2008
Posts: 6946
Location: Somewhere in GIMP
gramg wrote:
Now these are some great tips...I am going to read through all and save...they will help me a lot!...I can see that right now.
You can get to the tips quickly by going to the Tutorials forum, clicking Text Tutorials.
Image


Gimps Tips and Tricks are stickied at the top for easy finding.
Image


Or you can bookmark the topic for quicker access. You need to be logged into Gimp Chat and in the topic for the Bookmark Topic to be visible and accessible.
Image


Then go to the User Control Panel that is below the Gimp Chat banner and on the right.
Image


Click Manage Bookmarks on the left to get to your bookmarked topics.
Image


I hope this isn't too much information. They are kind of like Tips & Tricks anyway. :mrgreen:

_________________
Image
World War IV will be fought with sticks and stones. - Albert Einstein


Top
 Post subject: Alpha Channel Selections via the Layers Pallet
PostPosted: Sun Apr 14, 2013 4:12 pm  (#36) 
Offline
GimpChat Member
User avatar

Joined: Feb 14, 2012
Posts: 426
You can easily make selections of the alpha channel Layers by [Alt + right mouse click] ing it. Alternatively you can add another layers alpha channel to a selection area by [Alt + Shift + right mouse click] ing it. Or to subtract an alpha channel selection you can [Alt + Ctrl + right mouse click] it. And to intersect a selection you would [Alt + Ctrl + Shift + click] it.

This same technique works for layers with masks applied to them.

This also works the same in the paths layers pallet.

Alan


Top
 Post subject: Paste a New Image from the Clipboard
PostPosted: Sun Apr 14, 2013 9:06 pm  (#37) 
Offline
GimpChat Member
User avatar

Joined: Feb 14, 2012
Posts: 426
If you copy anything or copy something to the clipboard via [Ctrl + Print Screen] you can automatically use it as a new image in GIMP by hitting [Ctrl + Shift + V].


Top
 Post subject: Re: Gimp Tips and Tricks
PostPosted: Mon Apr 15, 2013 6:29 am  (#38) 
Offline
Script Coder
User avatar

Joined: Apr 23, 2010
Posts: 1553
Location: not from Guildford after all
PegLeg44 wrote:
You can easily make selections of the alpha channel Layers by [Alt + right mouse click] ing it. Alternatively you can add another layers alpha channel to a selection area by [Alt + Shift + right mouse click] ing it. Or to subtract an alpha channel selection you can [Alt + Ctrl + right mouse click] it. And to intersect a selection you would [Alt + Ctrl + Shift + click] it.

All of those "right mouse clicks" should be "left mouse clicks" (but a very useful tip, one of which I was previously unaware).

In a similar vein, hold down the CTRL key while clicking on a layermask's thumbnail preview in the Layers dialog to disable the layermask ("Layer->Mask->Disable Layer Mask"). Repeat to re-enable it.

Hold down ALT while clicking on a layermask's thumbnail to view the layermask ("Layer->Mask->Show Layer Mask"). Repeat to return to the normal image view.

_________________
Any sufficiently primitive technology is indistinguishable from a rock.


Top
 Post subject: Re: Gimp Tips and Tricks
PostPosted: Fri Apr 26, 2013 3:36 pm  (#39) 
Offline
GimpChat Member
User avatar

Joined: Feb 14, 2012
Posts: 426
Most of the opacity, position, and size fields in the layers and toolbox can be easily changed to exact amounts by simply double clicking them and typing in a number.

And Most of the fields in GIMP can be changed incrementally by typing in a [+] or [-] followed by the number that you wish to add or subtract.


Top
 Post subject: Re: Gimp Tips and Tricks
PostPosted: Fri Apr 26, 2013 7:03 pm  (#40) 
Offline
Script Coder
User avatar

Joined: Oct 25, 2010
Posts: 4812
PegLeg44 wrote:
And Most of the fields in GIMP can be changed incrementally by typing in a [+] or [-] followed by the number that you wish to add or subtract.

Even better, they support some simple arithmetic "(4*220)+20", which is very useful in several places (canvas resize, scale, rectangular selection...)

_________________
Image


Top
Post new topic Reply to topic  [ 76 posts ]  Go to page Previous  1, 2, 3, 4  Next

All times are UTC - 5 hours [ DST ]


* Login  


Powered by phpBB3 © phpBB Group